Socket.io is
one of the most prized libraries by those who develop with Node.js.
Why? Because it allows synchronized communication to take place simply
within your app, which means real-time communication!
Can’t
you see what this means? Let me say it another way: socket.io would
allow you to set up a chat service on your website, for example! 

The
possibilities that socket.io offers are really immense and go far
beyond chat. It’s useful for everything that needs immediate
communication between the visitors to your website. This can be, for
example, the first brick to build a game where we can see characters
develop in the browser, all without needing to reload the page!
It’s tempting, isn’t it!
What does socket.io do?
Before
starting to code, I would like to quickly explain the idea of
socket.io. It’s a library that allows us to simplify a large number of
things, but you’d be wrong to think it was ‘magic’. However, socket.io
bases itself on a number of different techniques that allow real-time
communication (and some of these have been around for years). The
best-known and most recent one is WebSocket.
WebSocket? Isn’t that one of those HTML5 innovations?
It’s a recent development that appeared around the same time as HTML5, but it isn’t HTML: it’s a JavaScript API.
WebSocket is a feature supported by all recent browsers. It allows synchronized bilateral exchange between the client and the server.
What
do you mean I’m speaking Double-Dutch?! Let’s go back to basics again.
Communication on the web is usually unsynchronized. The Internet has
always been this way: the client requests and the server responds (see
next figure).

That
was fine when the web was starting out, but it’s become too limiting in
recent times. We need more reactive and immediate communication. In
this diagram, for example, the server can’t decide for itself to send
something to the client (for example to say: "oh there’s a new
message!"). It has to be the client who reloads the page or takes action
to call the server because it doesn’t have the right to talk to the
client on its own.
WebSocket
is an innovation that allows a sort of ‘tube’ of communication that
remains open between the client and the server. The browser and the
server stay connected to each other and can exchange messages, in one
direction and the other, through this tube. So from now on the server
can decide on its own to send a message to the client like a grown up
(see next figure)!

Socket.io
allows us to use WebSockets very easily. And, as all browsers don’t
generate WebSockets, it is capable of using other synchronized
communication techniques if they are managed by the client’s browser.
Have a look at the Browser support section of the socket.io website. We can see that socket.io determines which real-time communication method is best suited to each client:
- WebSocket
- Adobe Flash Socket
- AJAX long polling
- AJAX multipart streaming
- Forever Iframe
- JSONP Polling
Thanks to all of these different techniques, socket.io supports a large number of browsers, even old ones:
- Internet Explorer 5.5+ (yes, you read that correctly!).
- Safari 3+
- Google Chrome 4+
- Firefox 3+
- Opera 10.61+
- Safari for iPhone and iPad
- The Android browser
Now that we know a bit more about how socket.io works, could we start using it? 

Sending and receiving messages with socket.io
Let’s get to the point: how do we use socket.io?
Installing socket.io
The
first step, obvious as it may seem, is to install socket.io. Don’t
laugh, the first time I wanted to use it I wasted 15 minutes before
realizing that I had forgotten to do a simple:
npm install socket.io
I just saved you 15 minutes of your life! Don’t thank me, it’s only right and proper.
First code: a client logs on
When we use socket.io, we must always deal with two files at the same time:
- The server file (e.g. app.js): it’s this one that centralizes and manages the connections of the different clients who are connected to the website.
- The client file (e.g. index.html): it’s this one that connects to the server and displays results in the browser.
The server (app.js)
I
deliberately separated the server code into two parts: at the
beginning, we load the server as usual (and retrieve and return the
content of the index.html page); then, we load socket.io and manage
socket.io’s events.
var http = require('http');
var fs = require('fs');
// Loading the index file . html displayed to the client
var server = http.createServer(function(req, res) {
fs.readFile('./index.html', 'utf-8', function(error, content) {
res.writeHead(200, {"Content-Type": "text/html"});
res.end(content);
});
});
// Loading socket.io
var io = require('socket.io').listen(server);
// When a client connects, we note it in the console
io.sockets.on('connection', function (socket) {
console.log('A client is connected!');
});
server.listen(8080);
This code does 2 things:
- It sends back the index.html file when a client asks to change the page in their browser.
- It prepares itself to receive requests via socket.io. Here, we are expecting to receive just one type of message: the connection. When we connect via soccer.io, we log the information in the console here.
Imagine
you’re a visitor. You open your browser where the app is located
(http://localhost:8080 in this case). We send you the index.html file,
the page loads. In this file, which we are going to see in a minute, a
JavaScript code connects to the server, this time not in http but via
socket.io (therefore via WebSockets in general). The client carries out 2
types of connections:
- A "classic" connection to the HTTP server to load the index.html page.
- A "real time" connection to open a tunnel via the WebSockets thanks to socket.io.
The client (index.html)
Let’s
look at the client for now. The index.html file is sent by the Node.js
server. It’s an HTML file as classic as they come, the only difference
being that it contains a bit of JavaScript that then allows for
real-time communication with the server via socket.io:
<!DOCTYPE html>
charset="utf-8"
Socket.io
Communication with socket.io!
src="/socket.io/socket.io.js"
var socket = io.connect('http://localhost:8080');
Firstly,
In a fist instance, we retrieve the socket.io.js file from the client.
This is automatically provided by the Node.js server via the socket.io
module (so the path to the file isn’t chosen at random):
src="/socket.io/socket.io.js"
The
code that it contains enables management of communication with the
server on the client side, either with WebSockets or with one of the
other methods that I told you about if the browser doesn’t support them.
Then,
we can carry out actions on the client side to communicate with the
server. For the moment, I’ve done something very simple: I connected to
the server. It’s on my machine, which explains the
http://localhost:8080address. Obviously, on the web, the path will need
to be adapted to show your website address (e.g.http://mysite.com).
var socket = io.connect('http://localhost:8080');
Let’s test the code!
You just need to launch the app:
node app.js
We can then go to our browser at this Node.js address: http://localhost:8080 here.
A
basic page will load. Your computer will then open a connection with
socket.io and the server should display debugging information in the
console:
$ node app.js
   info  - socket.io started
   debug - client authorized
   info  - handshake authorized Z2E7aqIvOPPqv_XBn421
   debug - setting request GET /socket.io/1/websocket/Z2E7aqIvOPPqv_XBn421
   debug - set heartbeat interval for client Z2E7aqIvOPPqv_XBn421
   debug - client authorized for
   debug - websocket writing 1::
A client is connected!
Great! This means that our code works. 

For
the moment it doesn’t do anything particularly extraordinary, but we’ve
got the basics. Now it’s time to get down to exchanging messages with
the server!
Sending and receiving messages
Now that the client is connected, we can exchange messages between the client and the server. There are 2 possible scenarios:
- The server wants to send a message to the client.
- The client wants to send a message to the server.
The server wants to send a message to the client.
I
suggest that the server sends a message to the client when they
connect, to confirm that the connection has worked properly. Add this to
the app.s file:
io.sockets.on('connection', function (socket) {
socket.emit('message', 'You are connected!');
});
When we detect a connection, we send a message to the client with socket.emit(). The function takes 2 settings:
- The type of message that we want to transmit. Here, my message is message type (I’m not very creative, I know). This will allow you to distinguish between the different types of messages. For example, in a game, we could send "move_player", "attack_player" type messages.
- The content of the message. Here you can say whatever you want.
On the index.html file side (the client), we’re going to listen to "message" type messages arriving:
var socket = io.connect('http://localhost:8080');
socket.on('message', function(message) {
alert('The server has a message for you: ' + message);
})
With
socket.on(), we listen for message type messages. When the messages
arrive, we call for the callback function that, in this case, displays a
simple dialog box.
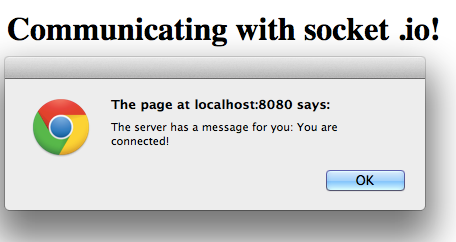
Try
it. You’ll see that when you load the index.html page, a dialog box is
displayed telling you that the connection was successful (see next
figure).

The client wants to send a message to the server.
Now,
let’s do it the other way around. I suggest adding a button in the web
page that sends a message to the server when it’s clicked on.
On
the client’s side (index.html), I’m going to add a "Poke the server"
button. When we click on it, a message will be sent to the server.
Here’s the complete code:
<!DOCTYPE html>
charset="utf-8"
Socket.io
Communicating with socket .io!
type="button" value="Poke the server" id="poke"
src="http://code.jquery.com/jquery-1.10.1.min.js"
src="/socket.io/socket.io.js"
var socket = io.connect('http://localhost:8080');
socket.on('message', function(message) {
alert('The server has a message for you: ' + message);
})
$('#poke').click(function () {
socket.emit('message', 'Hi server, how are you?');
})
Finally, the only new and exciting code here is:
$('#poke').click(function () {
socket.emit('message', 'Hi server, how are you?');
})
It’s very simple. When we click on the button we send a message type message to the server, along with content.
If
we want to retrieve this on the server side, we are going to have to
add listening to message type messages in the callback function of the
connection:
io.sockets.on('connection', function (socket) {
socket.emit('message', 'You are connected!');
// When the server receives a “message” type signal from the client
socket.on('message', function (message) {
console.log('A client is speaking to me! They’re saying: ' + message);
});
});
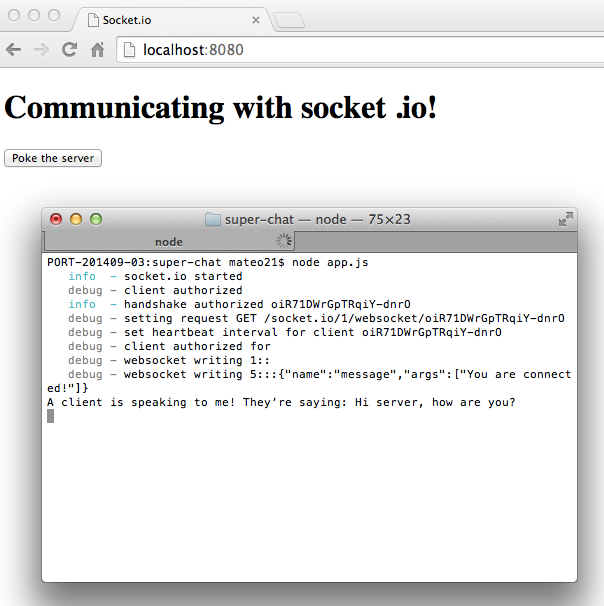
Launch
the code! Click on the Poke the server button on the page and watch the
server console. You should see the next figure appear.
A client is talking to me! They’re saying: Hi server, how are you?

Communicating with several clients
In
all our previous examples, we worked with one server and one client. In
practice, you will probably have several clients connected to your
Node.js application (or at least I hope you do!). To simulate this
locally, it’s very simple: you just need to open two tabs, both on the
http://localhost:8080 page. The server will see 2 different clients
connected.
When we have several clients, we must be able to:
- Send a message to everyone at the same time. We call those broadcasts.
- Remember information about each client (like their username, for example). For that we need session variables.
Surprise surprise, that’s exactly what I was going to show you next!
Sending a message to all the clients (broadcasts)
When you do a
socket.emit()
on the server side, you only send a message to the client that you’re
currently talking to. But you can do better than that: you can send a broadcast, meaning a message destined for all the other clients (except the one which the server just connected to).
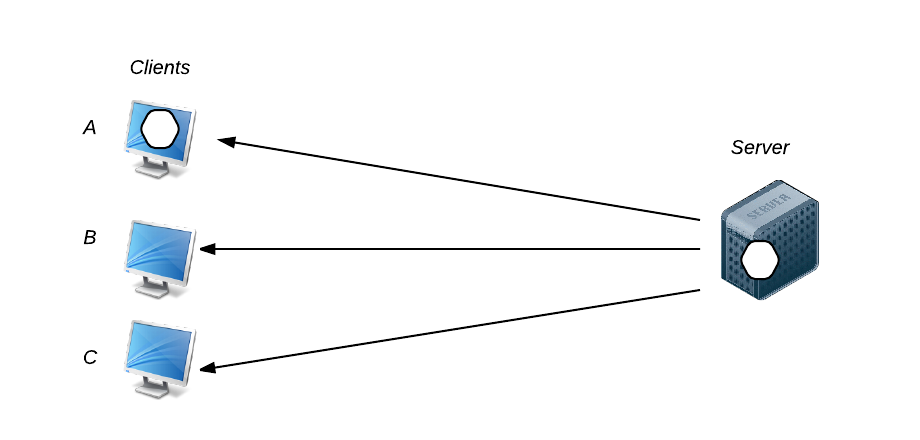
Let’s take this scenario:
- Client A sends a message to the server.
- The server analyses it.
- It decides to broadcast this message and send it to the other clients who are connected: B and C.

Imagine
for example a chat. Client A writes a message and sends it to the
server. So that the other clients can see the message, it must be
broadcast.
That’s really simple!
socket.broadcast.emit('message', 'Message to all units. I repeat, message to all units.');
You
just need to do a socket.broadcast.emit() and the message will go to
all other clients who are connected. Add a broadcast in app.js, for
example, when a client connects:
io.sockets.on('connection', function (socket) {
socket.emit('message', 'You are connected!');
socket.broadcast.emit('message', 'Another client has just connected!');
socket.on('message', function (message) {
console.log('A client is speaking to me! They\'re saying: ' + message);
});
});
Now
try opening 2 tabs (or more) on your http://localhost:8080 page. You’ll
see that when a new client arrives, the other pages react instantly and
say: "Another client has just connected!"
Session variables
When
you have several clients connected, you’ll soon realize that it is hard
to recognize them. The ideal thing would be to be able to memorize
information about each client in session variables... but session
variables are not enabled by default by socket.io.
Actually, session variables need to be managed in another library via a piece of middleware like session.socket.io (they work like the middleware in Express, a bit like plugins).
I
would probably need to write a whole chapter to show you how to use a
piece of middleware that manages sessions. To spare you that, I'm going
to give you a magic trick: just save the information as a variable in
the
socket object of each client. It'll be easy to set up!
So
we want to server to remember information about each client who's
connected. This way, the client won't need to remind us who they are
each time they send a message!
To stock a session variable on the server side, all you need to write is:
socket.myvariable = myvariable;
In this example, we store the data in a variable in the client's
socket object (remember, the server stores one socket object for each client).
To retrieve this information in the future, you'll just need to see the contents of
socket.myvariable:
console.log(socket.myvariable);
Simple,
isn’t it? Let’s try to imagine a practical case. When a client
connects, the webpage asks them for their username. The server will
stock the username in the session variable to use it when the client
clicks on "Poke the server".
Let’s see what modifications we need to do…
The web page (index.html) emits a signal containing the username
When
the web page is loaded, we’re going to ask for the visitor’s username.
We send this username to the server via a "little_newbie" signal (I
called it this to differentiate it from the "message" signals). This
signal contains the visitor’s username:
var username = prompt('What\'s your username?');
socket.emit('little_newbie', username);
The server (app.js) stores the username
The
server must retrieve this signal. We then listen for the
"little_newbie" signal and, when we receive it, we save the username as a
session variable:
socket.on('little_newbie', function(username) {
socket.username = username;
});
The server (app.js) remembers the username when we send it a message
Now,
we would like the server to remember us when we poke it by clicking on
the Poke server button (which triggers the sending of the "message"
signal). We’re going to complete the callback function that is called
when the server receives a "message":
socket.on('message', function (message) {
console.log(socket.username + ' is speaking to me! They\'re saying: ' + message);
});
As soon as we receive a message, we ask for the username session variable to be retrieved from the client's socket.
Testing the code
Try
to open 2 windows giving different usernames each time. Then click on
Poke the server. You’ll see the username of the person who clicked on
the button in the console!
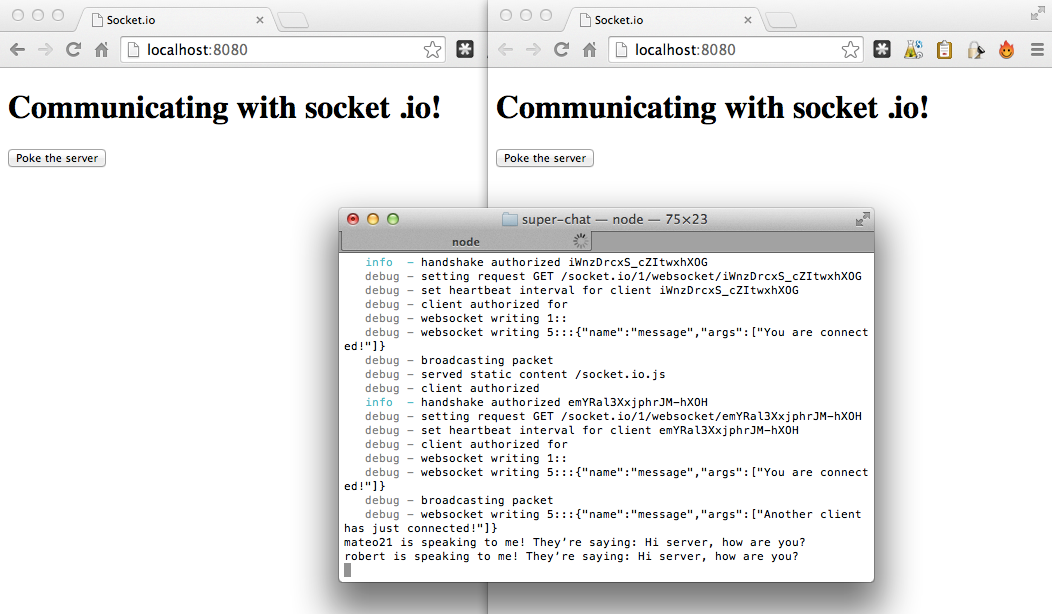
I
did the test for myself with two windows, one with the username
"mateo21" and the other with the username "robert". In the next figure,
you can see at the bottom of the console that it has actually recognized
who just clicked!

The complete code
I
deliberatley gave you very short bits of code to explain the idea to
you, but I’m sure you’re dying to have the full code to carry out your
tests. 

So, let’s go! Here’s index.html:
<!DOCTYPE html>
charset="utf-8"
Socket.io
Communicating with socket.io!
type="button" value="Poke the server" id="poke"
src="http://code.jquery.com/jquery-1.10.1.min.js"
src="/socket.io/socket.io.js"
var socket = io.connect('http://localhost:8080');
// The visitor is asked for their username...
var username = prompt('What\'s your username?');
// It's sent with the signal "little_newbie" (to differentiate it from "message")
socket.emit('little_newbie', username);
// A dialog box is displayed when the server sends us a "message"
socket.on('message', function(message) {
alert('The server has a message for you: ' + message);
})
// When the button is clicked, a "message" is sent to the server
$('#poke').click(function () {
socket.emit('message', 'Hi server, how are you?');
})
… and here is the app.'s application server:
var http = require('http');
var fs = require('fs');
// Loading the file index.html displayed to the client
var server = http.createServer(function(req, res) {
fs.readFile('./index.html', 'utf-8', function(error, content) {
res.writeHead(200, {"Content-Type": "text/html"});
res.end(content);
});
});
// Loading socket.io
var io = require('socket.io').listen(server);
io.sockets.on('connection', function (socket, username) {
// When the client connects, they are sent a message
socket.emit('message', 'You are connected!');
// The other clients are told that someone new has arrived
socket.broadcast.emit('message', 'Another client has just connected!');
// As soon as the username is received, it's stored as a session variable
socket.on('little_newbie', function(username) {
socket.username = username;
});
// When a "message" is received (click on the button), it's logged in the console
socket.on('message', function (message) {
// The username of the person who clicked is retrieved from the session variables
console.log(socket.username + ' is speaking to me! They\'re saying: ' + message);
});
});
server.listen(8080);
I hope that I have explained commented the code well enough so you can find your way round it. 

Summing up
- Socket.io is a Node.js module that allows your visitors to communicate continuously (in real time) with the server when the page is loaded.
- Socket.io is based on WebSockets, a sort of ‘super AJAX’. Your app can call the server at any time without reloading the page and the opposite is also true: your visitors can receive messages from the server at any time!
- The server and the client send each other events (with
socket.emit()) and listen to the events that are sent (withsocket.on()).
No comments:
Post a Comment