Believe it or not, the core of Node.js is very small. Basically, Node.js doesn’t do a lot.
However, Node.js is very rich thanks to its extensibility. These Node.js extensions are called modules.
There
are thousands of modules that offer varying features: from managing
uploaded files to connection to MySQL databases or to Redis, via
frameworks, template systems, and management of real-time communication
with visitors. There is pretty much everything you could dream of and
new modules appear every day.
We’re
going to begin by looking at how modules are managed by Node.js and
we’ll see that we can create our own easily. Then, we will look at NPM
(Node Package Manager), an essential tool that allows you to easily
download all the modules from the Node.js community. Finally, I will
show you how to achieve eternal glory by publishing your module on NPM.
Creating modules
Do you remember this line?
var http = require('http');
It
was right at the start of our first code. I told you that it was a call
to Node.js’s "http" library (or should I say to the "http" module).
When we do this, Node.js will search on our disk for a file called
http.js. Likewise, if we ask for the "url" module, Node.js will search for a file called url.js.
var http = require('http'); // Calls for http.js
var url = require('url'); // Calls for url.js
Where are these .js files? I can’t see them!
They are hidden in a nice and warm place on your disk, their location is of no interest to us. 
Given that they are part of the core of Node.js, they are always available.

Given that they are part of the core of Node.js, they are always available.
The
modules are therefore simply .js files. If we want to create a module,
let’s say the "test" module, we need to create a test.js file in the
same folder and call for it like this:
var test = require('./test'); // Calls for test.js (same folder)
It’s a relative path. If the module is in the parent folder, we can include it like this:
var test = require('../test'); // Calls for test.js (parent folder)
What if I don’t want to put in a relative pathway? Can’t I just do
require('test')?
You can! You need to put your test.js file in a sub-folder called "node_modules". It’s a Node.js standard:
var test = require('test'); // Calls for test.js (node_modules sub-folder)
The next figure summarizes all of this.
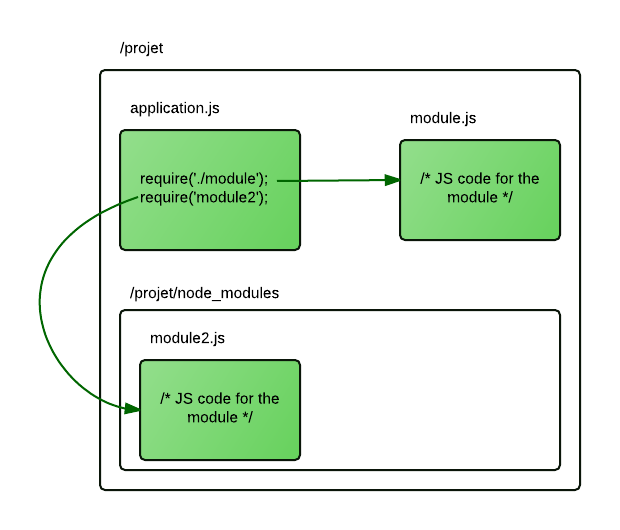
Note
that if the node_modules file doesn’t exist, Node.js will go to search
in a file that has the same name higher up in the tree. This way, if
your project is found in the /home/mateo21/dev/nodejs/projet folder, it
will go and find a file named:
- /home/mateo21/dev/nodejs/projet/node_modules, and if this file doesn’t exist, it will go and search in…
- … /home/mateo21/dev/nodejs/node_modules, and if the file doesn’t exist, it will go and search in…
- ... /home/mateo21/dev/node_modules, and so on!
What do the modules .js files look like?
It’s absolutely classic JavaScript. You create functions in it.
Just one detail: you have to "export" the functions that you want other people to be able to reuse.
Just one detail: you have to "export" the functions that you want other people to be able to reuse.
Let’s
test this! We’re going to create a really simple module that can say
"Hello!" and "Goodbye!". Create a file called mymodule.js with the
following code:
var sayHello = function() {
console.log('Hello!');
}
var sayGoodbye = function() {
console.log('Goodbye!');
}
exports.sayHello = sayHello;
exports.sayGoodbye = sayGoodbye;
The
start of the file doesn’t contain anything new. We’re creating
functions that we’re placing in the variables. From which the
var sayHello = function() comes from.
Then comes the new part, we’re exporting functions so they are usable externally:
exports.sayHello = sayHello;. Note that we could have just done this instead:
exports.sayHello = function() { ... };
Now, in your app’s main file (ex: app.js), you can call for these functions from the module!
var mymodule = require('./mymodule');
mymodule.sayHello();
mymodule.sayGoodbye();
require()
returns an object that contains the functions that you exported in your
module. We store this object in a variable of the same name mymodule (but we could have given it any other name), like in the next figure.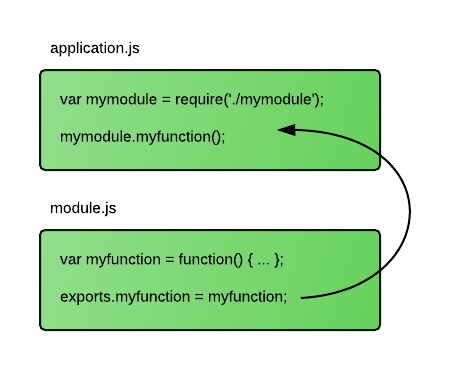
OK, so now you know everything! All Node.js modules are based on this very simple idea. 

This allows you to divide your project into several small files to spread roles.
Using NPM to install modules
I
told you about NPM in the introduction, the Node Package Manager. I
told you that it was a (great) way of installing new modules developed
by the community.
Imagine
that NPM is a bit like apt-get in Linux for installing programs. A
simple command and the module is downloaded and installed!
On top of that, NPM regulates the dependencies. This means that, if a module needs another module to function, NPM will go and download it automatically!
On top of that, NPM regulates the dependencies. This means that, if a module needs another module to function, NPM will go and download it automatically!
NPM has a website: http://npmjs.org!
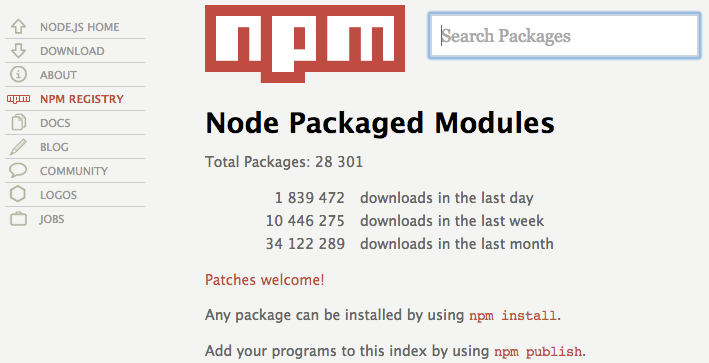
NPM
is very active, there are thousands and thousands of modules available
and we expect millions of uploads each week. You’re sure to find what
you’re looking for. 

As
the NPM website says, it just as simple to install new modules as it is
to upload your own modules. It’s a big part of what Node.js’s success
is down to.
How do you find a module here? It’s like searching for a needle in a haystack! 

It’s actually quite easy. I’ll show you a few ways of finding modules!
Finding a module
If
you know what you are looking for, the NPM website lets you search.
But, NPM is first and foremost a command! You can carry out a search in
the console, like this:
npm search postgresql
It will launch a search for all modules that have something to do with the PostgreSQL database.
If like me you like wandering around and don’t really know what you’re searching for, you will probably like http://nodetoolbox.com/. It organizes the modules by theme (see next figure).
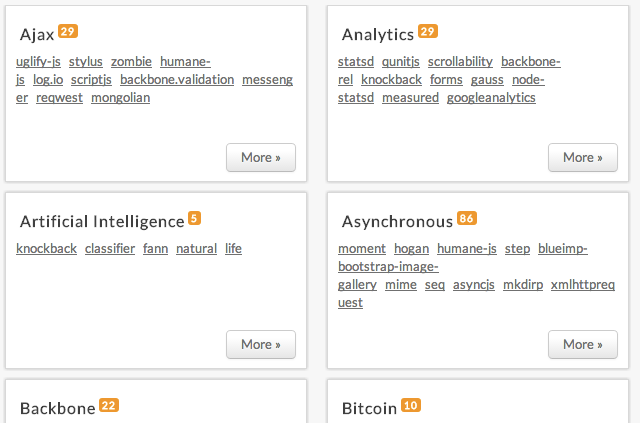
Installing a module
It’s dead easy to install a module. Go into your project’s folder and type:
npm install nameofmodule
The module will be installed locally specifically for your project.
If you have another project, you will need to relaunch the command to reinstall it for the other project. This allows you to use different versions of the same module depending on your projects.
If you have another project, you will need to relaunch the command to reinstall it for the other project. This allows you to use different versions of the same module depending on your projects.
Come on then, let’s do a test. We’re going to install the markdown module, which converts markdown code to HTML.
npm install markdown
NPM
will automatically download the latest version of the module and will
place it in a node_modules sub-folder. So check that you’re in the
folder that contains your Node.js project before launching this command!
Once that’s done, you have access to the functions offered by the ‘markdown’ module. Read the module’s handbook
to learn how to use it. It tells us that we need to call for the
markdown object within the module and that we can call the function
toHTML to convert Markdown into HTML.
Let’s try that:
var markdown = require('markdown').markdown;
console.log(markdown.toHTML('A paragraph in **markdown**!'));
This will be displayed in the console:
<p>A paragraph in <strong>markdown</strong>!</p>
Local installation and global installation
NPM installs modules locally for each project, which is why it creates node_modules sub-folders within your project.
If you use the same module in 3 different projects, it will be downloaded and copied 3 times. This is normal and it will allow us to generate different versions. So, it’s a good thing.
If you use the same module in 3 different projects, it will be downloaded and copied 3 times. This is normal and it will allow us to generate different versions. So, it’s a good thing.
However,
it needs to be said that NPM can also be used to install global
modules. This is useful in the rare cases where the module provides
runnables (and not just .js files).
This
is the case with our markdown module, for example. To install it
globally, we are going to add the -g parameter to the npm command:
npm install markdown -g
You will then have access to an md2html runnable in your console:
echo 'Hello *World*!' | md2html
Updating the modules
With a simple command:
npm update
NPM
will search on the databases to see if there are any new versions of
the modules, then update the modules that are installed on your machine
(whilst making sure not to break the compatibility) and it will delete
the old versions. In short, it’s the magic command. 

Declaring and publishing your module
If
your program needs external modules, you can install them one by one as
you have learnt, but you will quickly see that it becomes complicated
to manage. This is especially true if you use multiple modules. As these
modules evolve from version to version, your program might become
incompatible following an update to an external module!
Thankfully, we can sort all of this out by defining out program’s dependencies in a simple JSON file. It’s a bit like our app’s ID card.
Create a
package.json file in the same folder as your app. Let’s just start with this code:
{
"name": "my-app",
"version": "0.1.0",
"dependencies": {
"markdown": "~0.4"
}
}
This JSON file contains 3 key-value pairs:
- name: is the name of your app. Keep it simple, avoid spaces and accents.
- version: is the version number of your app. It is made up of a major version, minor version, and patch. I’ll come back to that right away.
- dependencies: is an array listing all the module names which your module needs to function as well as the compatible versions.
How version numbers work
To
manage dependencies correctly and know how to update the version number
of your application, you need to know how version numbers work with
Node.js. For each application there is:
- A major version number. In general we start with 0 whilst the application is not considered to be mature. This number doesn’t change often, only when the application has undergone very profound.
- A minor version number. This number is changed each time the application is changed a little.
- A patch number. This number is changed for each little bug or fault correction. The features of the app remain the same between patches. It’s mainly for optimization and unavoidable corrections. The next figure goes over all of this.
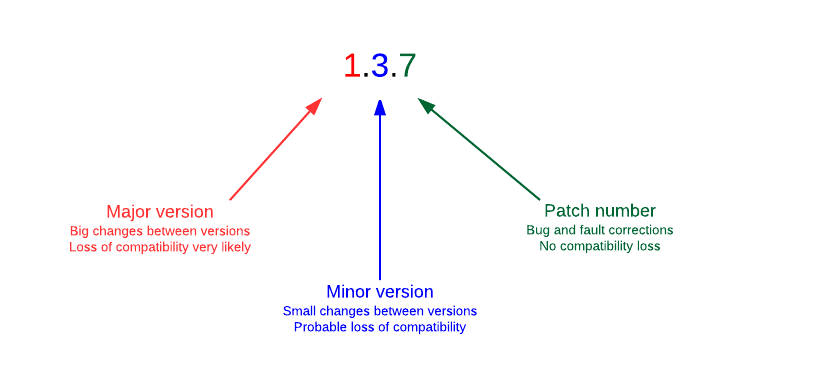
Here, I chose to start numbering my app at version 0.1.0 (we could have started at 1.0.0 but that would have been pretentious  ).
).
 ).
).- If I correct a bug, the application will go to version 0.1.1 and I will need to update this number in the package.json file.
- If I significantly improve my application, it will turn into version 0.2.0, then 0.3.0 and so on.
- The day that I decide that it’s reached an important turning point and is mature, I’ll be able to turn it into version 1.0.0.
Management of dependent versions
It’s
up to you to say which dependent versions your app works with. If your
app is only dependent on the markdown module v0.3.5, write:
"dependencies": {
"markdown": "0.3.5" // Version 0.3.5 only
}
If
you carry out an npm update to update all external modules, markdown
will never be updated (even if the app goes into version 0.3.6). You can
put a tilde (~) in front of the version number to allow updates until
the next minor version:
"dependencies": {
"markdown": "~0.3.5" // OK for versions 0.3.5, 0.3.6, 0.3.7, etc. up to version 0.4.0 not inclusive
}
You
don’t have to include the patch number if you don’t want to. In this
case, the modules will be updated even if the app changes minor
versions:
"dependencies": {
"markdown": "~0.3" // OK for versions 0.3.X, 0.4.X, 0.5.X up to 1.0.0 not inclusive
}
However
be careful: a module can change a fair amount between two minor
versions and your app may be incompatible. I recommend accepting only
patch updates, it’s the safest option.
Publishing a module
With
Node.js you can create an app for your own needs, but you can also
create modules that offer features. If you think that your module could
be useful for other people, don’t hesitate to share it! You can publish
it on NPM very easily so that other people can install it for
themselves.
Start by creating an account on npm:
npm adduser
Once this is done, go into the directory of the project that you want to publish. Check that you have:
- A package.json file that describes your module (at least its name, version and dependencies).
- A README.md file (written in markdown) which presents your module in more detail. Feel free to include a mini-tutorial to explain how to use your module!
All you need to do now is:
npm publish
And there you go, it’s done! 

All
that’s left to do is to tell the people you know about your module,
present it to Node.js mailing lists… The gateway to bearded geek glory
await you! (see next figure)

Summing up
- You can create Node.js modules to decouple your code and avoid writing everything in one file.
- You can call your modules with
require()as you do with official Node.js modules. - All the functions in the module file that can be called for externally have to be exported with the exports command.
- NPM is the Node.js module manager. Like ‘apt-get’ and ‘aptitude’ in Linux/Debian, it allows new modules to be coded by the community in the blink of an eye.
- Modules downloaded with NPM are installed locally by default in a node_modules sub-file of your app.
- The
-gextension allows a module to be installed globally for your entire computer. It’s only useful for a few specific modules. - You can share your own modules with the rest of the community by creating a package.json and a simple call to ‘npm publish’.
No comments:
Post a Comment