Time to get down to business! Joking aside, we’re getting down to the nitty gritty of the subject now.
This
is one of the most important chapters in the course because it
introduces numerous Node.js concepts, most of which will be new to you.
You will therefore need to read this chapter in a quiet place,
gradually, and it may be a good idea to read through it again the
following day to make sure that you’ve understood it correctly.
In this chapter we’re going to create a real Node.js app from start to finish.
You will find out what "low level" means and we will have to manage all parts of the web server that will handle the visitor’s HTTP requests and give them an HTML webpage.
You will find out what "low level" means and we will have to manage all parts of the web server that will handle the visitor’s HTTP requests and give them an HTML webpage.
This will be a chance for you to experiment with the infamous callbacks
that I told you about in the first chapter, the functions that are run
as soon as an event occurs. Node.js is full of them, so you won’t be
able to avoid them! 

Web servers and threads
I think I’ve already said it numerous times, but I feel I should mention it again here: Node.js is low level. So low level that you will have to do things that you aren’t used to doing to make your program work properly.
When
you create websites with PHP for example, you associate the language
with an HTTP web server such as Apache or Nginx. Each of them has its
own role in the process:
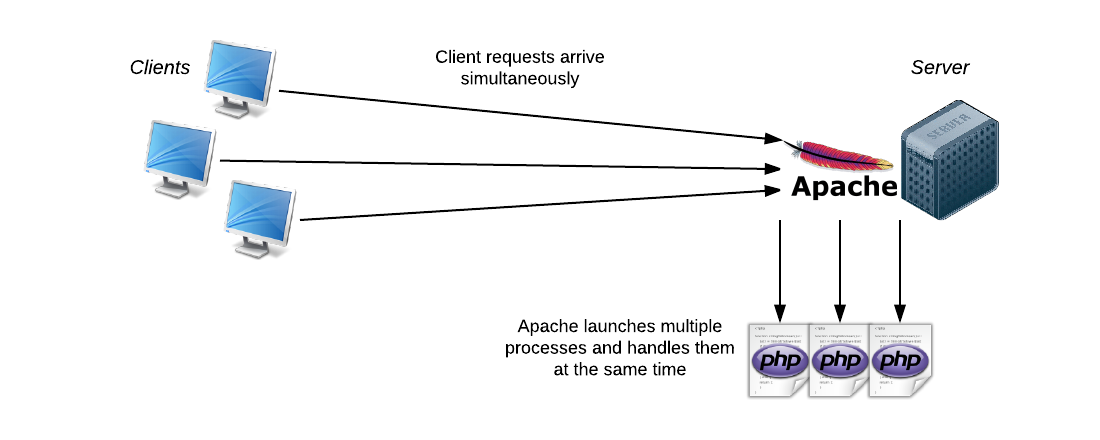
- Apache manages HTTP requests to connect to the server. Its role is more or less to manage the in/out traffic.
- PHP runs the .php file code and sends the result to Apache, which then sends it to the visitor.
As
several visitors can request a page from the server at the same time,
Apache is responsible for spreading them out and running different threads at the same time. Each thread uses a different processor on the server (or a processor core) (see next figure).

Node.js doesn’t use an HTTP server like Apache. In fact, it’s up to us to create the server! Isn’t that great? 

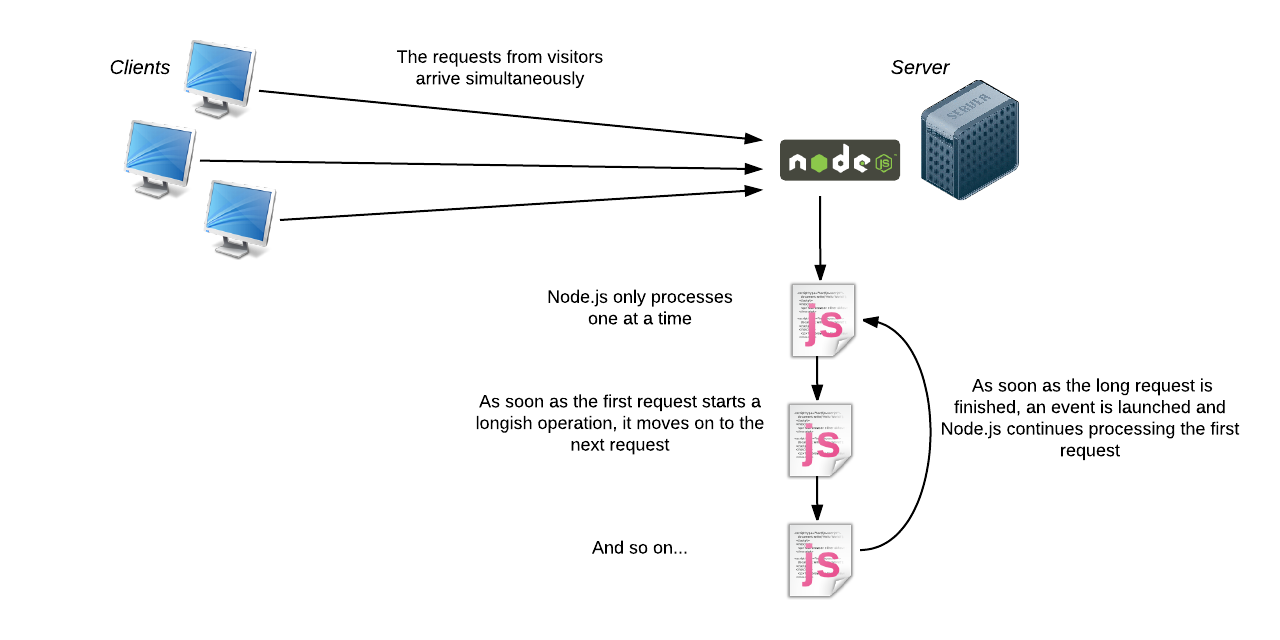
Unlike Apache, Node.js is monothread. This means that there is only one process and one version of the program that can be used at any one time in its memory.
But
I thought that Node.js was really fast because it could manage loads of
requests simultaneously. If it’s monothread, can it only perform one
action at a time?
Yes,
it can only do one thing at a time and therefore only runs on one
processor core. However, it does it efficiently, despite the latter, and
is still much faster!
This is due to the event-orientated nature of Node.js. Apps that use Node never sit around doing nothing. As soon as there is an action that takes a little too long, the program hands over to Node.js, which will carry out other actions while waiting for the event to happen to tell it that the operation is finished (see next figure).
This is due to the event-orientated nature of Node.js. Apps that use Node never sit around doing nothing. As soon as there is an action that takes a little too long, the program hands over to Node.js, which will carry out other actions while waiting for the event to happen to tell it that the operation is finished (see next figure).

Constructing your HTTP server
I suggest we get to the heart of the matter with this first Node.js code:
var http = require('http');
var server = http.createServer(function(req, res) {
res.writeHead(200);
res.end('Hi everybody!');
});
server.listen(8080);
In some ways it’s the "minimal code" for a Node.js project. Put it in a file and name it server.js (for example).
What does this code do?
It
creates a mini web server which sends a "Hi everybody" message in every
case, regardless of the page requested. This server is launched on the
8080 port on the last line.
Let’s analyze some code
Decomposing the code:
var http = require('http');
require
makes a call to a Node.js library, here it’s the "http" library which
allows us to create a web server. There are loads of libraries like this
one, most of them can be downloaded using NPM, Node.js’s packet manager
(we’ll learn how to use that later on).
The
http variable represents the JavaScript object that will let us launch a
web server and that’s exactly what we’re doing here:
var server = http.createServer();
We
call the createSever() function contained within the http object and we
save this server in the server variable. You’ll notice that the
createServer function takes on a setting… and that this setting is a
function. This is why the instruction is a little complicated, because
it runs over multiple lines:
var server = http.createServer(function(req, res) {
res.writeHead(200);
res.end('Hi everybody!');
});
All this code corresponds to a call to the createServer(). Its settings contain the function to be run when a visitor connects to our website.
Note that you can do this in two steps, as mentioned previously. The function to be run is the callback
function. We can define it beforehand in a variable and transmit this
variable to createServer(). This way, the code is exactly the same as
the previous one:
// Code exactly the same as the previous one
var instructionsNewVisitor = function(req, res) {
res.writeHead(200);
res.end('Hi everybody!');
}
var server = http.createServer(instructionsNewVisitor);
It’s
very important that you understand this idea, because Node.js only
works like that. There are callback functions everywhere and, generally
speaking, they are placed within the lines of another function as you
saw in my first code. This can seem a little tough to read, but you will
soon get the hang of it, don’t worry. 

Don’t
forget to close the callback function properly with a brace, to close
the brackets that contain the function, and to place the infamous
semicolon. This is why you see the
}); symbols on the last line of my first code.
The callback function is therefore called each time a visitor connects to the website. It takes on 2 settings:
- The visitor’s request (
reqin my examples): this object contains all the information about what the visitor asked for. In it you will find the name of the page that was requested, the settings, and any fields filled in on a form. - The response that you should send back (
resin my examples): this is the object that you need to fill to give a response to the visitor. In the end, res will generally contain the HTML code of the page to be sent to the visitor.
Here, we are doing 2 simple things in the response:
res.writeHead(200);
res.end('Hi everybody!');
We
send back the code 200 in the heading of the response, which tells the
server "It’s OK everything’s fine" (we could, for example, have replied
404 if the requested page didn’t exist). You need to know that in
addition to the HTML code, the server generally sends back a whole heap
of other settings as a header. You need to know the HTML standards that
show how clients and servers should communicate to be able to use it
well. Here is another example of complexity caused by the fact that
Node.js is low level. However, it helps us to understand all sorts of
things. 

Next, we end the response (with
end()) by sending the message of our choice back to the browser. Here, we don’t even send HTML, just plain text.
Finally, the server is launched and "listens" to the 8080 port with the instruction:
server.listen(8080);
Testing the HTTP server
To test your first server, go into the console and type:
node server.js
The
console doesn’t display anything and doesn’t respond – that’s totally
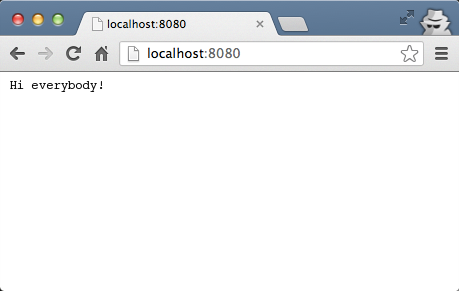
normal. Now open your browser and go to the address
http://localhost:8080. Connect your own machine to the 8080 port on
which the Node.js program is running. You should get something that
resembles the next figure.

To stop your Node.js server, return to the console and press ctrl + C to cut off the command.
Returning HTML code
Let’s sum up. We’ve created our first real app with our web server included. But the app is somewhat minimalist for the moment:
- The message sent back is in plain text, it doesn’t even contain any HTML.
- The application always sends back the same message, regardless of the page called (http://localhost:8080, http://localhost:8080/mypage, http://localhost:8080/file/otherpage).
For this chapter to be complete, we will need to cure these two problems. Let’s start here by seeing how to send some HTML back.
As I said before, there are rules that are to be respected between client and server. They communicate based on the HTTP standard
invented by Sir Tim Berners-Lee. This standard is the foundation of the
web (like HTML language, which was also invented by him  ).
).
 ).
).
What does the HTTP standard say? The server must indicate the type of data that it is about to send to the client because the server can return different types of data:
- Plain text: text/plain
- HTML: text/html.
- CCS: text/ccs
- A JPEG image: image/jpeg
- An MPEG4 video: video/mp4
- A ZIP file: application/zip
- etc.
These are what we call the MIME types. They are sent in the header of the server’s response.
Do you remember how to write the response header with Node.js? We wrote this:
Do you remember how to write the response header with Node.js? We wrote this:
res.writeHead(200);
All
we’ve done so far is enter the response code 200 to signify "OK, no
errors". We need to add another setting that indicates the response’s
MIME type. For HTML, it will therefore be:
res.writeHead(200, {"Content-Type": "text/html"});
Now that’s done, we can send HTML in the answer!
res.end('<p>Here is a paragraph of <strong>HTML</strong>!</p>');
Now our code looks like this:
var http = require('http');
var server = http.createServer(function(req, res) {
res.writeHead(200, {"Content-Type": "text/html"});
res.end('<p>Here is a paragraph of <strong>HTML</strong>!</p>');
});
server.listen(8080);
Try out what you have learned by launching the application with the
node command in the console and opening your browser to http://localhost:8080 (see next figure):
Your paragraph of text is displayed and is formatted as planned! 

But the HTML code isn’t valid, is it? We didn’t write a doctype or the
<html> or <body> tags.
Yikes, you caught me red-handed! An invalid HTML code, I’m ashamed...
We can repair it. It’s easy, you simply need to send all the other tags that were missing.
var http = require('http');
var server = http.createServer(function(req, res) {
res.writeHead(200, {"Content-Type": "text/html"});
res.write('<!DOCTYPE html>'+
'<html>'+
' <head>'+
' <meta charset="utf-8" />'+
' <title>My Node.js page!</title>'+
' </head>'+
' <body>'+
' <p>Here is a paragraph of <strong>HTML</strong>!</p>'+
' </body>'+
'</html>');
res.end();
});
server.listen(8080);
But you can’t write HTML like that, it’s awful!
We make do with what we have!
Don’t forget that Node.js is low level…
Don’t forget that Node.js is low level…

I
assure you that no developer will create complex HTML web pages using
it. There are ways of separating the HTML code from the JavaScript i.e.
template systems. It’s not particularly relevant at the moment, given
that we’re just getting used to the basics of Node.js. But if the
subject interests you, there are plenty of Node.js modules dedicated to templates.
Determining which page is called and the settings
We
know how to return HTML, but at the moment our app is returning the
same thing every time. How do I create different pages with Node.js?
Try our little app on different URLs. Whichever page is called...
- http://localhost:8080
- http://localhost:8080/mypage
- http://localhost:8080/folder/otherpage...
...the page displayed is always the same!
We
need to know which page the visitor requested. Since we aren’t doing
any tests at the moment our app always returns the same thing.
We’re going to find out how to recover:
- The name of the page requested (/mypage, /page.html, /folder/otherpage, etc.)
- The settings in the URL (eg: http://localhost:8080/mypage?lastname=doe&firstname=john).
Which page did the visitor request?
To find out which page the visitor requested, we’re going to use a new Node module called "url". We ask for its inclusion using:
var url = require("url");
Then, all we need to do is "parse" the visitor’s request like this to get the name of the page requested:
url.parse(req.url).pathname;
Here’s a simple code that will enable you to test this:
var http = require('http');
var url = require('url');
var server = http.createServer(function(req, res) {
var page = url.parse(req.url).pathname;
console.log(page);
res.writeHead(200, {"Content-Type": "text/plain"});
res.write('Well Hello');
res.end();
});
server.listen(8080);
First,
run the script and launch your browser at the address
http://localhost:8080. Then go back to the console. We’ll log the name
of the requested page. This is what you should see:
/
/favicon.ico
I only loaded the home page, why am I seeing /favicon.ico?
Most
browsers actually carry out a second query to retrieve the website icon
(the "favicon" generally seen in the tabs). This is normal, don’t
worry.
Now try to load "bogus pages" of your website to see what happens.
/testpage
/favicon.ico
/a/long/path/
/favicon.ico
/boguspage.html
/favicon.ico
If we ignore the favicon.ico, which is messing up the console, we can see that I tried to load the following pages:
- http://localhost:8080/testpage
- http://localhost:8080/a/long/path
- http://localhost:8080/boguspage.html
So what? My website is still sending me back to same thing regardless of the page called!
True, but all you need to do is write a condition and the job’s done! 

var http = require('http');
var url = require('url');
var server = http.createServer(function(req, res) {
var page = url.parse(req.url).pathname;
console.log(page);
res.writeHead(200, {"Content-Type": "text/plain"});
if (page == '/') {
res.write('You\'re at the reception desk. How can I help you?');
}
else if (page == '/basement') {
res.write('You\'re in the wine cellar. These bottles are mine!');
}
else if (page == '/floor/1/bedroom') {
res.write('Hey, this is a private area!');
}
res.end();
});
server.listen(8080);
How
about a little test to give you a bit of practice? Get an error message
to display if the visitor requests an unknown page. And don’t forget to
return a 404 error code!
What are the settings?
The settings are sent at the end of the URL, after the file pathway. Take this URL for example:
http://localhost:8080/page?fisrtname=John&lastname=Doe
The settings are contained in the ?firstname=John&lastname=Doe string. To retrieve this string, you simply need to use:
url.parse(req.url).query
The
problem is that the whole string will be returned to you without first
dividing the different settings. Thankfully, there is a Node.js module
that takes care of it for us, i.e. querystring!
Include this module:
var querystring = require('querystring');
Then you can do:
var params = querystring.parse(url.parse(req.url).query);
You will then have a "params" settings table. To retrieve the firstname setting, just write:
params['firstname'].
Let’s take a look at a full code that shows your first and last names (as long as these have been defined!):
var http = require('http');
var url = require('url');
var querystring = require('querystring');
var server = http.createServer(function(req, res) {
var params = querystring.parse(url.parse(req.url).query);
res.writeHead(200, {"Content-Type": "text/plain"});
if ('firstname' in params && 'lastname' in params) {
res.write('Your name is ' + params['firstname'] + ' ' + params['lastname']);
}
else {
res.write(''You do have a first name and a last name, don\'t you?');
}
res.end();
});
server.listen(8080);
Try
going to http://localhost:8080?firstname=John&lastname=Doe to see
the result and then change the first and last names to your own!
Summary diagram
Let’s sum up what we’ve just learnt in one single diagram (see next figure) before finishing.

Summing up
- With Node.js, your app must manage the web server (Apache equivalent) in addition to its own features. It should also determine the name of the page called and its settings so it knows what to return to the visitor.
- Node.js libraries are called modules and they are loaded using
require(). - With Node.js, we frequently send functions in settings of other functions. This determines which function should be called next when a task is finished.
- Your app should usually return HTML to the visitor’s browser using the
write()method.
No comments:
Post a Comment