Thursday, 15 February 2024


How To Install MySQL 5.7 on Ubuntu 20.04

268817
29

In our guide today, we are looking at how to install MySQL 5.7 on Ubuntu 20.04 (Focal Fossa) Server. MySQL is one of the most commonly used Database Management Systems. It uses the concept of relational databases and has a client/server architecture. It can be installed on various operating systems including Windows, CentOS and Debian among others.

The below steps describe how to install and configure MySQL 5.7 on Ubuntu 20.04. It start with adding APT repository with packages for MySQL then dives to the actual package installations and configurations.

  1. How to make Practical progression t...
Remaining Time 27:22

    1. Now Playing
      How to make Practical progression to Web3 and Metaverse by Geetika Gahlot

    2. What is Continuous Improvement and How Can It Drive Organizational Success?

    3. Is Flutter App Development the Future? Exploring its Potential and Advantages
    4. How To Add Products AJAX Live Search on WooCommerce WordPress Store For Free_ 🛒

    5. Using Free Meeting Solution Zoom to Record Screen Operation with the Camera
    6. VB.NET VS C#.NET STEP BY STEP WITH SAMPLE PROJECTS DAY 8

    7. Can Mars really be terraformed?
    8. Python Tutorial 8 - IF ELSE ELIF Decision Condition
    9. VB.NET VS C#.NET STEP BY STEP WITH SAMPLE PROJECTS DAY 12
    10. Install Group Policy Editor on Windows Home edition
    11. Add Two Numbers in PHP

1. Add MySQL APT repository

Ubuntu already comes with the default MySQL package repositories. In order to add or install the latest repositories, we are going to install package repositories . Download the repository using the below command:

sudo apt update
sudo apt install wget -y
wget https://dev.mysql.com/get/mysql-apt-config_0.8.12-1_all.deb

Once downloaded, install the repository by running the command below:Ezoic

sudo dpkg -i mysql-apt-config_0.8.12-1_all.deb

In the prompt, choose Ubuntu Bionic and click Ok

How to install mysql 5.7 on ubuntu 20.04 03

The next prompt shows MySQL 8.0 chosen by default. Choose the first option and click OK

How to install mysql 5.7 on ubuntu 20.04 04

In the next prompt, select MySQL 5.7 server and click OK.

How to install mysql 5.7 on ubuntu 20.04

The next prompt selects MySQL5.7 by default. Choose the last otpion Ok and click OK

How to install mysql 5.7 on ubuntu 20.04 01

2. Update MySQL Repository

Run the below command to update your system packages

sudo apt-get update

Now search for MySQL 5,7 using apt-cache as shown below:

$ sudo apt-cache policy mysql-server
mysql-server:
  Installed: (none)
  Candidate: 8.0.26-0ubuntu0.20.04.2
  Version table:
     8.0.26-0ubuntu0.20.04.2 500
        500 http://mirrors.digitalocean.com/ubuntu focal-updates/main amd64 Packages
        500 http://security.ubuntu.com/ubuntu focal-security/main amd64 Packages
     8.0.19-0ubuntu5 500
        500 http://mirrors.digitalocean.com/ubuntu focal/main amd64 Packages
     5.7.35-1ubuntu18.04 500
        500 http://repo.mysql.com/apt/ubuntu bionic/mysql-5.7 amd64 Packages

As you can see MySQl 5.7.31-1ubuntu18.04 is appearing in the list.

3. Install MySQL 5.7 on Ubuntu 20.04

Having found MySQL 5.7 in our system, we are going to install MySQL 5.7 client, MySQL 5.7 server with the below command:

sudo apt install -f mysql-client=5.7* mysql-community-server=5.7* mysql-server=5.7*

Hit the y key to start installation of MySQL 5.7 on Ubuntu 20.04 Linux.

Reading package lists... Done
Building dependency tree
Reading state information... Done
Selected version '5.7.35-1ubuntu18.04' (MySQL:repo.mysql.com [amd64]) for 'mysql-client'
Selected version '5.7.35-1ubuntu18.04' (MySQL:repo.mysql.com [amd64]) for 'mysql-community-server'
Selected version '5.7.35-1ubuntu18.04' (MySQL:repo.mysql.com [amd64]) for 'mysql-server'
The following additional packages will be installed:
  libmecab2 libtinfo5 mysql-common mysql-community-client
The following NEW packages will be installed:
  libmecab2 libtinfo5 mysql-client mysql-common mysql-community-client mysql-community-server mysql-server
0 upgraded, 7 newly installed, 0 to remove and 90 not upgraded.
Need to get 51.6 MB of archives.
After this operation, 315 MB of additional disk space will be used.
Do you want to continue? [Y/n] y

Enter and re-enter root password when prompted

How to install mysql 5.7 on ubuntu 20.04 02

4. Secure MySQL 5.7 Installation

Run the command below to secure MySQL

sudo mysql_secure_installation

Press Enter. When prompted for password, provide the root password set above.

Answer the prompts as below:

Enter current password for root (enter for none): <Enter password>
VALIDATE PASSWORD PLUGIN can be used to test passwords 
and improve security. It checks the strength of password 
and allows the users to set only those passwords which are 
secure enough. Would you like to setup VALIDATE PASSWORD plugin? 

Press y|Y for Yes, any other key for No: Y 

There are three levels of password validation policy: 

LOW    Length >= 8 
MEDIUM Length >= 8, numeric, mixed case, and special characters 
STRONG Length >= 8, numeric, mixed case, special characters and dictionary                 

Please enter 0 = LOW, 1 = MEDIUM and 2 = STRONG: 1 
Using existing password for root. 
Estimated strength of the password: 25  
Change the password for root ? ((Press y|Y for Yes, any other key for No) : d
Remove anonymous users? [Y/n] Y 
Disallow root login remotely? [Y/n] Y 
Remove test database and access to it? [Y/n] Y 
Reload privilege tables now? [Y/n] Y 
Thanks for using MariaDB!

5. Check MySQL 5.7 version

To confirm the installed version, first, connect to MySQL with the set root password.

$ mysql -u root -p 
Enter password:
Welcome to the MySQL monitor.  Commands end with ; or \g.
Your MySQL connection id is 6
Server version: 5.7.35 MySQL Community Server (GPL)

Copyright (c) 2000, 2021, Oracle and/or its affiliates.

Oracle is a registered trademark of Oracle Corporation and/or its
affiliates. Other names may be trademarks of their respective
owners.

Type 'help;' or '\h' for help. Type '\c' to clear the current input statement.

mysql>

Run the below command to display version

$ SELECT VERSION();
+-----------+ 
| VERSION() | 
+-----------+ 
| 5.7.35    | 
+-----------+ 
1 row in set (0.00 sec)

6. Create MySQL User (Optional, testing only)

While still connected to MySQL, run the following commands to create a user:

CREATE USER 'user'@'%' IDENTIFIED BY 'MyStrongPass.';
GRANT ALL PRIVILEGES ON * . * TO 'user'@'%'; 
FLUSH PRIVILEGES;
exit

7. Enable MySQL remote access (Optional)

By default, MySQL remote access is disabled. To enable it we need to edit mysqld.cnf file as below:

sudo vim /etc/mysql/mysql.conf.d/mysqld.cnf

Look for the line ‘bind_address’ and change as below:

# By default we only accept connections from localhost 
#bind-address   = 127.0.0.1 
bind-address   = 0.0.0.0

Save the file and restart mysql

sudo systemctl restart mysql

Allow remote connections through the firewall

sudo ufw allow from <remote_IP_address> to any port 3306
sudo ufw enable

To access the database from a remote machine, run the following command:

$ mysql -u user -h database_server_ip -p

You have successfully installed MySQL 5.7 on Ubuntu 20.04.

Saturday, 27 January 2024

Using GitHub App authentication


Using GitHub App authentication

5 minute read

There are several reasons for considering this authentication approach including:

  • The rate limit for a GitHub App scales with your organization size, whereas a user based token has a limit of 5000 requests per hour, regardless of how many repositories you have.

  • For organizations that have 2-factor authentication enforced - with GitHub Apps there is no need to manage 2-factor authentication tokens for a 'bot' user.

  • Jenkins GitHub Apps require a minimal, controlled set of privileges compared to a service user and its personal access token.

GitHub App authentication can be used with Multibranch Pipeline jobs, Organization folders, and Shared Libraries. It is not available for regular Pipeline or Freestyle jobs.

Setting up GitHub App authentication requires several steps in both GitHub and Jenkins. Complete the following steps in GitHub:

Afterwards, complete the following steps in Jenkins:

Supported versions

GitHub App authentication is available on the following versions and platforms:

  • CloudBees CI on modern cloud platforms version 2.222.4.3 (and higher)

  • CloudBees CI on traditional platforms version 2.222.4.3 (and higher)

  • GitHub Branch Source plugin version 2.7.1 (or higher)

Prerequisites

The following permissions are required to set up GitHub App authentication:

GitHub

Permission to create a GitHub App

CloudBees CI

Permissions to create a new credential and update job configurations:

  • Credentials/Create

  • Job/Configure

Creating the GitHub App

To create the GitHub App:
  1. Do one of the following:

    • For a GitHub App owned by an organization: In the upper-right corner of any page in GitHub, select your profile icon > Your organizations then select Settings for the organization.

    • For a GitHub App owned by a personal account: In the upper-right corner of any page in GitHub, select your profile icon > Settings.

  2. In the left navigation, select Developer settings > GitHub Apps.

  3. Select New GitHub App.

  4. Complete the following fields as follows:

    • GitHub App Name: enter an appropriate name to reference this authentication, i.e. "Jenkins - <team name>".

    • Homepage URL: enter your company domain or GitHub repository URL.

    • Webhook URL: enter your Jenkins instance URL such as https://<jenkins-host>/github-webhook/.

  5. You do not need to complete any of the fields in the Identifying and authorizing users section.

  6. Under Repository permissions, choose the following permissions. For each type of permission, use the drop-down menu to select Read-only, Read & write, or No access.

    • Administration: Read-only

    • Checks: Read & write

    • Contents: Read-only (to read the Jenkinsfile and the repository content during git fetch).

    • Metadata: Read-only

    • Pull requests: Read-only

    • (Optional)Webhooks: If you want the plugin to manage webhooks for you, Read & write.


      For more information on using webhooks with Jenkins, refer to Creating projects based on GitHub repository structure - Using build triggers and webhooks.
    • Commit statuses: Read & write


      These permissions are the minimum permissions CloudBees CI will need for general Multibranch Pipeline workflows; however, you can add more permissions. We recommend that you select minimal permissions to limit the security risk if CloudBees CI is somehow compromised.
  7. Under Subscribe to events, select the following events:

    • Check run

    • Check suite

    • Pull request

    • Push

    • Repository


      If you do not see an event listed, check that you have applied the appropriate Repository permissions in the previous step. The events are added to the list based on the permissions selected.

      You can add additional events, the ones listed in this step are events CloudBees CI will use for general Multibranch Pipeline workflows.
  8. Select the appropriate choice for Where can this GitHub App be installed?

    • Only on this account: If you only want to use the GitHub App for a single GitHub account.

    • Any account: If you want to use the GitHub App for multiple organizations.


      If you select Any account, you will need one credentials entry in CloudBees CI per organization.
  9. Select Create GitHub App.


See Creating a GitHub App for more information on creating a GitHub App from GitHub’s Developer guide.

You are not required to use webhooks but it strongly recommended over alternatives such as polling. To use webhooks, add the Webhook URL and secret (noted above).

This version of CloudBees CI does not support concurrent registration of multiple webhook secrets.

Generating a private key for authenticating to the GitHub App

After you have created the GitHub App, you will need to generate a private key for authenticating to the GitHub App.

To generate a private key authenticating to the GitHub App:
  1. In the upper-right corner of any page in GitHub, select your profile icon > Settings.

  2. In the left navigation, select Developer settings > GitHub Apps.

  3. Select the GitHub App.

  4. Under Private keys, select Generate a private key option.

  5. A private key in PEM format will be downloaded to your computer.

Converting the private key for Jenkins

After you have generated the private key authenticating to the GitHub App, you need to convert the key into a different format that Jenkins can use with the following command:

openssl pkcs8 -topk8 -inform PEM -outform PEM -in key-in-your-downloads-folder.pem -out converted-github-app.pem -nocrypt

Installing the GitHub App to your organization

Finally, you must install the newly created app to your organization.

To install the newly created GitHub App to your organization:
  1. From the GitHub Apps settings page, select the GitHub App.

  2. In the left navigation, select Install App.

  3. Select Install next to the organization or user account containing the correct repository.

  4. Install the app on all repositories or select repositories.

  5. Once installed, you will have configuration options for the app on your selected account.

Adding the Jenkins credential

To add the Jenkins credential in the UI:
  1. From the CloudBees CI dashboard, select Credentials in the left navigation.

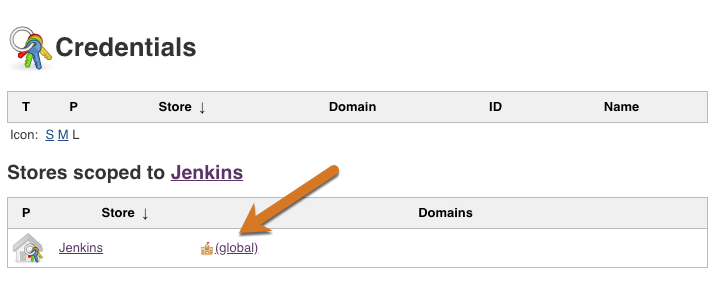
  2. Select the global credential store.

  3. Select Add Credentials.

  4. Select GitHub App as the Kind.

  5. For the ID, enter the GitHub App Name you created in Creating the GitHub App.

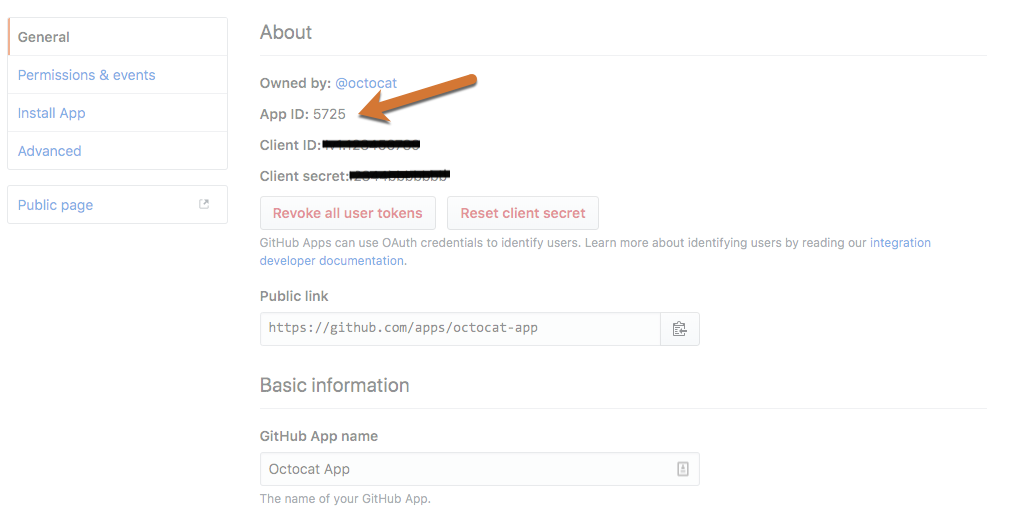
  6. For App ID enter the GitHub App ID.


    The GitHub App ID can be found in the About section of your GitHub App under the General tab in GitHub.
    github apps settings
  7. (Optional) Enter the API Endpoint.


    This field will only appear if you are adding a Jenkins Credential to a GitHub Enterprise account.
  8. Select the Add button to enter the converted private key in the Key field.

  9. (Advanced) Select the Advanced…​ button if you have installed the same GitHub App on multiple organizations, and enter the name of the organization or user in the Owner field.

  10. Select OK.

Configuring the GitHub Organization


The following instructions assume you have already created a GitHub Organization in Jenkins. For more information see Creating projects based on GitHub repository structure.
To configure your GitHub Organization to use your GitHup App for authentication:
  1. From the GitHub Organization, select Configure in the left navigation.

  2. Select the Projects tab.

  3. Select the new GitHub App credentials from the Credentials drop down in the GitHub Organization section. GHApp verified, remaining rate limit: 5000 displays.


    If you are using GitHub Enterprise, the API URL must be set to your server. The API URL must be set on both the credential and the job.
  4. Select Save.

  5. In the left navigation, select Scan Organization Now.

  6. View the Scan Organization log and verify that the success message displays.

Configuring a controller to use a webhook secret

  1. From the controller, select Manage Jenkins > Configure System.

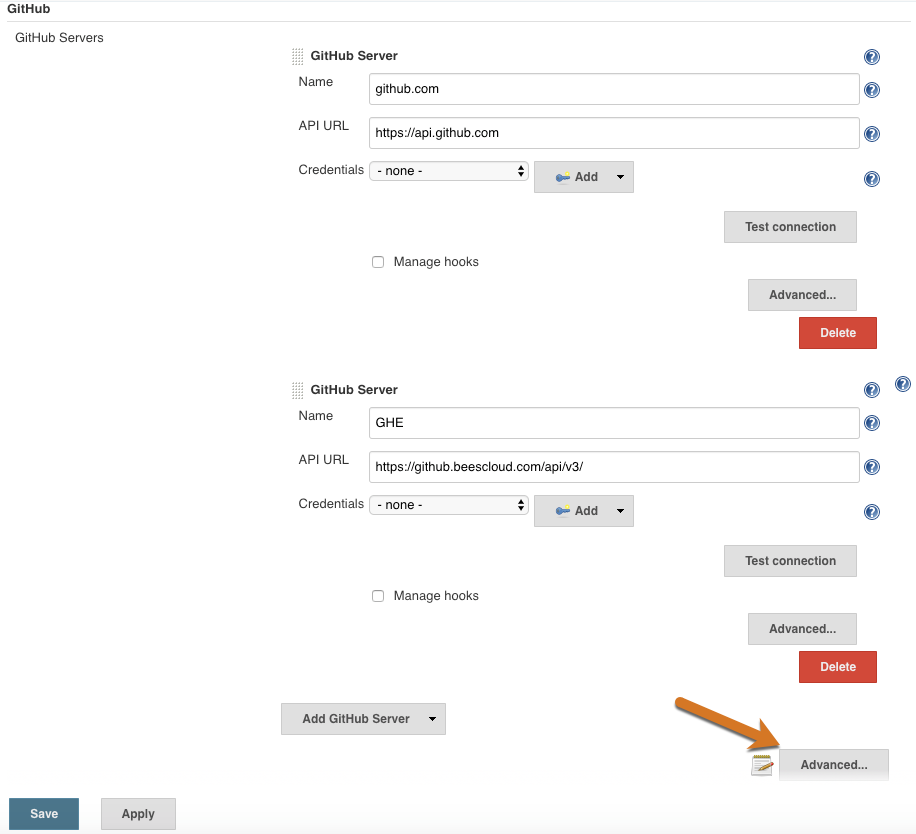
  2. Under GitHub > GitHub Servers, select the Advanced button next to a notebook with a pencil icon.

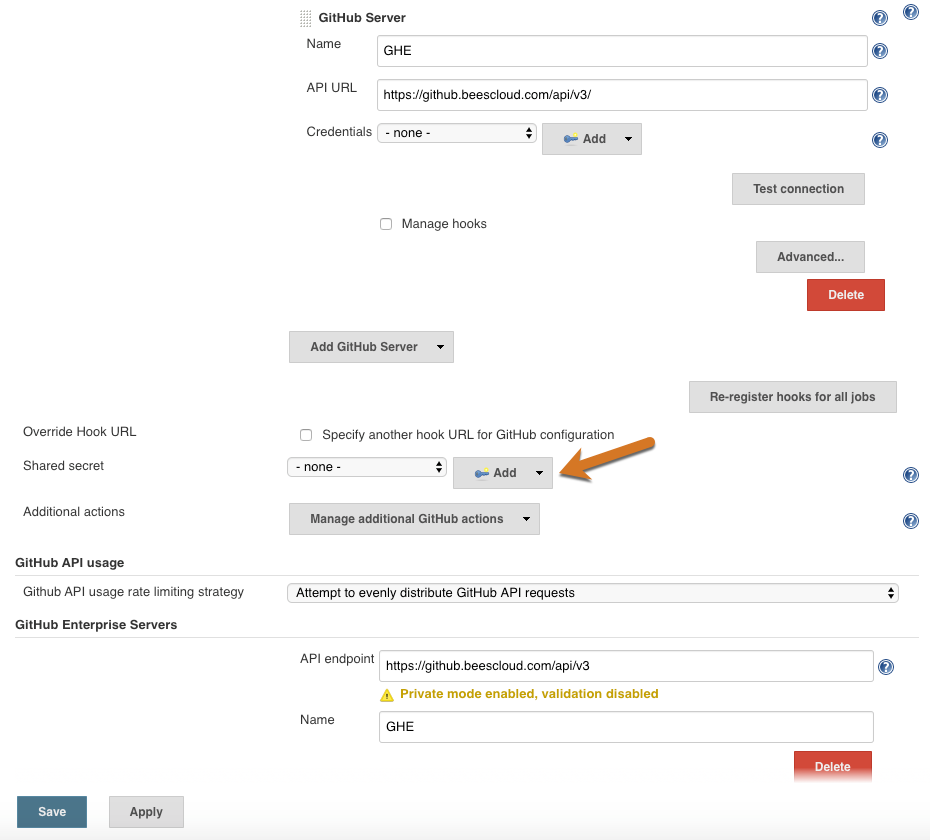
  3. For Shared secret, select Add and choose Jenkins.

    add cred button
  4. For Kind, select Secret text.

  5. Enter the webhook secret you added to the GitHub App in Creating the GitHub App.

  6. Select Add.

Unthrottling GitHub API usage

By default, CloudBees CI tries to be parsimonious with GitHub API usage since the rate limit can easily be exceeded when using a personal access token. Exceeding the rate limit is unlikely to be an issue when using a GitHub App for authentication, since the rate limit is elastic and much higher. So you should go to Manage Jenkins > Configure System and under GitHub API usage > Github API usage rate limiting strategy switch Normalize API requests to Throttle at/near rate limit and select Save. See GitHub rate limiting for more information.


SOURCE

Monday, 5 June 2023

AWS certificate manager certificate with Go daddy domain.


The last time I applied AWS SSL certificate for my website https://www.createclassicsudoku.com (when you google “make sudoku”, it ranks 1st), it was a long time ago. At that time, I did not write anything down, so this time when I tried to apply an AWS SSL certificate for my website https://www.zinsolution.com (a marketing tools website), it took me a long time. This motivates me to write it down, even if I will be the only reader in future. I also wish it will help lots of people who are doing their own websites.

So much about my motivation. I am going straight to the topic. I already have http://www.zinsolution.com being set up, however, a website with https looks more reliable and can attract more visitors.

My steps are as follows:

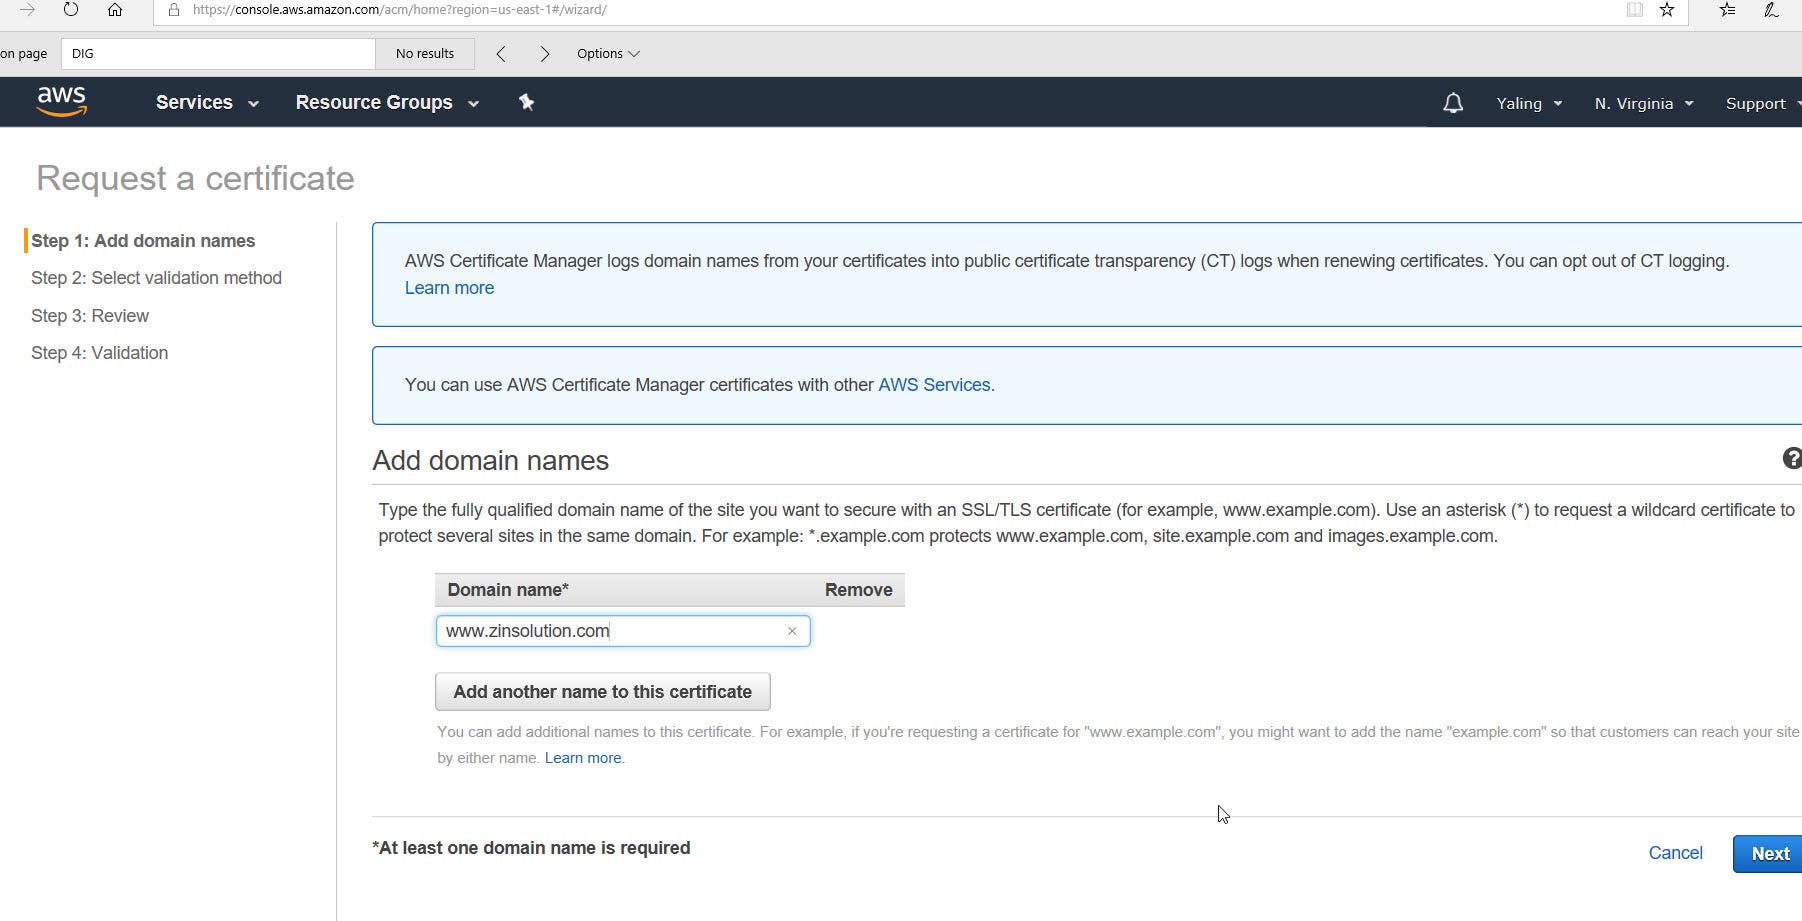
Step 1: Request a Certificate — Add domain names
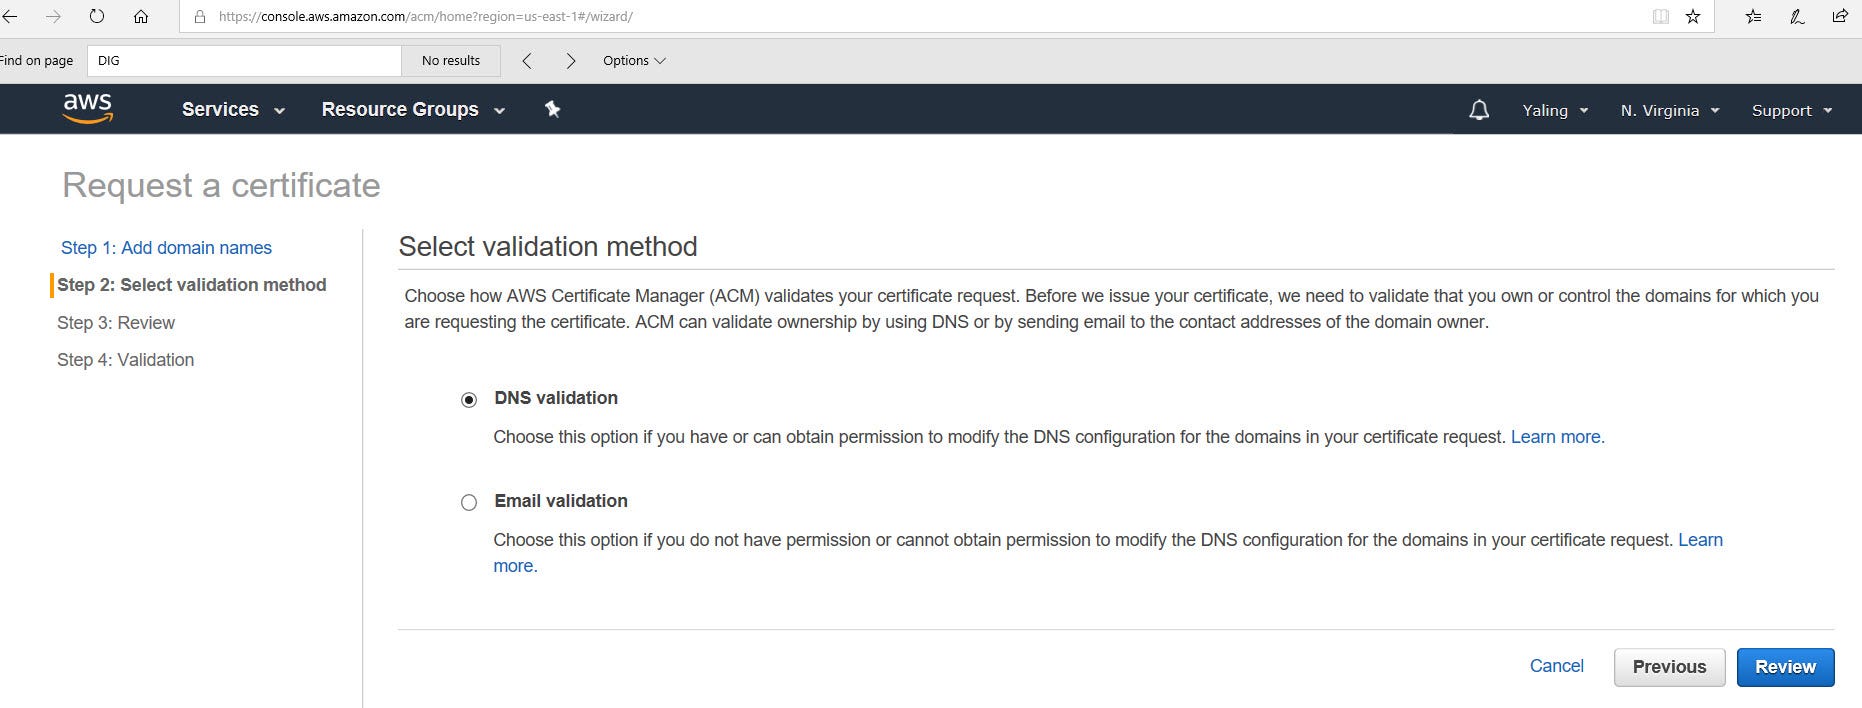
Step 2: Request a certificate — Select Validation Method
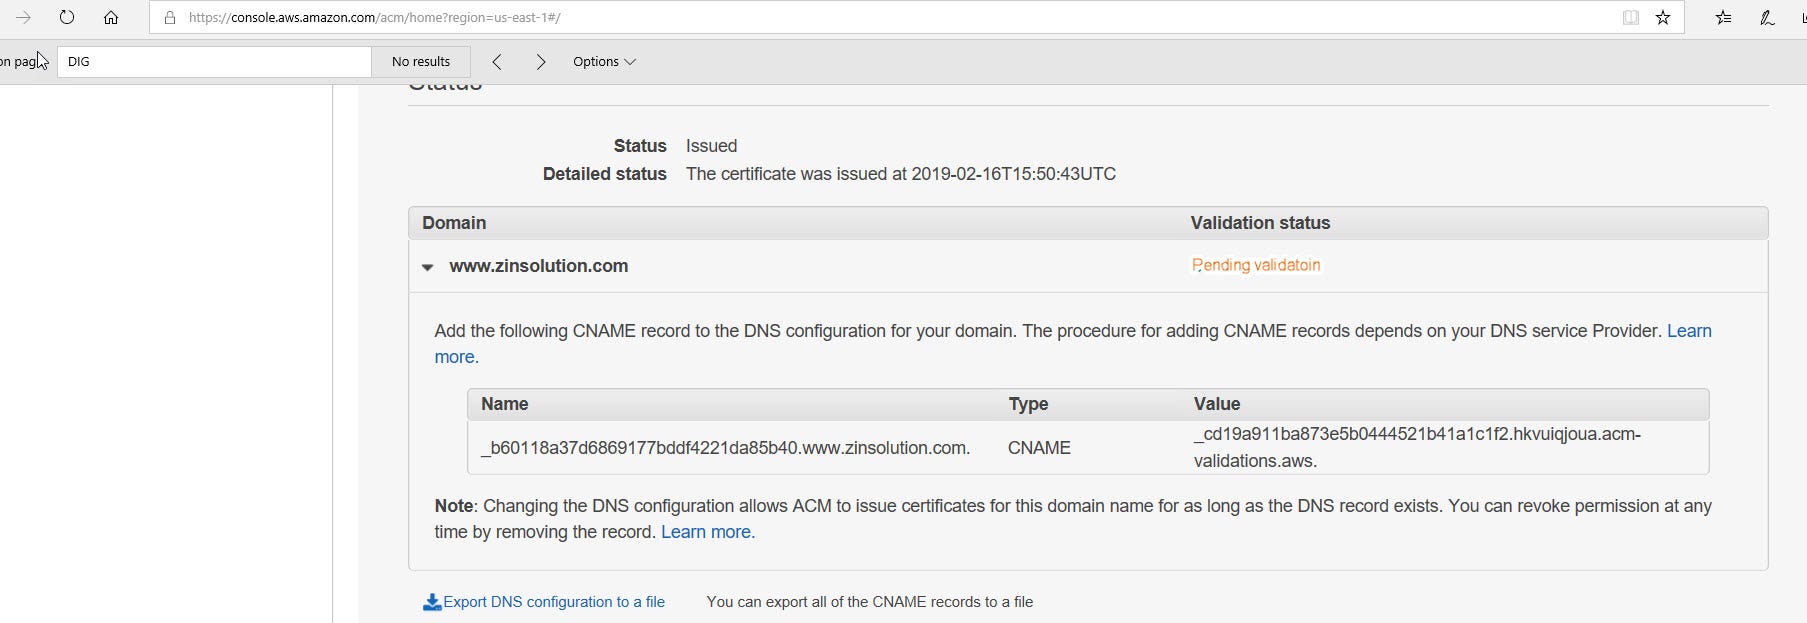
validation
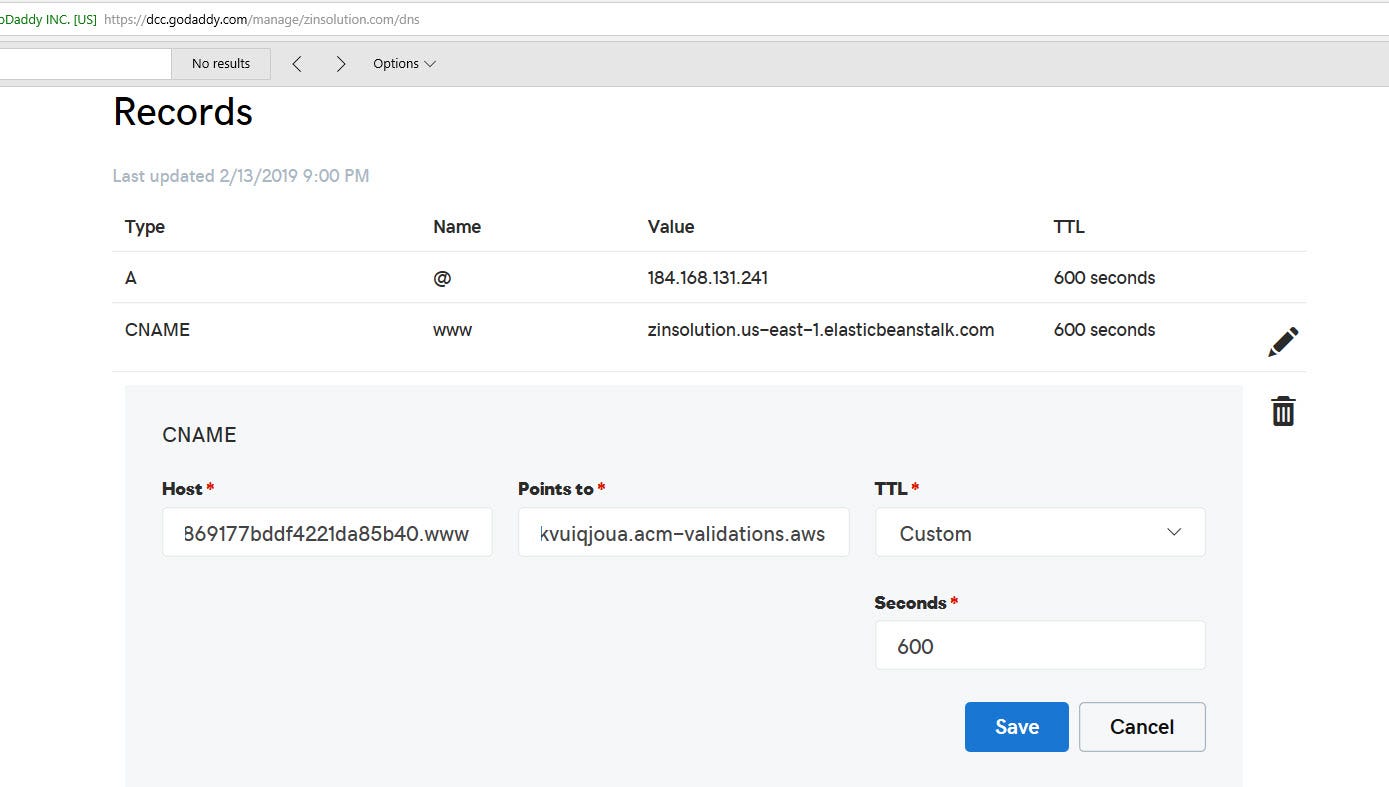
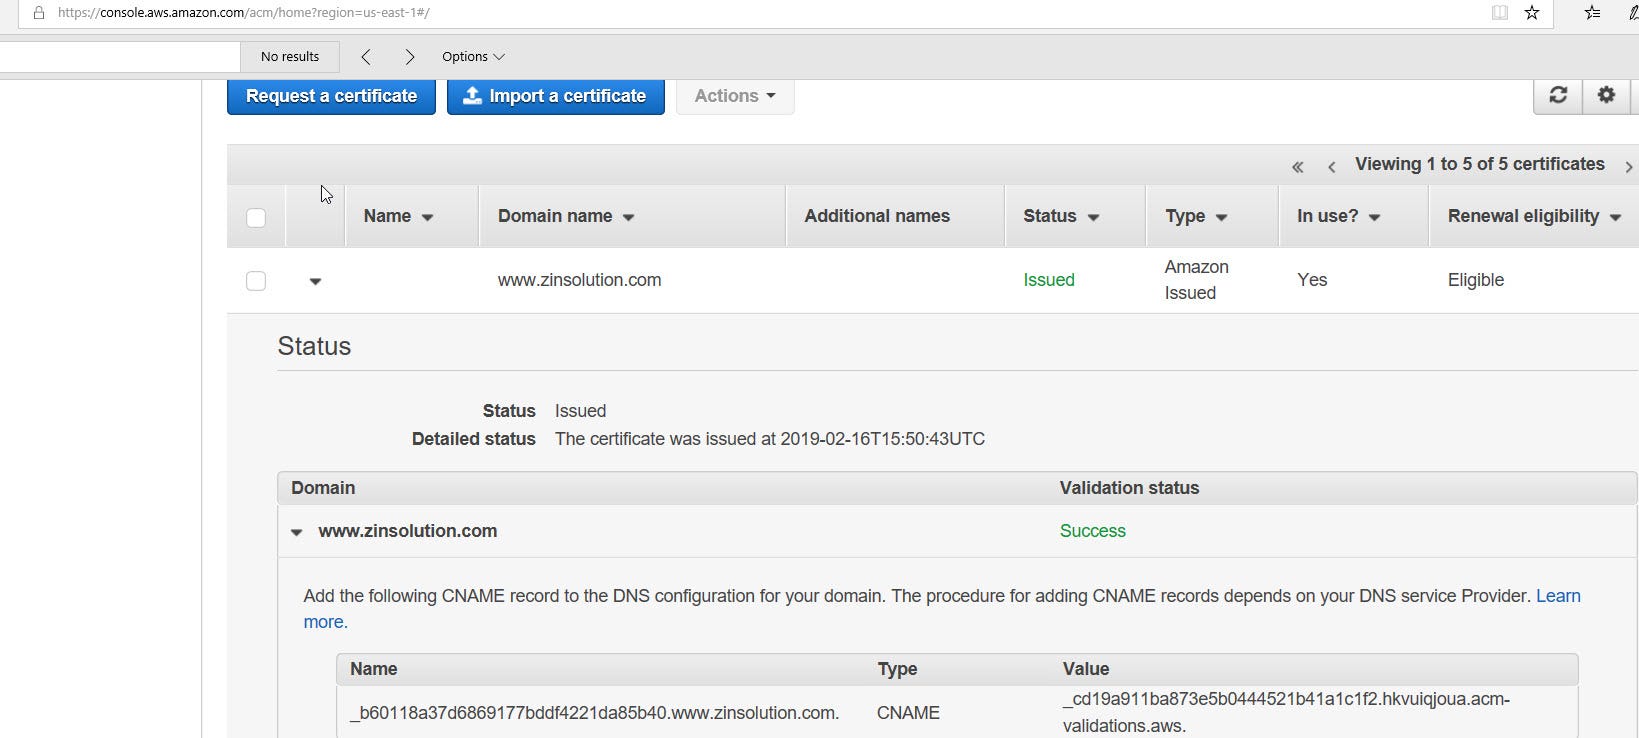
Step 4: Go to GoDaddy.com, and add a CNAME with value

Your CNAME should remove example.com (in my case, remove zinsolution.com from the given name by AWS), and you copy the Value directly from the given value by AWS.

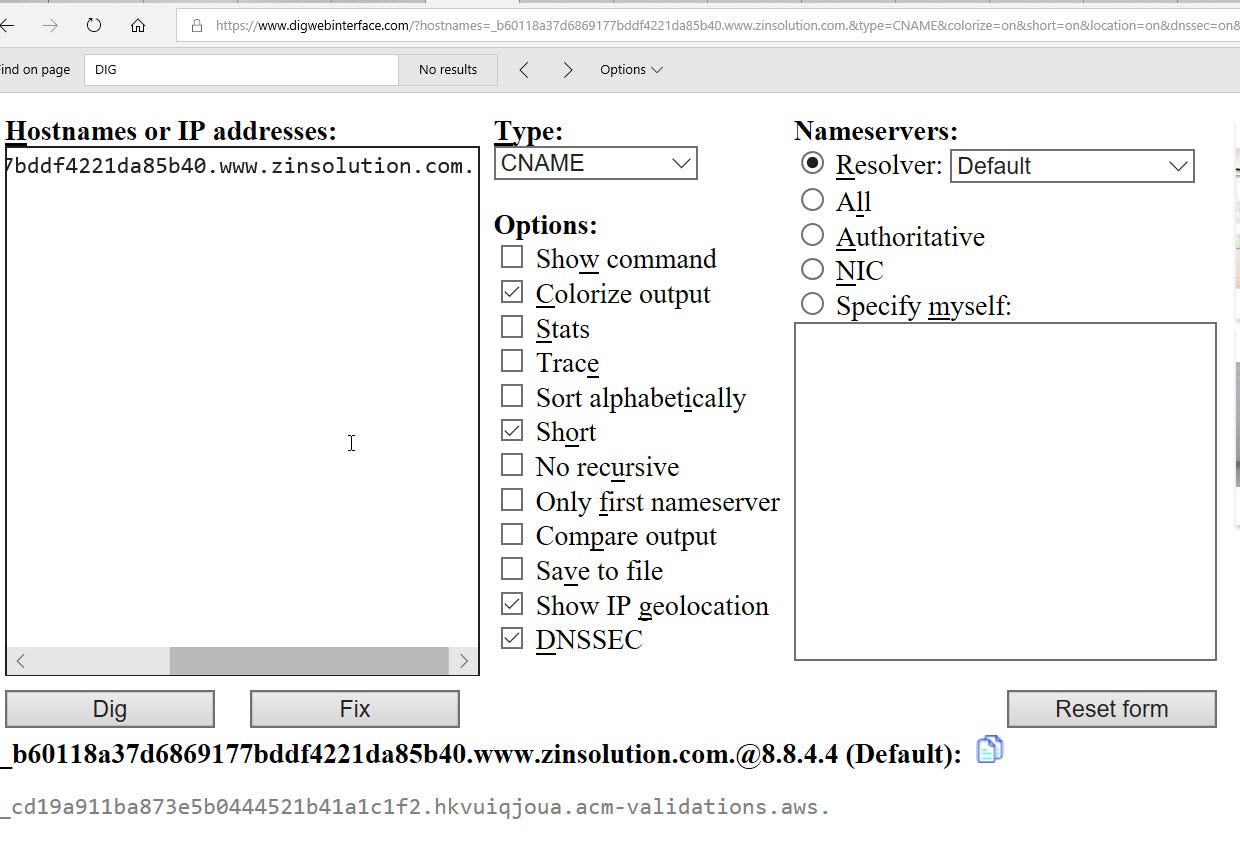
Use digwebinterface.com to check whether the CNAME is properly propogated. Copy the Name from AWS. Check the “Short” option to see the concise result

If the result shows the Value given by AWS, then this CNAME is properly propagated.

Pretty soon (in my case, within two minutes at most), my AWS shows the Validation status as “success”.

AWS shows the Validation Status to be “Success”

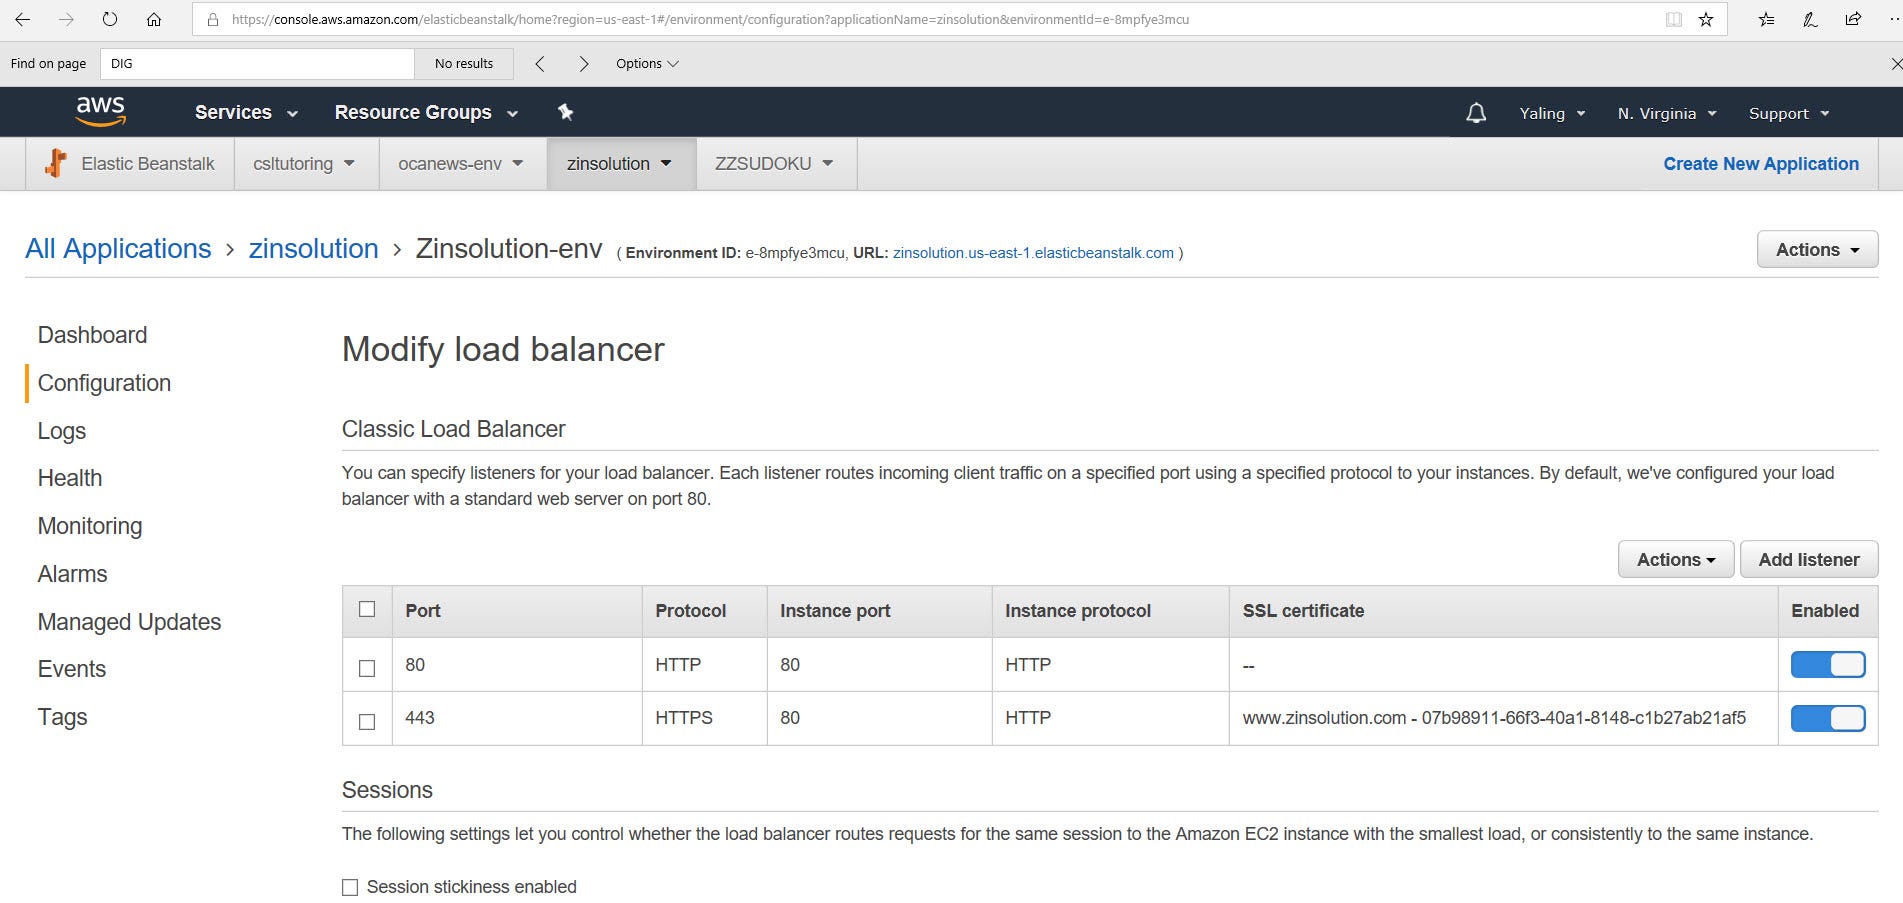
Wait, you have not yet finished yet. You got to add https listener to your website. Go to “Configuration” Tab, and add a listener to the classic load balancer. Add a 443 port with Protocol to the instance port 80 and instance protocol http.

Last step: Add a listener to your load balancer

Hope this helps!


SOURCE

Wednesday, 7 September 2022

Building a case study


Building an effective content marketing strategy that can take your prospects through every stage of the buyer's journey means creating a variety of content.

From relevant, informative blog content to engaging webpages, landing pages, whitepapers, and emails, a comprehensive content marketing strategy should run deep.

One powerful, but often underused, piece of content is the case study.

What Is a Case Study?

A case study is a special type of thought leadership content that tells a story.

Case studies are narratives that feature real world situations or uses of products or services to demonstrate their value. A well written case study will follow a customer as they define a problem, determine a solution, implement it, and reap the benefits.

Case studies offer readers the ability to see a situation from the customer's perspective from beginning to end. 

Why Case Studies Are Important

A marketing case study is one of the most compelling content items in your sales funnel.

It’s the perfect way to guide people into and through the decision phase, when they have the best options laid out on the table and they’re ready to puzzle through that final selection.

Because of this, case studies are uniquely useful as bottom of the funnel content.

case studies are bottom of the funnel content

By the time prospects are ready to read case studies, they have a nuanced grasp of the problem in front of them. They also have a good selection of potential solutions and vendors to choose from.

There may be more than one option that’s suitable for a given situation. In fact, there usually is. But there’s just one option that fits the prospect best. The challenge is figuring out which one.

Since B2B decision makers aren’t mind readers, they need content to bridge the gap between “what they know about your solution” and “what they know about their own business.” The case study does that by showing how a similar customer succeeded.

The more similar the prospect is to the customer in the case study, the more striking it will be.

For that reason, you might want to have a case study for every buyer persona you serve. And naturally, case studies pertain to specific products or services, not your whole brand.

So, you could find yourself with multiple case studies for each buyer type.

However, the effort is worth it, since case studies have a direct impact on sales figures.

bofu-fill-pipeline

How Long Should a Case Study Be?

via GIPHY

Honestly, the more to-the-point you can be in a case study, the better.

Great case studies should pack a lot of meaning into a small space. In the best examples, your reader can grasp the single main idea of each page in a short paragraph or two.

Each detail should build on the next, so they’ll keep moving forward until the end without getting distracted.

Sure, it’s no Dan Brown novel, but if you do it right, it’ll still be a real page-turner.

Note: Some businesses will have a brief case study in PDF form to use as sales collateral then a longer form, more in-depth version of the same case study on their website. In this case, it can be normal to write a lengthier case study.

Where Should I Put My Case Studies?

via GIPHY

Anywhere you want, really!

Ideally, you should upload case studies somewhere on your website so new leads coming to your site have the opportunity to see just how kickass your business is at driving revenue and results for your current customers.

Whether it's an online case study or a PDF version, making your successes available to the public can prove just how valuable your efforts are.

Plus, make sure every member of your sales team has access to your case studies so they can use them as sales collateral to send to prospects and opportunities! A quick PDF attachment to a sales email can be very convincing.

The Best Case Study Format

Like press releases, case studies often fall into a certain specific format.

While it’s not required that you have all of the possible topics in a particular order, picking a consistent format will help you accelerate production down the road. It also makes your content easier to read.

Many B2B businesses use the following approach:

  • Introduction: sets the stage by providing context for the situation.
  • Challenge: discusses the key problem that the customer was facing.
  • Solution: a basic overview of the product or service the customer used.
  • Benefit: recaps the solution’s top advantages – why it was the right choice.
  • Result: the positive business outcome arising from the solution and benefits.

This formula gives you enough flexibility to highlight what’s most important about your enterprise, solution, and the customer you’re showcasing.

At the same time, it ensures that your team will know exactly what information they need to compile to design case studies in the future.

It also serves as an intuitive trail of breadcrumbs for your intended reader.

How to Write a Case Study

writing-case-study

1. Ask Your Client/Customer for Approval.

This first step is crucial because it sets the layout for your entire case study. 

If your client or customer gives the ok to use their name and information, then you can add as much detail as you want to highlight who they are, what you helped them do, and the results it had.

But, if they would rather remain anonymous or want you to leave out any specific details, you’ll have to find a way to keep your information more generalized while still explaining the impact of your efforts.

2. Gather Your Information.

Like any good story, a marketing case study has a beginning, middle, and end. Or, you could think of it as “before, during, and after.”

Before: The Problem

Your case study will always open by presenting a problem suffered by one of your clients.

This part of the study establishes what’s at stake and introduces the characters – your company, the client company, and whichever individual decision makers speak for each side.

During: The Solution

Once you define the problem, the next step presents your offering, which serves as the answer to the dilemma.

Your product or service is, in a very real sense, the hero of the story. It catalyzes the change, which you describe in terms of your features, advantages, and other differentiators.

After: The Result

In the final step, you discuss the “happy ending” brought about by your solution.

Returning to the “stakes” you established at the very start, you expand on how much better things are thanks to your intervention. You want prospects to imagine themselves enjoying that level of success.

3. Get a Quote.

via GIPHY

Of course, a study about two corporations isn’t very interesting on its own. The best case studies personify the protagonists, including the vendor and the client company, by having plenty of quotes peppered throughout the entire story.

Naturally, the business problem to be solved is the big, bad villain here, so you want the client (and preferably, your own team as well) to weigh in on that problem: How complex it is, what solving it would mean, and what not solving it would cost.

Then, as the situation turns around, testimonials become essential.

Naturally, the longest, most emphatic testimonial should come from the top decision maker. But you should aim to include a glowing quote from many different stakeholders – representing the full cast of “characters” who might be making consensus buying decisions around your solution.

Note: Don’t use a testimonial or quote if your case study is anonymous. 

4. Find Some Compelling Graphics.

A case study isn’t a whitepaper: You shouldn’t be trudging through page after page of text.

In fact, some of the most powerful case studies establish their own vivid, graphics-heavy style – looking a lot more like an infographic, or even a magazine, than traditional B2B marketing collateral.

Color blocks, strong contrasts, skyscraper photography, and hero shots are all on the table when it comes to case studies. The more data you have to convey, the more creative you should be in presenting it so it can be understood at a glance. 


SOURCE