How to Uninstall MySQL in Linux, Windows, and macOS
Introduction
MySQL is an open-source relational database management system (RDBMS) available on Linux,
Solaris, macOS, Windows, and FreeBSD. Sometimes, uninstalling the
software and a fresh installation is the best solution for resolving
bugs, or for fixing compatibility purposes.
In this tutorial, you will learn how to uninstall MySQL on Linux, Windows, and macOS.
Prerequisites
MySQL installed on Linux, Windows, or macOS system.
A user account with administrator privileges.
How to Uninstall MySQL {on Linux, Windows, and macOS}?
Depending on the operating system, the process of uninstalling MySQL
is different. The sections below show how to uninstall MySQL on Linux,
Windows, and macOS, and delete all the associated data.
Uninstall MySQL on Linux
Uninstall MySQL from Linux using the distribution's default package manager, and the rm command
to delete the leftover data. In this tutorial, we will work on Ubuntu,
but the instructions for other distros are provided as well.
Follow the steps below:
1. Open a terminal window (Ctrl + Alt + T) and stop the MySQL service and all the related processes. Run the following commands:
sudo service mysql stop
sudo killall -KILL mysql mysqld_safe mysqld
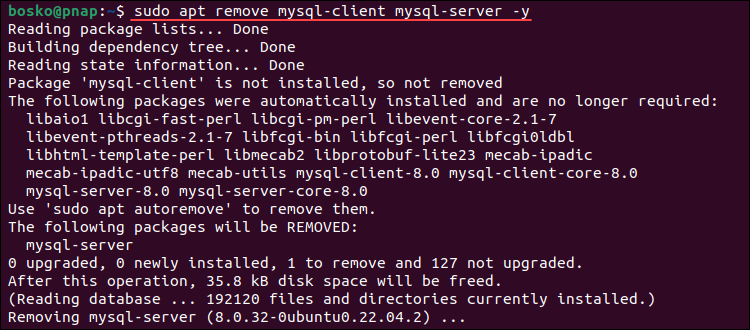
3. Depending on the Linux distribution and package manager you are using, run one of the following commands to uninstall MySQL:
CentOS, Rocky Linux, and RedHat:
sudo yum remove mysql-client mysql-server -y
Ubuntu and Debian:
sudo apt remove mysql-client mysql-server -y
Run autoremove and autoclean to remove unnecessary packages and clean up the package cache:
sudo apt autoremove -y
sudo apt autoclean -y
Fedora:
sudo dnf remove mysql-client mysql-server -y
4. After uninstalling MySQL, the next step is to remove residual
data. If you still need the data, make a backup before removing it, or
rename the directory.
Rename the /var/lib/mysql directory to keep the data if you ever need it again in the future:
5. Remove the mysql user and delete the mysql group, if it exists. Run:
sudo deluser --remove-home mysql
sudo delgroup mysql
After completing the steps above, you have successfully uninstalled MySQL from your Linux system.
Uninstall MySQL on Windows
Follow the steps below to uninstall MySQL from a Windows operating system:
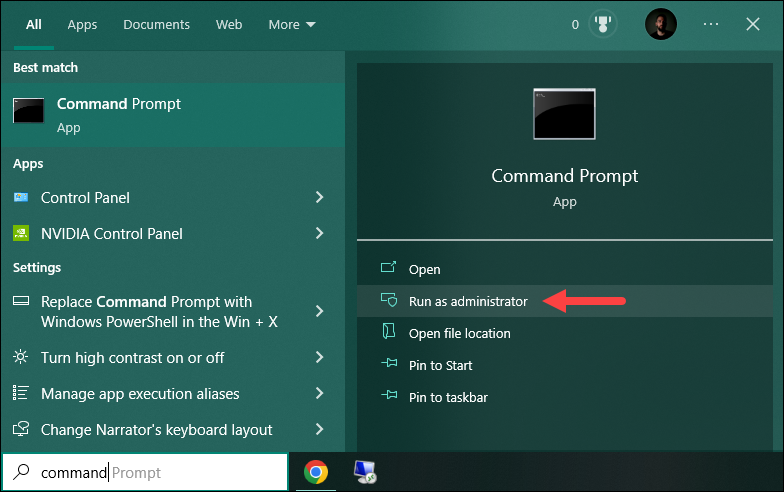
1. Press the Windows key and search for command prompt. Run the app as administrator.
2. Stop the running MySQL server before uninstalling it. The easiest way to stop it is by using the mysqladmin command which was installed automatically during the MySQL installation. In the command prompt, navigate to the bin folder of the MySQL installation directory. For example, the default path is:
cd C:\Program Files\MySQL\MySQL Server 8.0\bin
After navigating into that path, stop the running server by executing:
mysqladmin -u root -p shutdown
The command asks you for the password and shuts down the running server after confirming it.
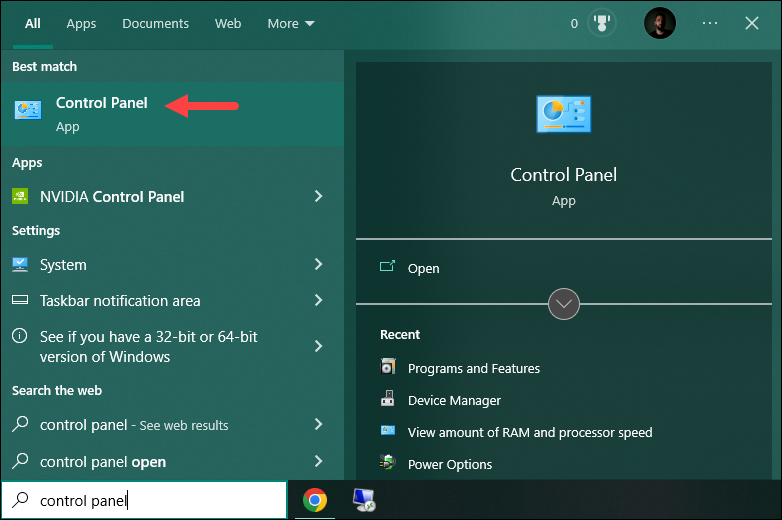
3. Next, open the Control Panel. Press the Windows key and search for control panel. Press Enter to open the app.
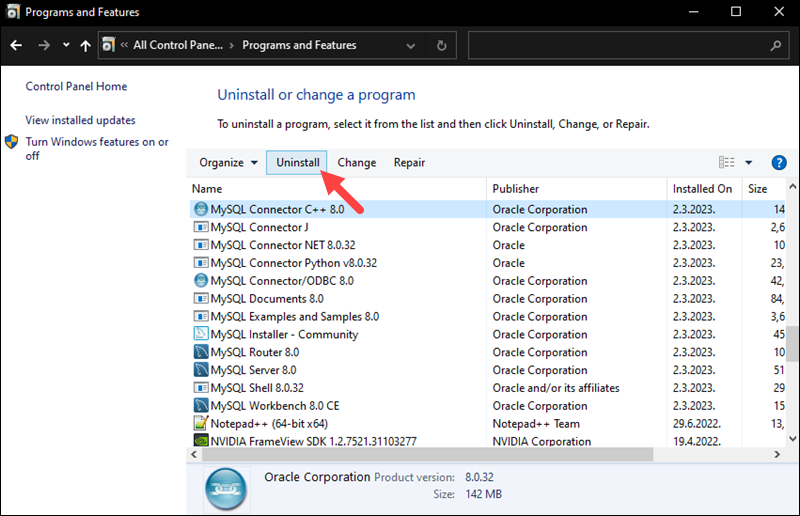
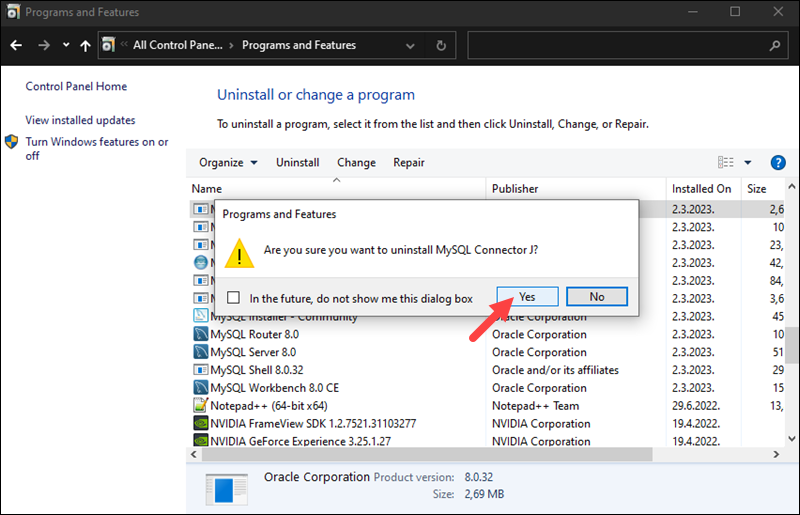
4. Open Programs and Features. In the list of installed programs, locate MySQL and all related programs. Click each one individually and select the Uninstall option.
Click Yes for each prompt and wait for the wizard to finish.
5. After uninstalling all MySQL components, delete the remaining data
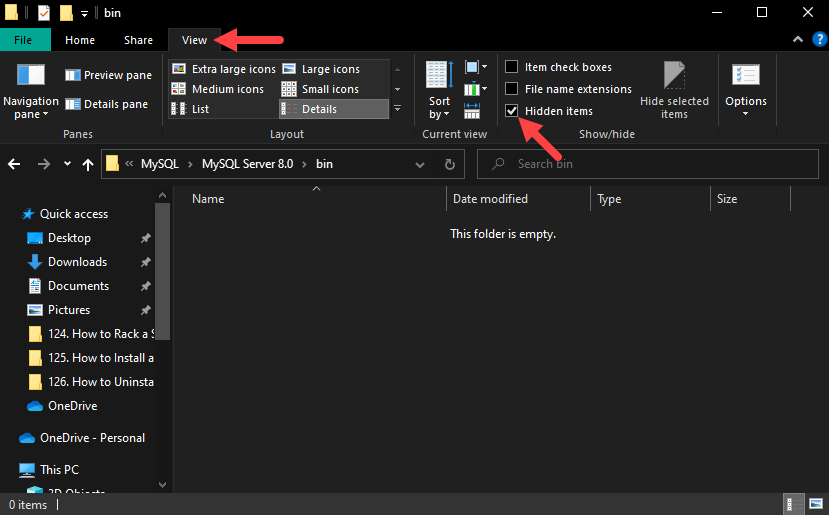
directories. Since one of the directories is hidden, make sure to
enable the Hidden items option in folder settings.
To do so, open any folder using File Explorer, click the View tab, and check the Hidden items option:
Important: If there is critical data that you may still need, make sure to backup MySQL databases before deleting them.
The directories that you need to remove are:
C:\Program Files\MySQL
C:\Program Files (x86)\MySQL
C:\ProgramData\MySQL
C:\Users\[YourUsername]\AppData\Roaming\MySQL
6. After you uninstall all the components and delete the remaining
directories, restart the computer for the changes to take effect.
Uninstall MySQL on macOS
Follow the steps below to uninstall MySQL on a macOS system:
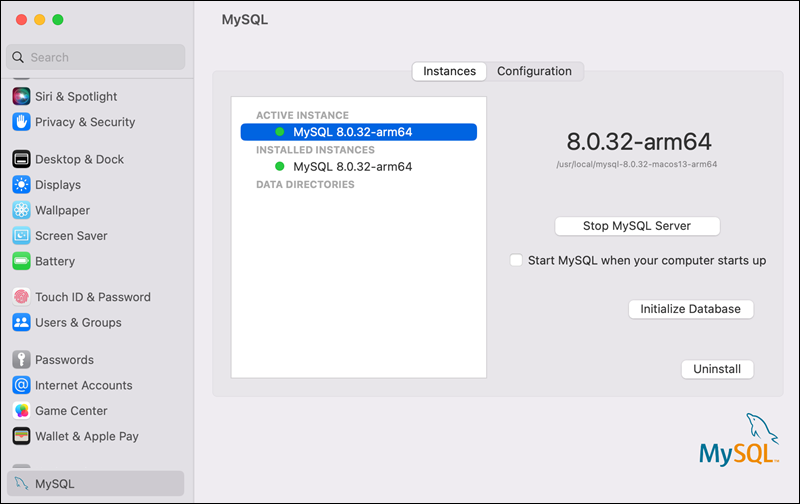
1. Go to System Settings and click MySQL. Click the Uninstall button to remove MySQL from the system.
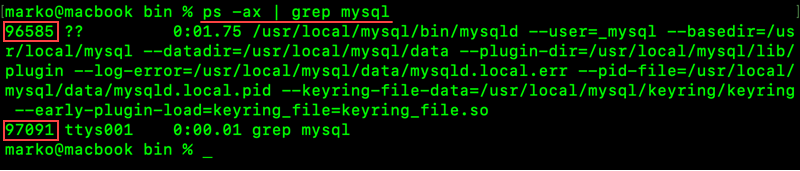
2. Click the Launchpad icon in the Dock and type Terminal in the search field. Click Terminal to open a new terminal window.
3. Deleting MySQL removes all its databases. If you have critical data stored in MySQL, make sure to back up your files first.
Use mysqldump to back up your databases to a text file. Run the following command:
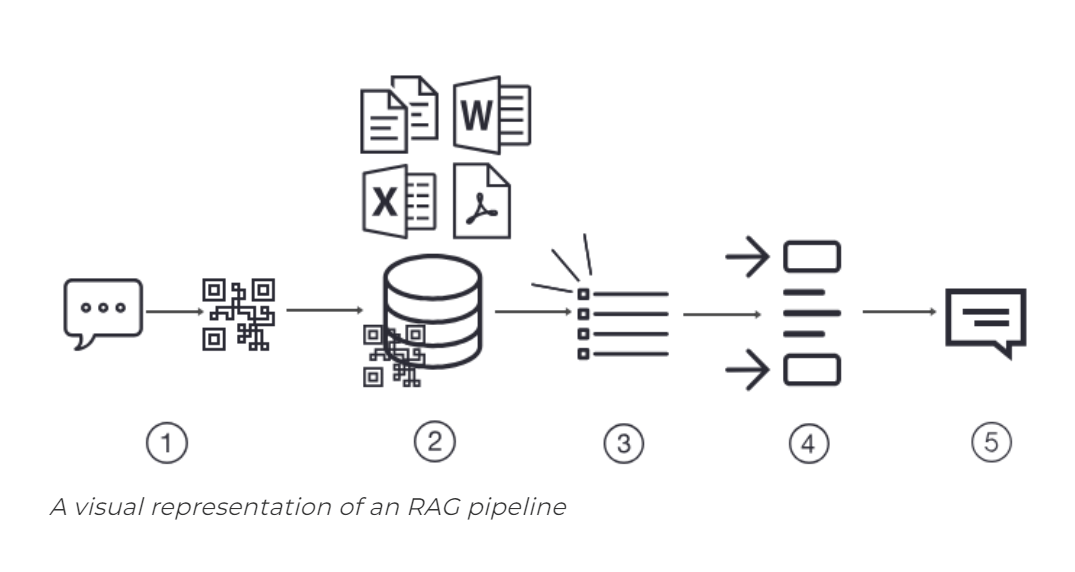
RAG is a framework that retrieves data from external sources and
incorporates it into the LLM’s decision-making process. This allows the
model to access real-time information and address knowledge gaps. The
retrieved data is synthesized with the LLM’s internal training data to
generate a response.
The challenge of bringing RAG based LLM applications to production
Prototyping a RAG application is easy, but making it performant, robust, and scalable to a large knowledge corpus is hard.
There are three important steps in a RAG framework i.e. Data
Ingestion, Retrieval, and Generation. In this blog, we will be
dissecting the challenges encountered based on each stage of the RAG
pipeline specifically from the perspective of production, and then
propose relevant solutions. Let’s dig in!
Stage 1: Data Ingestion Pipeline
The ingestion stage is a preparation step for building a RAG
pipeline, similar to the data cleaning and preprocessing steps in a
machine learning pipeline. Usually, the ingestion stage consists of the
following steps:
Collect data
Chunk data
Generate vector embeddings of chunks
Store vector embeddings and chunks in a vector database
The efficiency and effectiveness of the data ingestion phase significantly influence the overall performance of the system.
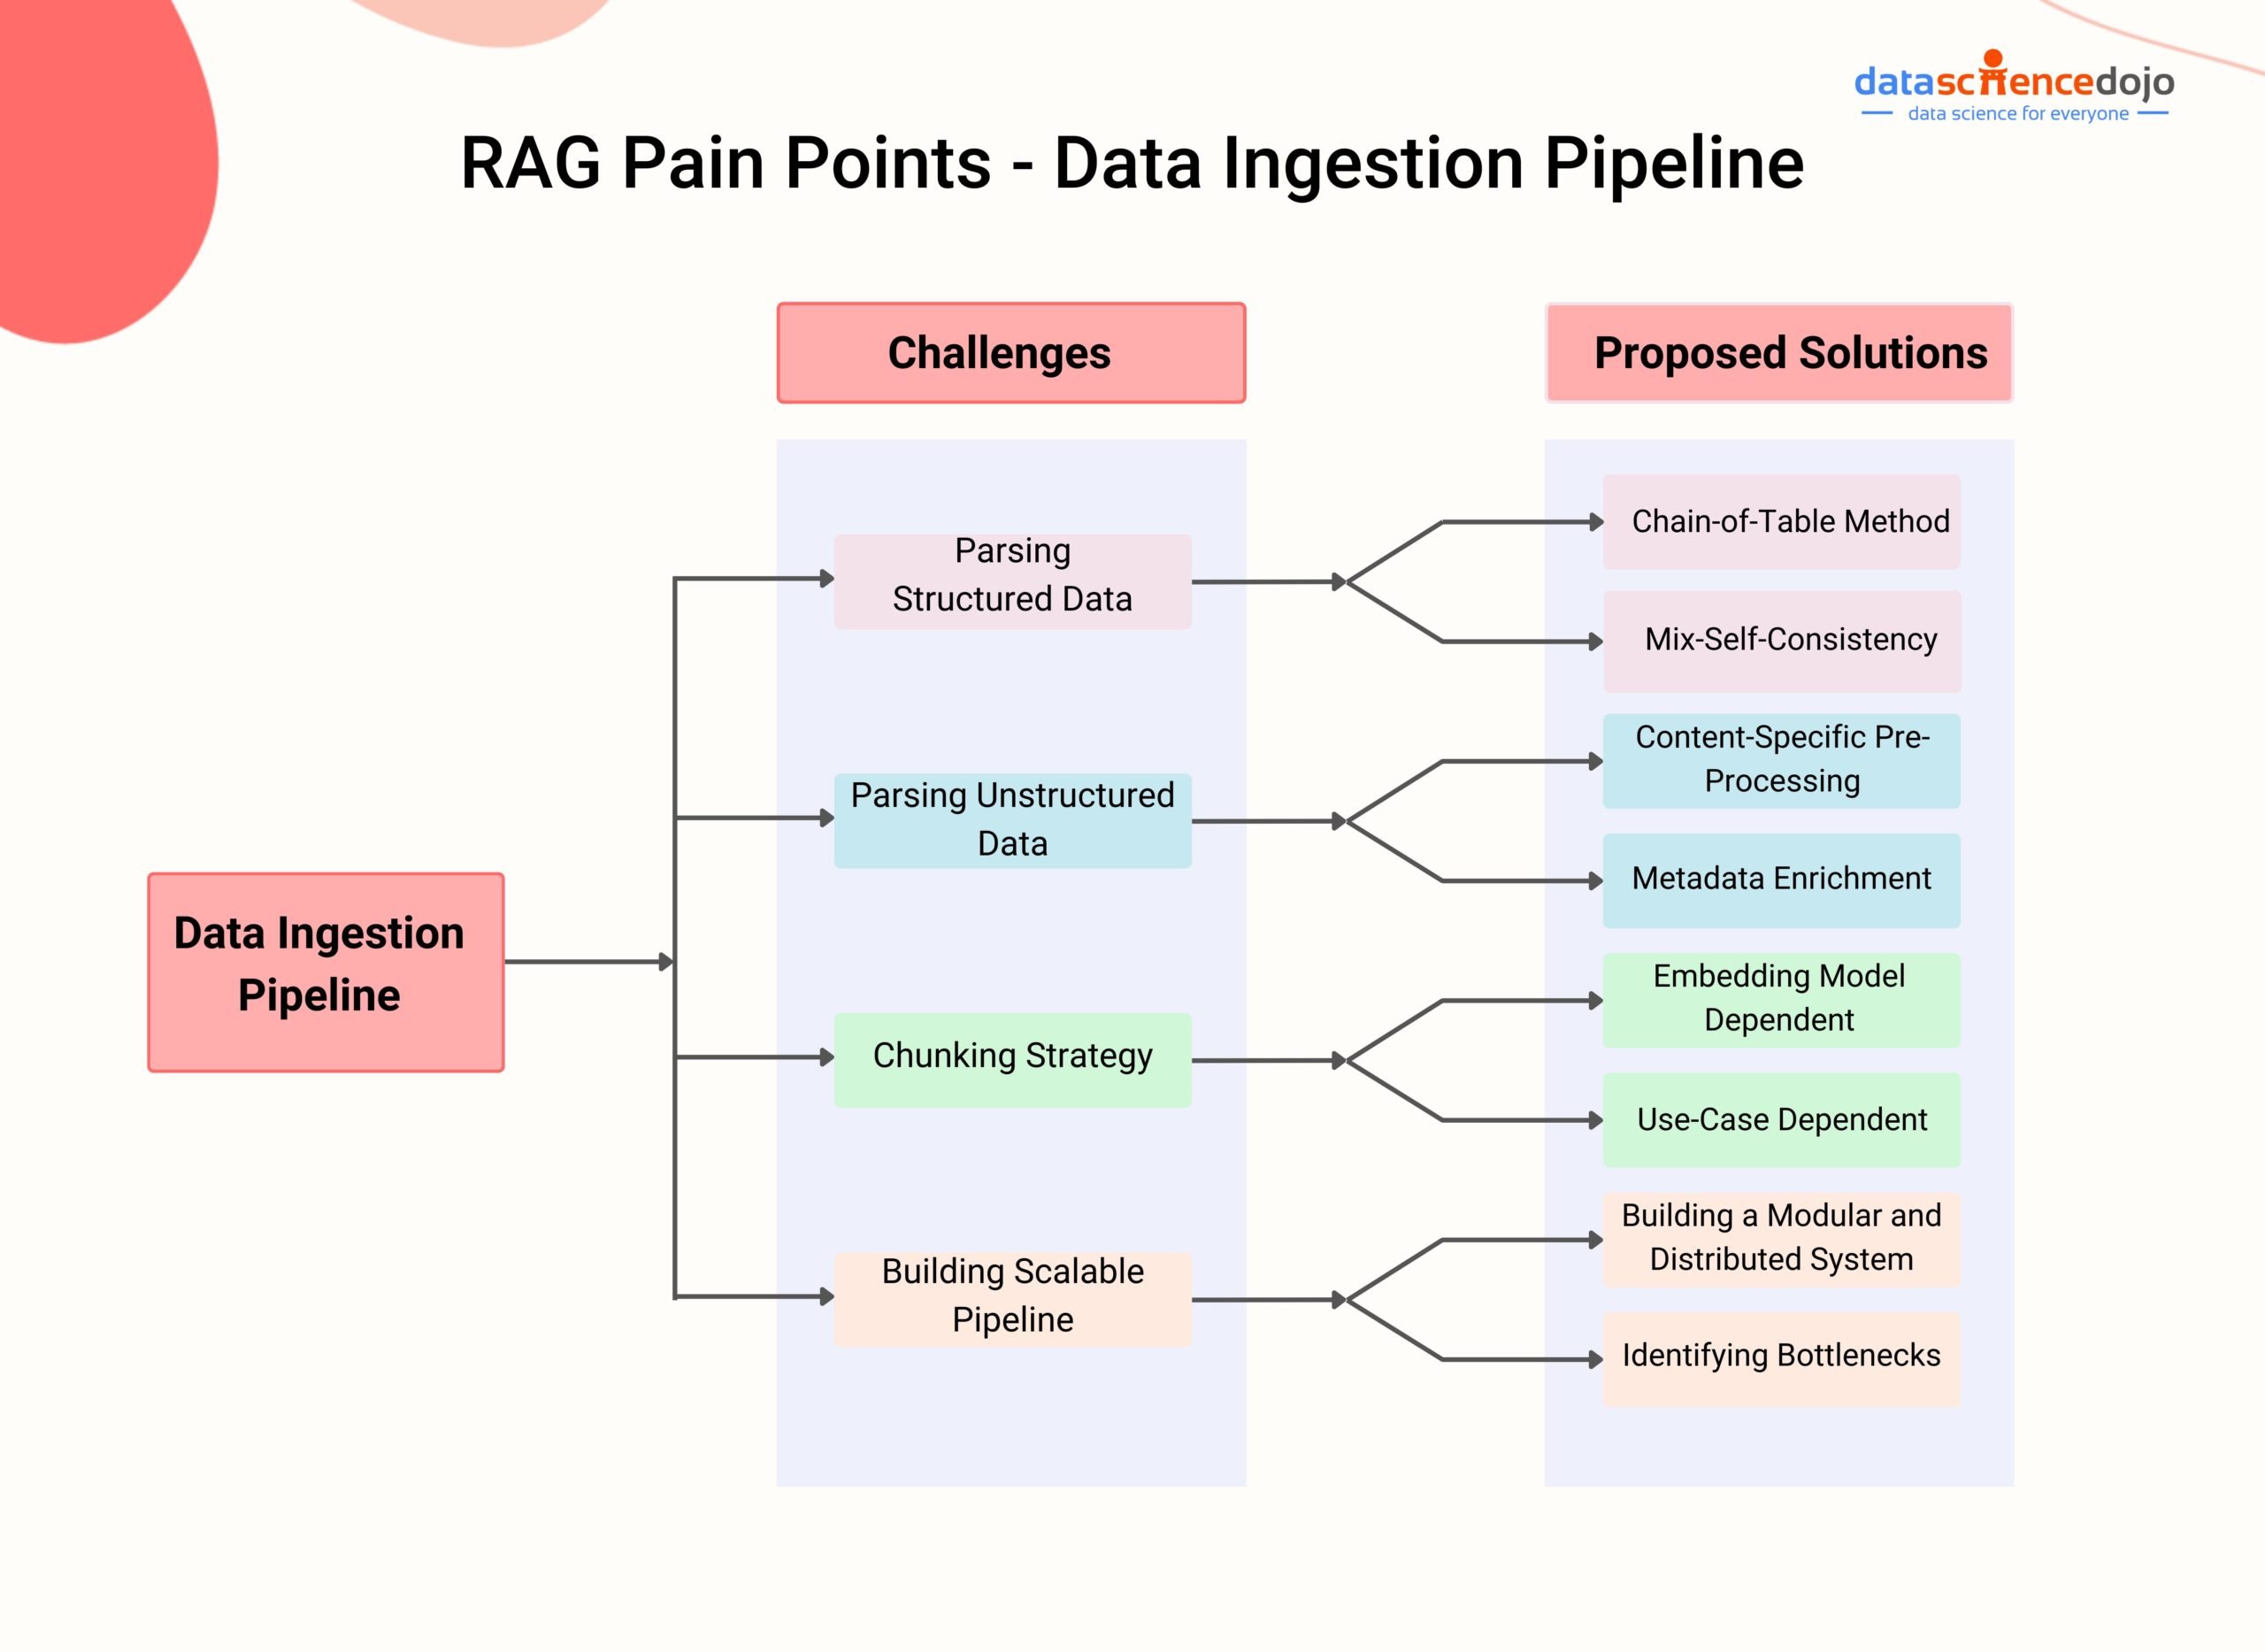
Common Pain Points in Data Ingestion Pipeline
Challenge 1: Data Extraction:
Parsing Complex Data Structures: Extracting data
from various types of documents, such as PDFs with embedded tables or
images, can be challenging. These complex structures require specialized
techniques to extract the relevant information accurately.
Handling Unstructured Data: Dealing with unstructured data, such as free-flowing text or natural language, can be difficult.
Proposed solutions
Better parsing techniques:Enhancing parsing
techniques is key to solving the data extraction challenge in RAG-based
LLM applications, enabling more accurate and efficient information
extraction from complex data structures like PDFs with embedded tables
or images. Llama Parse is a great tool by LlamaIndex that significantly
improves data extraction for RAG systems by adeptly parsing complex
documents into structured markdown.
Chain-of-the-table approach:The chain-of-table approach, as detailed by Wang et al., https://arxiv.org/abs/2401.04398
merges table analysis with step-by-step information extraction
strategies. This technique aids in dissecting complex tables to pinpoint
and extract specific data segments, enhancing tabular
question-answering capabilities in RAG systems.
Mix-Self-Consistency:
Large Language Models (LLMs) can analyze tabular data through two primary methods:
Direct prompting for textual reasoning.
Program synthesis for symbolic reasoning, utilizing languages like Python or SQL.
According to the study “Rethinking Tabular Data Understanding with Large Language Models”
by Liu and colleagues, LlamaIndex introduced the
MixSelfConsistencyQueryEngine. This engine combines outcomes from both
textual and symbolic analysis using a self-consistency approach, such as
majority voting, to attain state-of-the-art (SoTA) results. Below is an
example code snippet. For further information, visit LlamaIndex’s
complete notebook.
Challenge 2: Picking the Right Chunk Size and Chunking Strategy:
Determining the Right Chunk Size: Finding the
optimal chunk size for dividing documents into manageable parts is a
challenge. Larger chunks may contain more relevant information but can
reduce retrieval efficiency and increase processing time. Finding the
optimal balance is crucial.
Defining Chunking Strategy: Deciding how to
partition the data into chunks requires careful consideration. Depending
on the use case, different strategies may be necessary, such as
sentence-based or paragraph-based chunking.
Proposed Solutions:
Fine Tuning Embedding Models:
Fine-tuning embedding models plays a pivotal role in solving the
chunking challenge in RAG pipelines, enhancing both the quality and
relevance of contexts retrieved during ingestion.
By incorporating domain-specific knowledge and training on pertinent
data, these models excel in preserving context, ensuring chunks maintain
their original meaning.
This fine-tuning process aids in identifying the optimal chunk size,
striking a balance between comprehensive context capture and efficiency,
thus minimizing noise.
Additionally, it significantly curtails hallucinations—erroneous or
irrelevant information generation—by honing the model’s ability to
accurately identify and extract relevant chunks.
According to experiments conducted by Llama Index, fine-tuning your
embedding model can lead to a 5–10% performance increase in retrieval
evaluation metrics.
Use Case-Dependent Chunking
Use case-dependent chunking tailors the segmentation process to the
specific needs and characteristics of the application. Different use
cases may require different granularity in data segmentation:
Detailed Analysis: Some applications might benefit from very fine-grained chunks to extract detailed information from the data.
Broad Overview: Others might need larger chunks that provide a broader context, important for understanding general themes or summaries.
Embedding Model-Dependent Chunking
Embedding model-dependent chunking aligns the segmentation strategy
with the characteristics of the underlying embedding model used in the
RAG framework. Embedding models convert text into numerical
representations, and their capacity to capture semantic information
varies:
Model Capacity: Some models are better at
understanding broader contexts, while others excel at capturing specific
details. Chunk sizes can be adjusted to match what the model handles
best.
Semantic Sensitivity: If the embedding model is
highly sensitive to semantic nuances, smaller chunks may be beneficial
to capture detailed semantics. Conversely, for models that excel at
capturing broader contexts, larger chunks might be more appropriate.
Challenge 3: Creating a Robust and Scalable Pipeline:
One of the critical challenges in implementing RAG is creating a
robust and scalable pipeline that can effectively handle a large volume
of data and continuously index and store it in a vector database. This
challenge is of utmost importance as it directly impacts the system’s
ability to accommodate user demands and provide accurate, up-to-date
information.
Proposed Solutions
Building a modular and distributed system:
To build a scalable pipeline for managing billions of text
embeddings, a modular and distributed system is crucial. This system
separates the pipeline into scalable units for targeted optimization and
employs distributed processing for parallel operation efficiency.
Horizontal scaling allows the system to expand with demand, supported by
an optimized data ingestion process and a capable vector database for
large-scale data storage and indexing.
This approach ensures scalability and technical robustness in handling vast amounts of text embeddings.
Stage 2: Retrieval
Retrieval in RAG involves the process of accessing and extracting
information from authoritative external knowledge sources, such as
databases, documents, and knowledge graphs. If the information is
retrieved correctly in the right format, then the answers generated will
be correct as well. However, you know the catch. Effective retrieval is
a pain, and you can encounter several issues during this important
stage.
Common Pain Points in Data Ingestion Pipeline
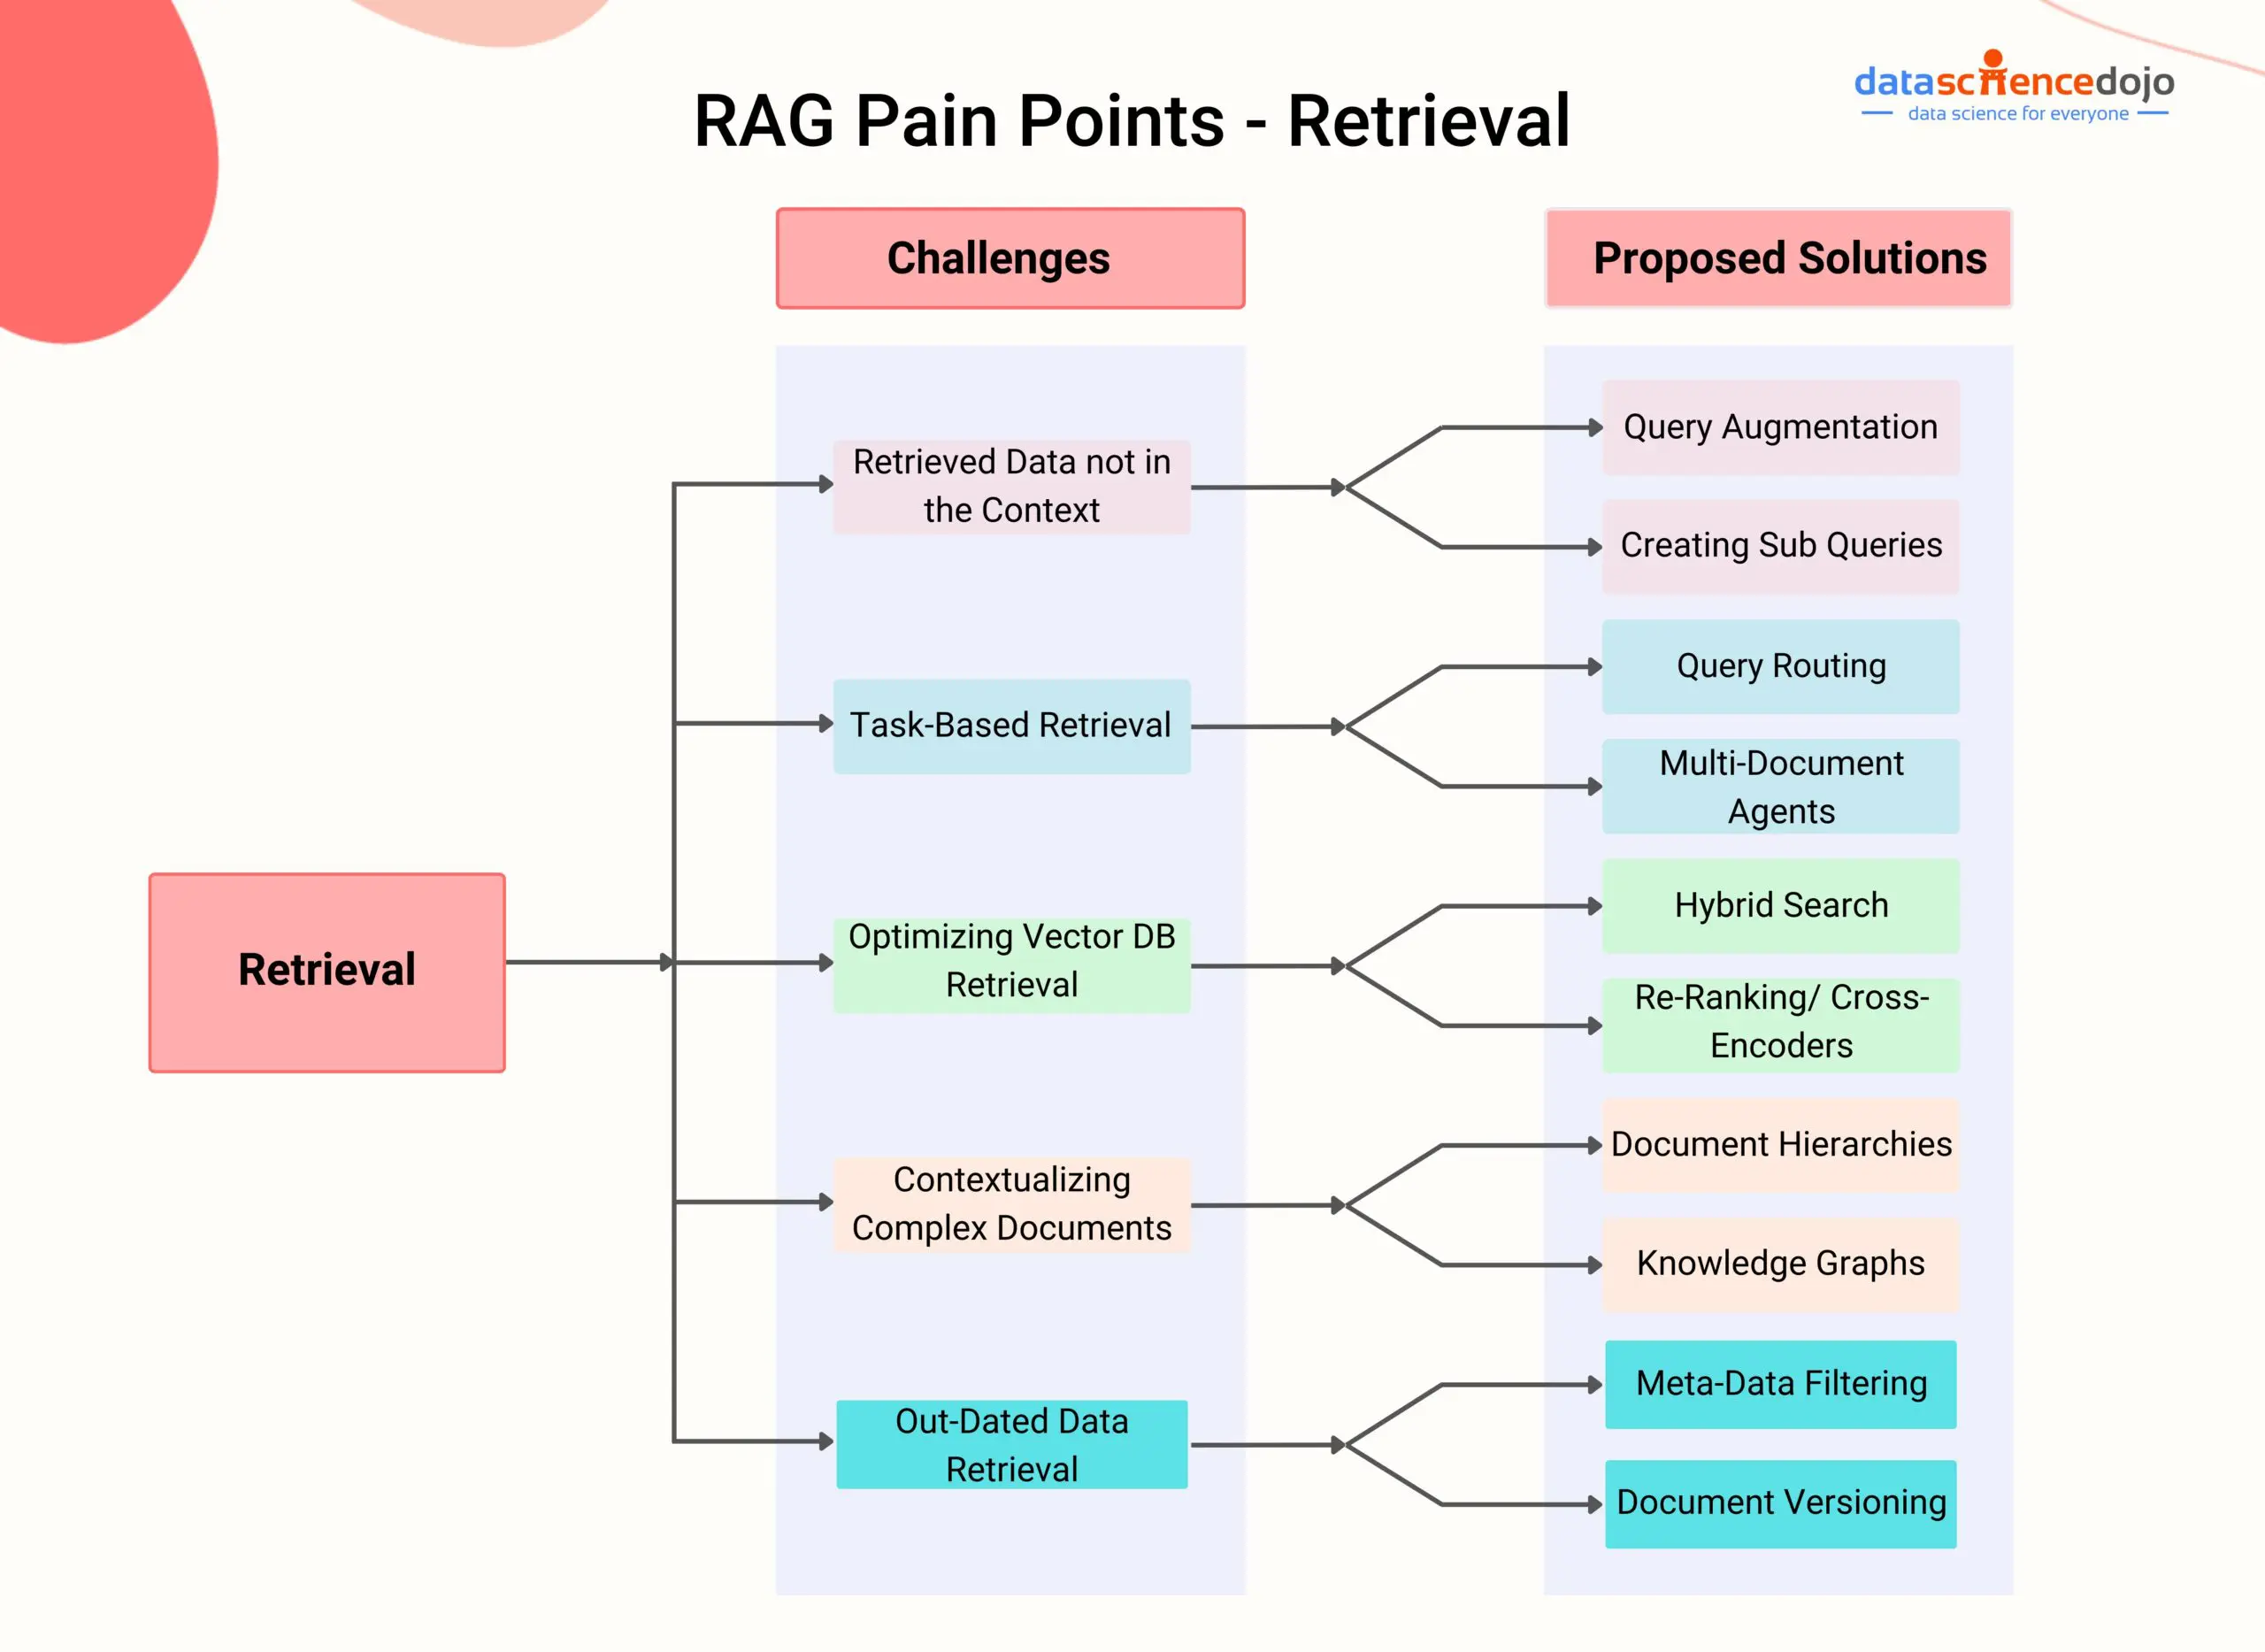
Challenge 1: Retrieved Data Not in Context
The RAG system can retrieve data that doesn’t qualify to bring
relevant context to generate an accurate response. There can be several
reasons for this.
Missed Top Rank Documents: The system sometimes
doesn’t include essential documents that contain the answer in the top
results returned by the system’s retrieval component.
Incorrect Specificity: Responses may not provide precise information or adequately address the specific context of the user’s query
Losing Relevant Context During Reranking: This
occurs when documents containing the answer are retrieved from the
database but fail to make it into the context for generating an answer.
Proposed Solutions:
Query Augmentation: Query augmentation enables RAG
to retrieve information that is in context by enhancing the user queries
with additional contextual details or modifying them to maximize
relevancy. This involves improving the phrasing, adding company-specific
context, and generating sub-questions that help contextualize and
generate accurate responses
Rephrasing
Hypothetical document embeddings
Sub-queries
Tweak retrieval strategies:Llama Index
offers a range of retrieval strategies, from basic to advanced, to
ensure accurate retrieval in RAG pipelines. By exploring these
strategies, developers can improve the system’s ability to incorporate
relevant information into the context for generating accurate responses.
Small-to-big sentence window retrieval,
recursive retrieval
semantic similarity scoring.
Hyperparameter tuning for chunk size and similarity_top_k: This solution involves adjusting the parameters
of the retrieval process in RAG models. More specifically, we can tune
the parameters related to chunk size and similarity_top_k.
The chunk_size parameter determines the size of the text chunks used for
retrieval, while similarity_top_k controls the number of similar chunks
retrieved.
By experimenting with different values for these parameters, developers
can find the optimal balance between computational efficiency and the
quality of retrieved information.
Reranking: Reranking retrieval results before they
are sent to the language model has proven to improve RAG systems’
performance significantly.
By retrieving more documents and using techniques like CohereRerank,
which leverages a reranker to improve the ranking order of the
retrieved documents, developers can ensure that the most relevant and
accurate documents are considered for generating responses. This
reranking process can be implemented by incorporating the reranker as a
postprocessor in the RAG pipeline.
Challenge 2: Task-Based Retrieval
If you deploy a RAG-based service, you should expect anything from
the users and you should not just limit your RAG in production
applications to only be highly performant for question-answering tasks.
Users can ask a wide variety of questions. Naive RAG stacks can
address queries about specific facts, such as details on a company’s
Diversity & Inclusion efforts in 2023 or the narrator’s activities
at Google.
However, questions may also seek summaries (“Provide a high-level
overview of this document”) or comparisons (“Compare X and Y”).
Different retrieval methods may be necessary for these diverse use cases.
Proposed Solutions
Query Routing: This technique involves retaining
the initial user query while identifying the appropriate subset of tools
or sources that pertain to the query. By routing the query to the
suitable options, routing ensures that the retrieval process is
fine-tuned to the specific tools or sources that are most likely to
yield accurate and relevant information.
Challenge 3: Optimize the Vector DB to look for correct documents
The problem in the retrieval stage of RAG is about ensuring the
lookup to a vector database effectively retrieves accurate documents
that are relevant to the user’s query.
Hereby, we must address the challenge of semantic matching by seeking
documents and information that are not just keyword matches, but also
conceptually aligned with the meaning embedded within the user query.
Proposed Solutions:
Hybrid Search:
Hybrid search tackles the challenge of optimal document lookup in
vector databases. It combines semantic and keyword searches, ensuring
retrieval of the most relevant documents.
Semantic Search: Goes beyond keywords, considering document meaning and context for accurate results.
Keyword Search: Excellent for queries with specific terms like product codes, jargon, or dates.
Hybrid search strikes a balance, offering a comprehensive and
optimized retrieval process. Developers can further refine results by
adjusting weighting between semantic and keyword search. This empowers
vector databases to deliver highly relevant documents, streamlining
document lookup.
Challenge 4: Chunking Large Datasets
When we put large amounts of data into a RAG-based product we
eventually have to parse and then chunk the data because when we
retrieve info – we can’t really retrieve a whole pdf – but different
chunks of it.
However, this can present several pain points.
Loss of Context: One primary issue is the potential
loss of context when breaking down large documents into smaller chunks.
When documents are divided into smaller pieces, the nuances and
connections between different sections of the document may be lost,
leading to incomplete representations of the content.
Optimal Chunk Size: Determining the optimal chunk
size becomes essential to balance capturing essential information
without sacrificing speed. While larger chunks could capture more
context, they introduce more noise and require additional processing
time and computational costs. On the other hand, smaller chunks have
less noise but may not fully capture the necessary context.
Document Hierarchies: This is a pre-processing step
where you can organize data in a structured manner to improve
information retrieval by locating the most relevant chunks of text.
Knowledge Graphs: Representing related data through
graphs, enabling easy and quick retrieval of related information and
reducing hallucinations in RAG systems.
Sub-document Summary: Breaking down documents into
smaller chunks and injecting summaries to improve RAG retrieval
performance by providing global context awareness.
Parent Document Retrieval: Retrieving summaries and
parent documents in a recursive manner to improve information retrieval
and response generation in RAG systems.
RAPTOR: RAPTOR recursively embeds, clusters, and
summarizes text chunks to construct a tree structure with varying
summarization levels. Read more
Recursive Retrieval: Retrieval of summaries and
parent documents in multiple iterations to improve performance and
provide context-specific information in RAG systems.
Challenge 5: Retrieving Outdated Content from the Database
Imagine a RAG app working perfectly for 100 documents. But what if a
document gets updated? The app might still use the old info (stored as
an “embedding”) and give you answers based on that, even though it’s
wrong.
Proposed Solutions:
Meta-Data Filtering: It’s like a label that tells
the app if a document is new or changed. This way, the app can always
use the latest and greatest information.
Stage 3: Generation
While the quality of the response generated largely depends on how
good the retrieval of information was, there still are tons of aspects
you must consider. After all, the quality of the response and the time
it takes to generate the response directly impacts the satisfaction of
your user.
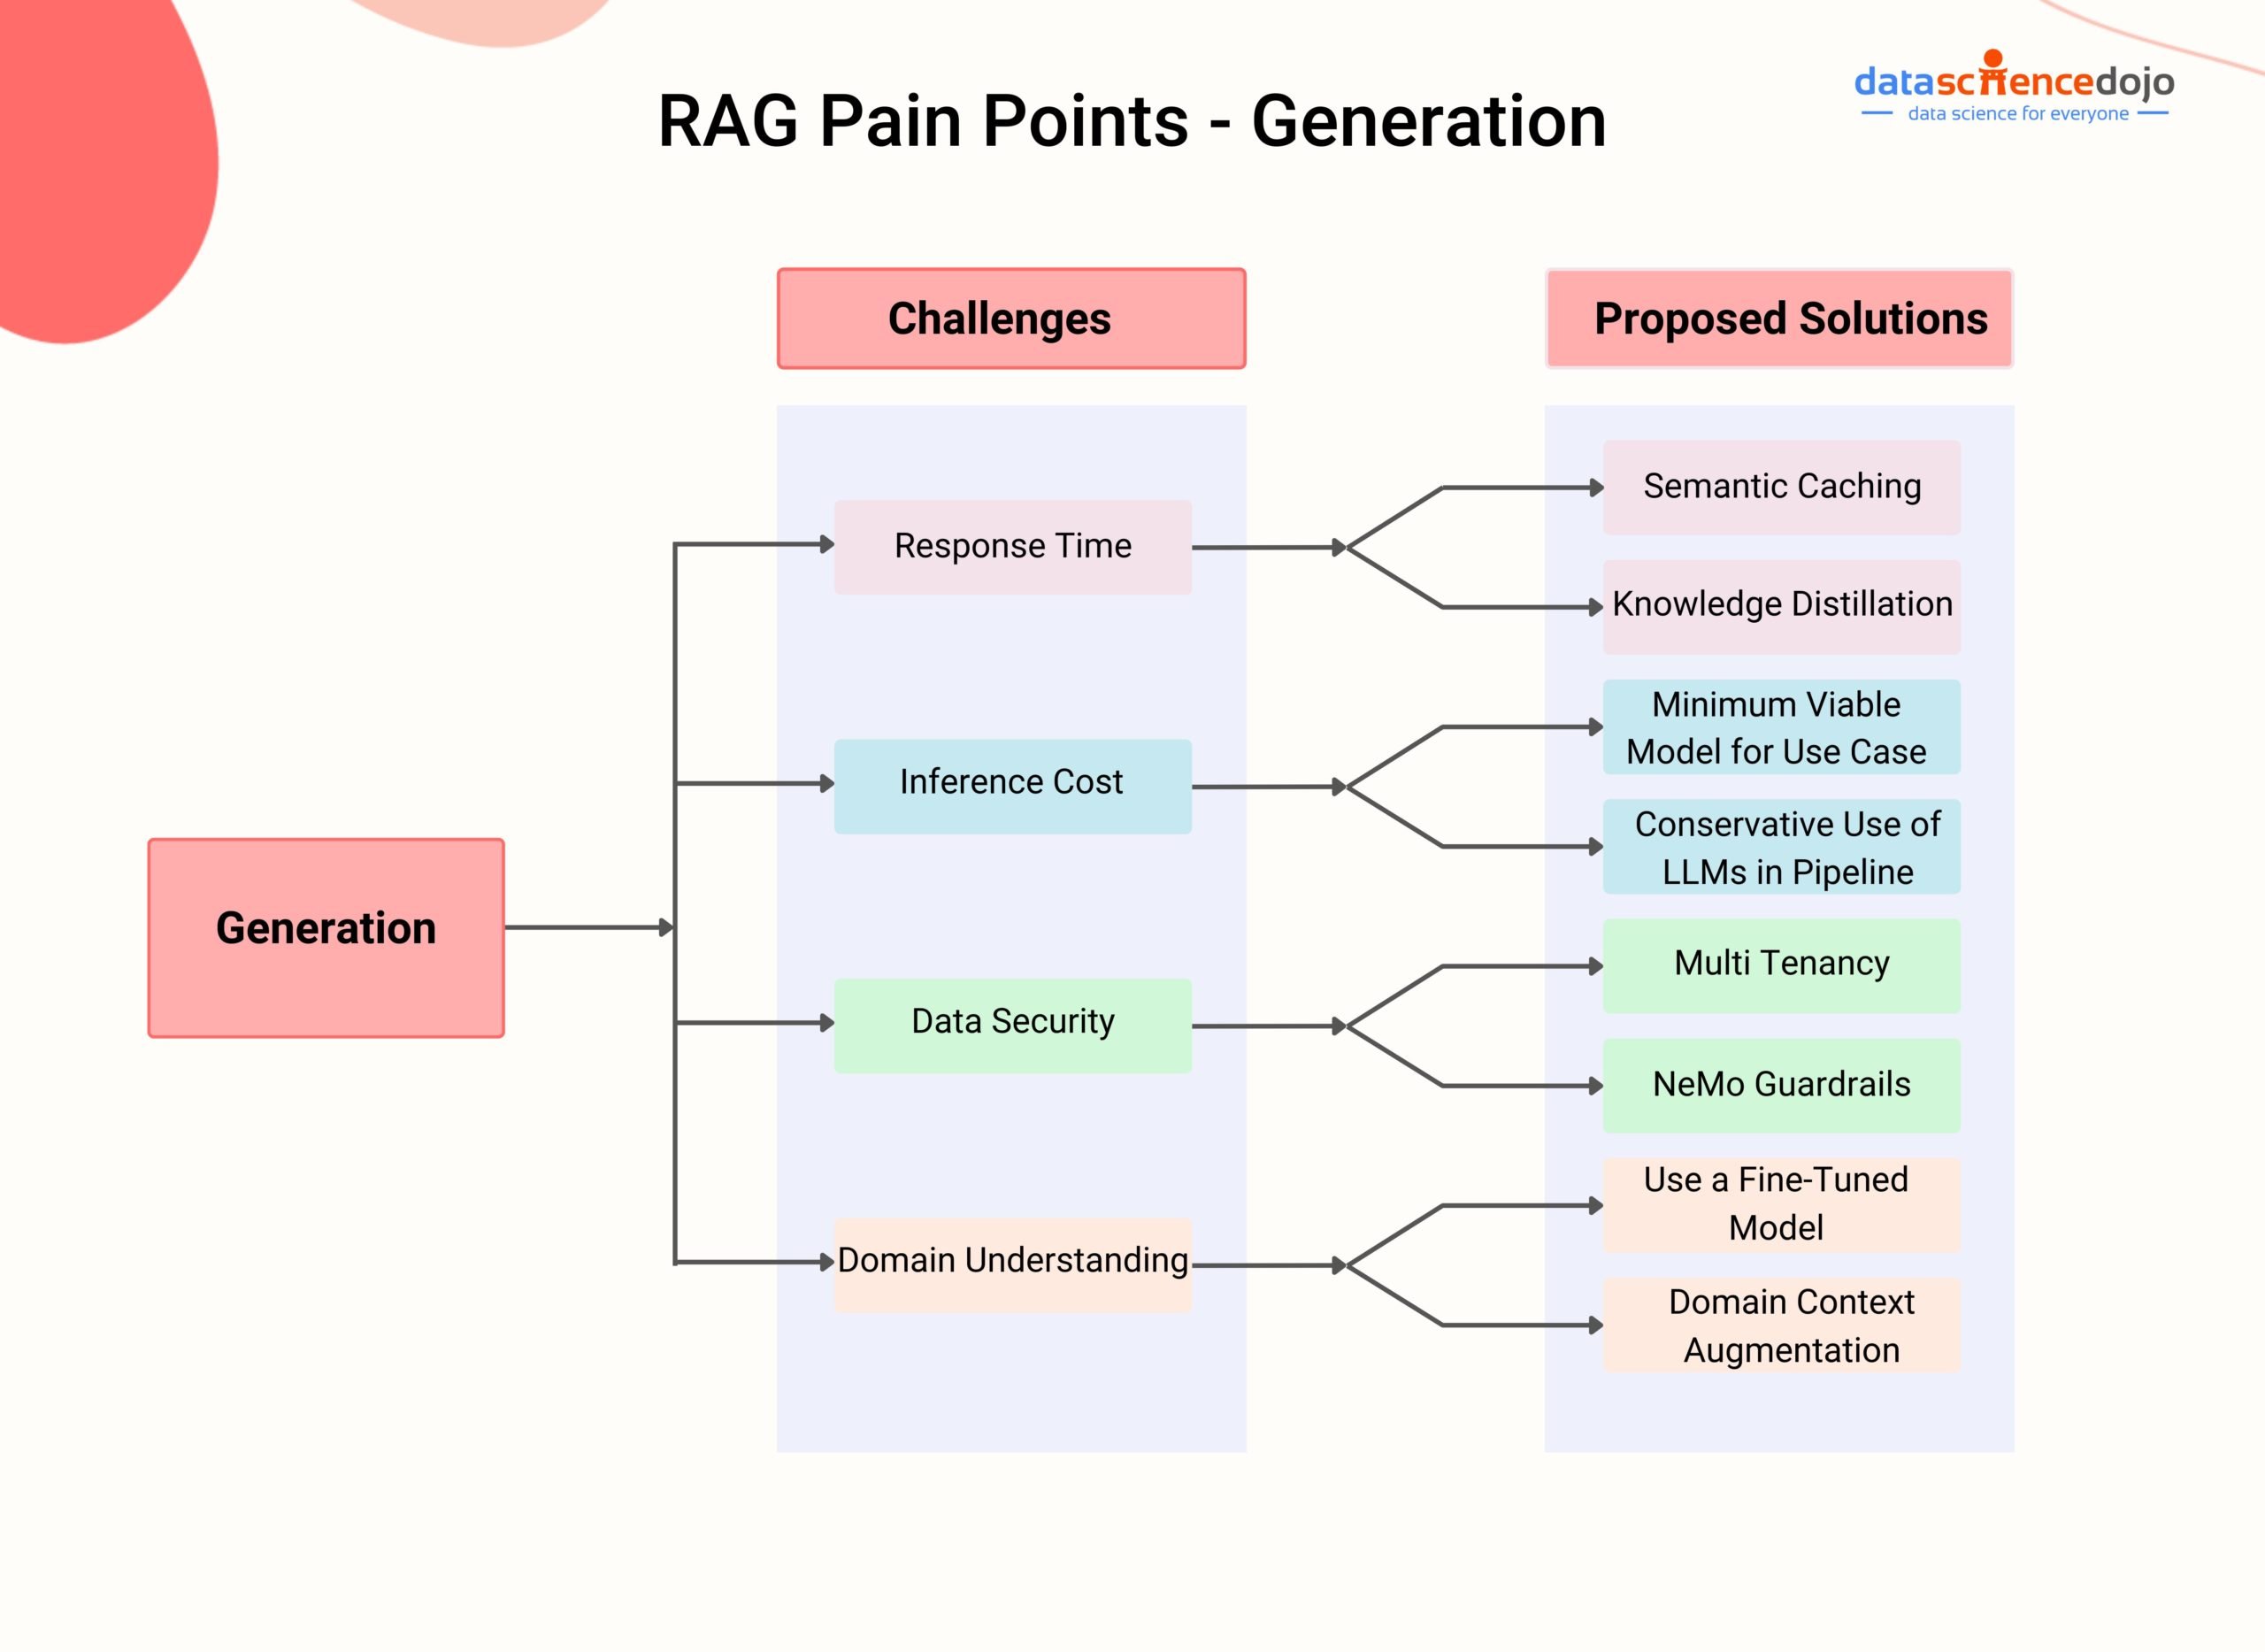
Challenge 1: Optimized Response Time for User
The prompt response to user queries is vital for maintaining user engagement and satisfaction.
Proposed Solutions:
Semantic Caching: Semantic caching addresses the
challenge of optimizing response time by implementing a cache system to
store and quickly retrieve pre-processed data and responses. It can be
implemented at two key points in an RAG system to enhance speed:
Retrieval of Information: The first point where
semantic caching can be implemented is in retrieving the information
needed to construct the enriched prompt. This involves pre-processing
and storing relevant data and knowledge sources that are frequently
accessed by the RAG system.
Calling the LLM: By implementing a semantic cache
system, the pre-processed data and responses from previous interactions
can be stored. When similar queries are encountered, the system can
quickly access these cached responses, leading to faster response
generation.
Challenge 2: Inference Costs
The cost of inference for large language models (LLMs) is a major concern, especially when considering enterprise applications.
Some of the factors that contribute to the inference cost of LLMs include context window size, model size, and training data.
Proposed Solutions:
Minimum viable model for your use case: Not all
LLMs are created equal. There are models specifically designed for tasks
like question answering, code generation, or text summarization.
Choosing an LLM with expertise in your desired area can lead to better
results and potentially lower inference costs because the model is
already optimized for that type of work.
Conservative Use of LLMs in Pipeline: By
strategically deploying LLMs only in critical parts of the pipeline
where their advanced capabilities are essential, you can minimize
unnecessary computational expenditure. This selective use ensures that
LLMs contribute value where they’re most needed, optimizing the balance
between performance and cost.
Challenge 3: Data Security
The problem of data security in RAG systems refers to the concerns
and challenges associated with ensuring the security and integrity of
Language Models LLMs used in RAG applications. As LLMs become more
powerful and widely used, there are ethical and privacy considerations
that need to be addressed to protect sensitive information and prevent
potential abuses.
These include:
Prompt injection
Sensitive information disclosure
Insecure outputs
Proposed Solutions:
Multi-tenancy: Multi-tenancy is like having
separate, secure rooms for each user or group within a large language
model system, ensuring that everyone’s data is private and safe.It makes
sure that each user’s data is kept apart from others, protecting
sensitive information from being seen or accessed by those who
shouldn’t.By setting up specific permissions, it controls who can see or
use certain data, keeping the wrong hands off of it. This setup not
only keeps user information private and safe from misuse but also helps
the LLM follow strict rules and guidelines about handling and protecting
data.
NeMo Guardrails: NeMo Guardrails
is an open-source security toolset designed specifically for language
models, including large language models. It offers a wide range of
programmable guardrails that can be customized to control and guide LLM
inputs and outputs, ensuring secure and responsible usage in RAG
systems.
Ensuring the Practical Success of the RAG Framework
This article explored key pain points associated with RAG systems,
ranging from missing content and incomplete responses to data ingestion
scalability and LLM security. For each pain point, we discussed
potential solutions, highlighting various techniques and tools that
developers can leverage to optimize RAG system performance and ensure
accurate, reliable, and secure responses.
By addressing these challenges, RAG systems can unlock their full
potential and become a powerful tool for enhancing the accuracy and
effectiveness of LLMs across various applications.
As
Kubernetes continues to solidify its position as the leading container
orchestration platform, the ecosystem around it is evolving rapidly. In
2024, several tools have emerged as essential for developers and DevOps
professionals looking to streamline their Kubernetes workflows, enhance
security, and optimize performance. Here’s an overview of the top 5
Kubernetes tools for 2024, complete with usage scenarios, benefits,
links to resources, and suggested alternatives.
1. Argo CD
Overview:
Argo CD is a declarative, GitOps continuous delivery tool for
Kubernetes, which automates the deployment of applications to ensure
that the live state aligns with the configurations stored in Git
repositories.
How
and When to Use: It’s best used in environments where rapid iteration
and consistent deployment practices are critical. Argo CD shines in
scenarios requiring multi-environment deployment strategies, from
development to production, with a clear audit trail for changes.
Why
to Use: By adopting a GitOps approach, Argo CD enables teams to
leverage Git as the single source of truth for deployment, simplifying
the process and enhancing security and traceability.
Overview:
Helm is the package manager for Kubernetes, allowing developers and
operators to easily package, configure, and deploy applications onto
Kubernetes clusters.
How
and When to Use: Helm is invaluable when you need to manage complex
applications as it allows you to define, install, and upgrade Kubernetes
applications using a simple command-line interface.
Why
to Use: Helm charts provide a reproducible way of deploying and
managing applications, supporting complex dependencies, and enabling
easy updates and rollbacks.
Overview:
Kustomize is a Kubernetes-native configuration management tool that
enhances Kubernetes’ own configuration management capabilities.
How
and When to Use: It’s especially useful in scenarios where you need to
maintain multiple, slightly different configurations of the same
application, such as different environments or deployment scenarios.
Why
to Use: Kustomize allows for the customization of Kubernetes resource
configurations without the need for template processing or manual
editing, making it easier to manage application configurations across
various environments.
Overview:
Prometheus is an open-source monitoring system with a dimensional data
model, flexible query language, and alerting capabilities. It’s designed
for reliability and scalability, making it an ideal monitoring solution
for Kubernetes environments.
How
and When to Use: Use Prometheus to collect and store metrics as time
series data, providing insights into your Kubernetes cluster’s
performance and the health of your applications.
Why
to Use: With its powerful data model and querying language (PromQL),
Prometheus enables detailed observation and real-time monitoring of
Kubernetes clusters, making it easier to identify and resolve issues.
Suggested Alternative: Grafana for visualization or Thanos for long-term storage enhancement.
5. Istio
Overview:
Istio is a powerful service mesh that provides a way to control how
microservices share data. It offers advanced traffic management,
security features, and observability into your applications.
How
and When to Use: Istio is particularly useful in complex microservices
architectures where you need fine-grained control over traffic, security
policies, and service monitoring.
Why
to Use: It provides an additional layer of infrastructure that allows
you to secure, connect, and monitor services more effectively, without
requiring changes to your code.
Overview:
Tekton is a powerful and flexible Kubernetes-native open-source
framework for creating CI/CD systems, allowing developers to build,
test, and deploy across cloud providers and on-premise systems.
How
and When to Use: Tekton is best utilized for constructing CI/CD
pipelines that are Kubernetes-native. It’s particularly useful for teams
looking to standardize their development workflows across different
environments in a cloud-native way.
Why
to Use: Tekton abstracts away the underlying implementation details and
provides a set of standardized, Kubernetes-native constructs for
building and running CI/CD pipelines, making it highly scalable and
portable.
Overview:
Flux is a tool that enables the GitOps approach to managing Kubernetes
clusters, where the desired state of your cluster is described in a Git
repository and automatically applied and updated.
How
and When to Use: Flux is particularly useful for teams adopting GitOps
principles for managing their Kubernetes applications and
infrastructure, ensuring that the cluster state is always synchronized
with the Git repository.
Why
to Use: It automates the deployment process, improves reproducibility
and traceability, and integrates seamlessly with Kubernetes, reducing
the risk of human error.
Overview:
Skaffold is a command-line tool that facilitates continuous development
for Kubernetes applications. It automates the workflow for building,
pushing, and deploying applications, making it easier for developers to
iterate on their code.
How
and When to Use: Skaffold is ideal for development stages, allowing
developers to focus on writing code without worrying about the
deployment process. It’s particularly useful for teams looking for fast
feedback loops during development.
Why
to Use: Simplifies the development and deployment process by automating
it, supports multiple build tools and deployment strategies, and
integrates well with existing CI/CD pipelines.
Overview:
KubeVela is a modern application deployment system that simplifies the
deployment and management of applications by abstracting away the
complexities of underlying infrastructures.
How
and When to Use: KubeVela is best used in environments that require a
high degree of automation and abstraction for deploying and managing
cloud-native applications across multiple clusters and clouds.
Why
to Use: It offers a simplified and consistent approach to application
delivery, regardless of the complexity of the services, making it
accessible for developers without sacrificing the flexibility and power
required by operators.
Overview:
Crossplane is an open-source Kubernetes add-on that extends your
cluster to manage and compose infrastructure from multiple vendors and
sources as standard Kubernetes resources.
How
and When to Use: Crossplane is particularly useful for teams looking to
adopt Infrastructure as Code (IaC) practices within their Kubernetes
environments, enabling the management of external resources such as
databases, clusters, and storage accounts through Kubernetes APIs.
Why
to Use: It allows teams to unify the deployment and management of
cloud-native applications and the infrastructure they depend on, using a
single declarative configuration.
Overview:
Kube-bench is an open-source tool designed to check whether Kubernetes
deployments are secure by running the checks documented in the CIS
Kubernetes Benchmark.
How
and When to Use: Utilize kube-bench to audit your Kubernetes clusters
for security compliance to identify and remediate potential
vulnerabilities following the CIS (Center for Internet Security) best
practices.
Why
to Use: Ensuring your Kubernetes clusters are compliant with CIS
benchmarks helps safeguard against common security threats and aligns
your operations with industry standards for secure Kubernetes
deployments.
Website: N/A — Refer to the GitHub repository for all resources and documentation.
Usage Code Example: To run kube-bench, you typically execute it within a container in your Kubernetes cluster:
kubectl run --rm -i -t kube-bench --image=aquasec/kube-bench:latest --restart=Never -- benchmarks/run
Docs: Directly available in the GitHub repository’s README and through various markdown files for different Kubernetes versions.
Suggested Alternative: Kube-hunter
12. Kubernetes External Secrets
Overview:
Kubernetes External Secrets allows you to use external secret
management systems, such as AWS Secrets Manager or HashiCorp Vault, to
securely add secrets in Kubernetes.
How
and When to Use: This tool is essential when you manage sensitive
information outside of Kubernetes’ native Secrets mechanism and need a
secure bridge to use those secrets within your Kubernetes applications
without exposing them.
Why
to Use: It enhances security by enabling the use of dedicated secret
management systems that offer advanced features like secret rotation,
centralized auditing, and access control, beyond what Kubernetes native
Secrets provide.
Docs: Documentation can be found within the GitHub repository, including setup instructions, configurations, and usage examples.
Suggested Alternative: HashiCorp Vault with Kubernetes integration
13. Octant
Overview:
Octant is a highly extensible, open-source developer-centric web
interface for Kubernetes that provides deep insights into your
Kubernetes clusters. It offers a comprehensive view of resources managed
within a cluster and features to make troubleshooting easier.
How
and When to Use: Octant is particularly useful for developers and
operators looking for a visual representation of their Kubernetes
clusters, needing to debug issues, inspect cluster resources, or
understand the relationships between them.
Why
to Use: It offers real-time updates, a plugin ecosystem for extended
functionalities, and a user-friendly interface to navigate through
Kubernetes resources, making cluster management and troubleshooting more
accessible.
Usage
Code Example: Octant is a GUI-based tool, so typical usage involves
starting the application on your local machine, which then connects to
your Kubernetes cluster:
In
our guide today, we are looking at how to install MySQL 5.7 on Ubuntu
20.04 (Focal Fossa) Server. MySQL is one of the most commonly used
Database Management Systems. It uses the concept of relational databases
and has a client/server architecture. It can be installed on various
operating systems including Windows, CentOS and Debian among others.
The
below steps describe how to install and configure MySQL 5.7 on Ubuntu
20.04. It start with adding APT repository with packages for MySQL then
dives to the actual package installations and configurations.
How to make Practical progression t...
Remaining Time -27:22
Now Playing
How to make Practical progression to Web3 and Metaverse by Geetika Gahlot
What is Continuous Improvement and How Can It Drive Organizational Success?
Is Flutter App Development the Future? Exploring its Potential and Advantages
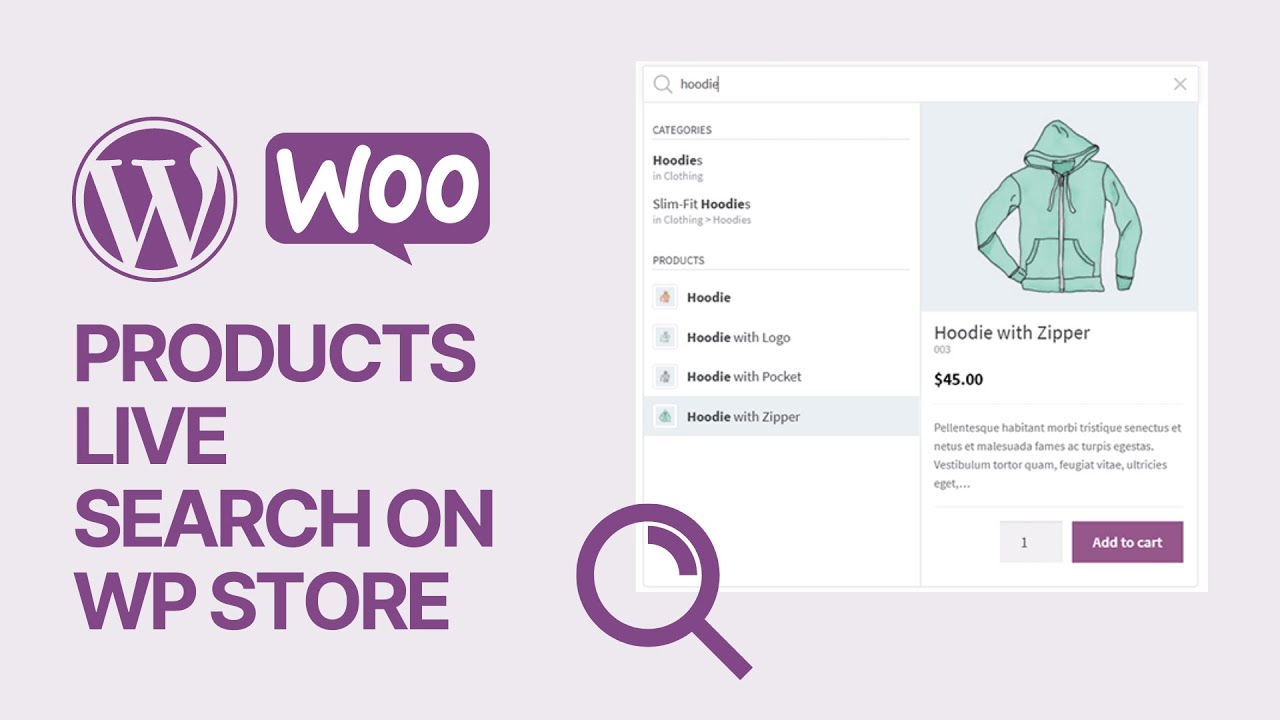
How To Add Products AJAX Live Search on WooCommerce WordPress Store For Free_ 🛒
Using Free Meeting Solution Zoom to Record Screen Operation with the Camera
VB.NET VS C#.NET STEP BY STEP WITH SAMPLE PROJECTS DAY 8
Can Mars really be terraformed?
Python Tutorial 8 - IF ELSE ELIF Decision Condition
VB.NET VS C#.NET STEP BY STEP WITH SAMPLE PROJECTS DAY 12
Install Group Policy Editor on Windows Home edition
Ubuntu
already comes with the default MySQL package repositories. In order to
add or install the latest repositories, we are going to install package
repositories . Download the repository using the below command:
Hit the y key to start installation of MySQL 5.7 on Ubuntu 20.04 Linux.
Reading package lists... Done
Building dependency tree
Reading state information... Done
Selected version '5.7.35-1ubuntu18.04' (MySQL:repo.mysql.com [amd64]) for 'mysql-client'
Selected version '5.7.35-1ubuntu18.04' (MySQL:repo.mysql.com [amd64]) for 'mysql-community-server'
Selected version '5.7.35-1ubuntu18.04' (MySQL:repo.mysql.com [amd64]) for 'mysql-server'
The following additional packages will be installed:
  libmecab2 libtinfo5 mysql-common mysql-community-client
The following NEW packages will be installed:
  libmecab2 libtinfo5 mysql-client mysql-common mysql-community-client mysql-community-server mysql-server
0 upgraded, 7 newly installed, 0 to remove and 90 not upgraded.
Need to get 51.6 MB of archives.
After this operation, 315 MB of additional disk space will be used.
Do you want to continue? [Y/n] y
Enter and re-enter root password when prompted
4. Secure MySQL 5.7 Installation
Run the command below to secure MySQL
sudo mysql_secure_installation
Press Enter. When prompted for password, provide the root password set above.
Answer the prompts as below:
Enter current password for root (enter for none): <Enter password>
VALIDATE PASSWORD PLUGIN can be used to test passwords
and improve security. It checks the strength of password
and allows the users to set only those passwords which are
secure enough. Would you like to setup VALIDATE PASSWORD plugin?

Press y|Y for Yes, any other key for No: Y

There are three levels of password validation policy:

LOW    Length >= 8
MEDIUM Length >= 8, numeric, mixed case, and special characters
STRONG Length >= 8, numeric, mixed case, special characters and dictionary

Please enter 0 = LOW, 1 = MEDIUM and 2 = STRONG: 1
Using existing password for root.
Estimated strength of the password: 25
Change the password for root ? ((Press y|Y for Yes, any other key for No) : d
Remove anonymous users? [Y/n] Y
Disallow root login remotely? [Y/n] Y
Remove test database and access to it? [Y/n] Y
Reload privilege tables now? [Y/n] Y
Thanks for using MariaDB!
5. Check MySQL 5.7 version
To confirm the installed version, first, connect to MySQL with the set root password.
$ mysql -u root -p
Enter password:
Welcome to the MySQL monitor.  Commands end with ; or \g.
Your MySQL connection id is 6
Server version: 5.7.35 MySQL Community Server (GPL)

Copyright (c) 2000, 2021, Oracle and/or its affiliates.

Oracle is a registered trademark of Oracle Corporation and/or its
affiliates. Other names may be trademarks of their respective
owners.

Type 'help;' or '\h' for help. Type '\c' to clear the current input statement.

mysql>
Run the below command to display version
$ SELECT VERSION();
+-----------+
| VERSION() |
+-----------+
| 5.7.35    |
+-----------+
1 row in set (0.00 sec)
6. Create MySQL User (Optional, testing only)
While still connected to MySQL, run the following commands to create a user:
CREATE USER 'user'@'%' IDENTIFIED BY 'MyStrongPass.';
GRANT ALL PRIVILEGES ON * . * TO 'user'@'%';
FLUSH PRIVILEGES;
exit
7. Enable MySQL remote access (Optional)
By default, MySQL remote access is disabled. To enable it we need to edit mysqld.cnf file as below:
sudo vim /etc/mysql/mysql.conf.d/mysqld.cnf
Look for the line ‘bind_address’ and change as below:
# By default we only accept connections from localhost
#bind-address   = 127.0.0.1
bind-address   = 0.0.0.0
Save the file and restart mysql
sudo systemctl restart mysql
Allow remote connections through the firewall
sudo ufw allow from <remote_IP_address> to any port 3306
sudo ufw enable
To access the database from a remote machine, run the following command:
$ mysql -u user -h database_server_ip -p
You have successfully installed MySQL 5.7 on Ubuntu 20.04.