Tuesday, 31 December 2024

How to Install Tomcat on Ubuntu 24.04 LTS


How to Install Tomcat on Ubuntu 24.04 LTS

In This Article We Will Learn How to  install  Tomcat on Ubuntu 24.04 LTS.

Tomcat is a free and open-source Java Servlet container, a software application that executes Java Server Pages (JSP) and Java servlets. It is widely used for deploying Java-based web applications. We will walk you through the process step-by-step, including installing Java, creating a dedicated Tomcat user, downloading and extracting the Tomcat archive, configuring systemd, and verifying the installation.

Table of Contents

Prerequisites

  • AWS Account with Ubuntu 24.04 LTS EC2 Instance.
  • Java Development Kit (JDK) installed.

Step #1:Install Java on Ubuntu 24.04 LTS

To install Tomcat you should have Java installed. Tomcat relies on Java to function.

First update the package repository.

sudo apt update

How to Install Tomcat on Ubuntu 24.04 LTS 1

Install Openjdk (Java).

sudo apt install openjdk-17-jdk

How to Install Tomcat on Ubuntu 24.04 LTS 2

Step #2:Create a Tomcat User

For security reasons, it’s best not to run Tomcat as the root user. Let’s create a dedicated user and group.

sudo useradd -m -U -d /opt/tomcat -s /bin/false tomcat

This command creates a user named “tomcat” with a home directory at /opt/tomcat. The /bin/false shell prevents login access.

How to Install Tomcat on Ubuntu 24.04 LTS 3

Step #3:Install Tomcat on Ubuntu 24.04 LTS

Now lets install Tomcat. First navigate to the Tomcat official website and download the latest version of Tomcat 10. You can use wget for this purpose.

sudo wget https://www-eu.apache.org/dist/tomcat/tomcat-10/v10.1.24/bin/apache-tomcat-10.1.24.tar.gz -P /tmp
How to Install Tomcat on Ubuntu 24.04 LTS 4

extract it to the /opt/tomcat directory.

sudo tar -xvf /tmp/apache-tomcat-10.1.24.tar.gz -C /opt/tomcat

How to Install Tomcat on Ubuntu 24.04 LTS 5

Step #4:Update Permissions of Tomcat

Change ownership of the Tomcat directory to the tomcat user and group:

sudo chown -R tomcat:tomcat /opt/tomcat

How to Install Tomcat on Ubuntu 24.04 LTS 6

Step #5:Configure Tomcat as a Service

A systemd unit file tells systemd how to manage a service. Create a file named tomcat.service under the /etc/systemd/system directory using a text editor.

navigate to the /etc/systemd/system.

cd /etc/systemd/system

How to Install Tomcat on Ubuntu 24.04 LTS 7

Create a tomcat.service file using nano command.

sudo nano tomcat.service

How to Install Tomcat on Ubuntu 24.04 LTS 8

add the following content into it.

[Unit]
Description=Tomcat Server
After=network.target

[Service]
Type=forking
User=tomcat
Group=tomcat
Environment="JAVA_HOME=/usr/lib/jvm/java-17-openjdk-amd64"
WorkingDirectory=/opt/tomcat/apache-tomcat-10.1.24
ExecStart=/opt/tomcat/apache-tomcat-10.1.24/bin/startup.sh

[Install]
WantedBy=multi-user.target
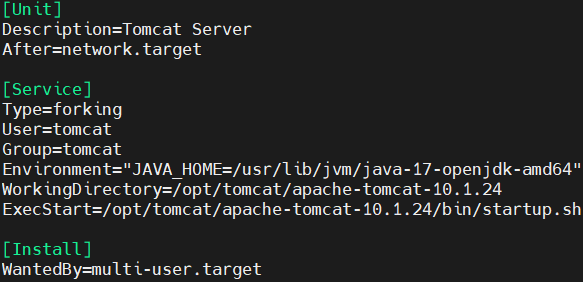
How to Install Tomcat on Ubuntu 24.04 LTS 9

Save and close the file.

Adjust the JAVA_HOME environment variable path based on your OpenJDK installation location.

Step #6:Reload systemd and Start Tomcat

Reload the systemd daemon to apply the changes.

sudo systemctl daemon-reload

How to Install Tomcat on Ubuntu 24.04 LTS 10

Start the Tomcat service.

sudo systemctl start tomcat

How to Install Tomcat on Ubuntu 24.04 LTS 11

Enable Tomcat to start on boot.

sudo systemctl enable tomcat

How to Install Tomcat on Ubuntu 24.04 LTS 12

Now you can verify if your service is running properly or not by running your public ip address with port 8080 which is default port for Tomcat in url. You should see the Tomcat welcome page if everything is set up correctly.

How to Install Tomcat on Ubuntu 24.04 LTS 13

Conclusion:

In conclusion, installing Apache Tomcat on Ubuntu 24.04 is a straightforward process that involves updating your system, installing Java, creating a Tomcat user, downloading and configuring Tomcat, setting up a systemd service. By following these steps, you can easily install Tomcat and set up a robust environment for deploying Java-based web applications on your server.


SOURCE

Tuesday, 5 November 2024

Fedora linux creating sudo user


Step 1: Create a Regular Standard User

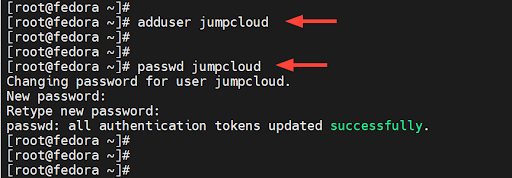
The first order of business is to create a standard login user. So, right off the bat, log into your server and run the `adduser` command with the username as the command-line argument. Here, we are creating a login user called ‘jumpcloud’.

# adduser jumpcloud

Next, assign a password to the user using the `passwd` command as shown. Be sure to provide a strong password and confirm it.

# passwd jumpcloud

In the end, you’ll get a confirmation indicating that the operation was successful.

code

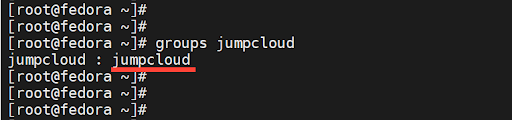
By default, once a user is created, they are placed in a primary group named after the username. In this case, the user jumpcloud is placed in a group called jumpcloud. To confirm this, run the groups command.

# groups jumpcloud

code

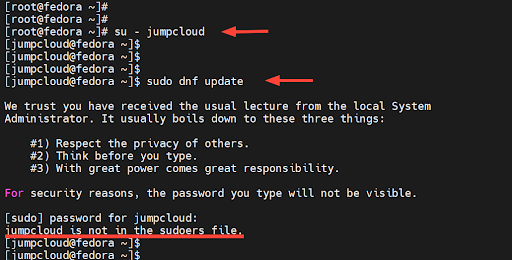
Now we are going to check if the regular user we just created can run commands with elevated privileges. To verify this, we will switch to the user.

 # su – jumpcloud

Next, we will try to upgrade system packages to their latest versions.

$ sudo dnf update

Upon providing the password, you will get a notification that the user is not in the sudoers file. This implies that the user does not have elevated privileges to run administrative or root commands.

code

The next step is to grant sudo privileges to the user. Note that there should be a limited set of privileges granted and no alias commands allowed. 

Step 2: Add the Regular User to the Sudoers Group

To grant sudo privileges to the user, we will add the user to a secondary group called wheel. This is a special user group in Arch and Red Hat-based systems that provides administrative access to a regular user in order to masquerade as the root user.

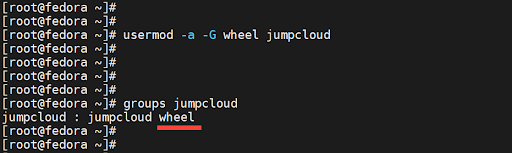
To add the user to the group, run the usermod command as shown.

 # usermod -aG wheel jumpcloud

Or

 # usermod -a -G wheel jumpcloud

The -a option appends the user to the group, while the -G option specifies the group, in this case, wheel.Now run the command to confirm that the user is now a member of the group.

# groups jumpcloud

code

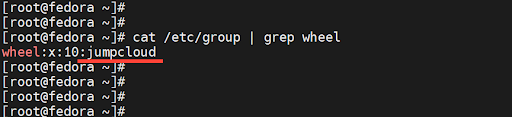
In addition, you can view the user accounts that belong to the wheel group as follows.

# cat /etc/group | grep wheel

code

Step 3: Test the Sudo User

It’s now time to put our sudo user to the test and verify its ability to run administrative privileges which are a preserve of the root user.

So, let’s now switch to the user.

# su – jumpcloud

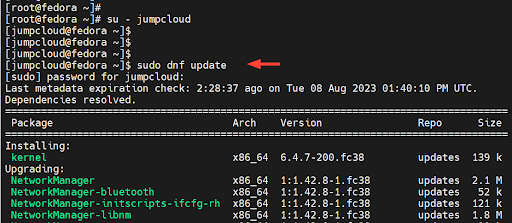
Once again, we will attempt to upgrade all the packages to their latest versions as shown.

$ sudo dnf update

This time around, the command executes without any issues. This is confirmation that we have successfully added the user to the sudo group and can execute elevated privileges.

code

Step 4: How to Remove a Sudo User (Optional)

If you no longer need a sudo user on your server, you can easily remove them using the gpasswd command-line utility. This is a tool for managing entries in the /etc/shadow and /etc/groups files.

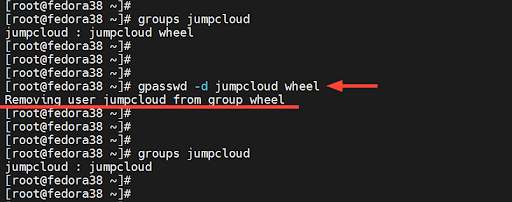
To remove a sudo user, invoke the gpasswd utility as shown to remove the user from the “wheel” group.

$ gpasswd -d jumpcloud wheel

code

From the removal of the user from the “wheel” group, the user regains its initial primary group which is the default group that the user belongs to during creation.

Sunday, 16 June 2024

Create a systemd service script for running Gunicorn to serve your application


To create or edit a gunicorn.service file in Linux for running a Flask application, you need to create a systemd service unit file. This service unit file will define how Gunicorn should run your Flask application as a service. Here's a step-by-step guide:

Create or Edit the Gunicorn Service File:

Open a terminal on your Linux system and use a text editor to create or edit the gunicorn.service file. You can use editors like nano or vi:

   sudo nano /etc/systemd/system/gunicorn.service

Or with vi:

   sudo vi /etc/systemd/system/gunicorn.service

To create a systemd service script for running Gunicorn to serve your application, you'll need to create a file named gunicorn.service with the following contents and place it in the appropriate directory on your server:

[Unit]
Description=Gunicorn instance to serve application
After=network.target

[Service]
User=your_username
Group=your_groupname
WorkingDirectory=/path/to/your/app
Environment="PATH=/path/to/venv/bin"
ExecStart=/path/to/venv/bin/gunicorn --workers 3 --bind 0.0.0.0:5003 web_dynamic.2-hbnb:app
ExecReload=/bin/kill -s HUP $MAINPID
KillMode=mixed
TimeoutStopSec=5
PrivateTmp=true

[Install]
WantedBy=multi-user.target

Replace the placeholders with your actual values:

  • your_username: Your username on the system.
  • your_groupname: Your primary group name on the system.
  • /path/to/your/app: The absolute path to your application's root directory.
  • /path/to/venv/bin: The absolute path to your virtual environment's bin directory.
  • web_dynamic.2-hbnb:app: The Python import path to your Gunicorn app object.

Username and Primary Group Name on a Unix-like system

To find your username and primary group name on a Unix-like system, you can use the id command. Open a terminal and type the following commands:

To get your username:

   id -un

To get your primary group name:

   id -gn

These commands will display your username and primary group name respectively. You can then use these values to replace the placeholders in the gunicorn.service file.

After creating the gunicorn.service file, you need to place it in the appropriate directory for systemd unit files. Typically, this directory is /etc/systemd/system/.

Then, follow these steps:

Reload the systemd manager configuration to make it aware of the new service file:

   sudo systemctl daemon-reload

Enable the service to start on boot:

   sudo systemctl enable gunicorn

Start the service:

   sudo systemctl start gunicorn

Verify that the service is running without errors:

   sudo systemctl status gunicorn

You can also restart, stop, or check the logs of the service using systemd commands:

   sudo systemctl restart gunicorn
   sudo systemctl stop gunicorn
   journalctl -u gunicorn

Finally, test your application to ensure it's serving content as expected using curl commands similar to what you mentioned in your instructions.

Remember that the gunicorn.service script must be tailored to your specific environment and application setup. Make sure to adjust paths, usernames, and other parameters accordingly.

Also, note that systemd services require administrative privileges to manage. Be sure to use sudo as needed while performing these steps.


SOURCE

Wednesday, 22 May 2024

How to Uninstall MySQL in Linux, Windows, and macOS

How to Uninstall MySQL in Linux, Windows, and macOS

Introduction

MySQL is an open-source relational database management system (RDBMS) available on Linux, Solaris, macOS, Windows, and FreeBSD. Sometimes, uninstalling the software and a fresh installation is the best solution for resolving bugs, or for fixing compatibility purposes.

In this tutorial, you will learn how to uninstall MySQL on Linux, Windows, and macOS.

How to uninstall MySQL on Windows, Linux or macOS?

Prerequisites

  • MySQL installed on Linux, Windows, or macOS system.
  • A user account with administrator privileges.

How to Uninstall MySQL {on Linux, Windows, and macOS}?

Depending on the operating system, the process of uninstalling MySQL is different. The sections below show how to uninstall MySQL on Linux, Windows, and macOS, and delete all the associated data.

Uninstall MySQL on Linux

Uninstall MySQL from Linux using the distribution's default package manager, and the rm command to delete the leftover data. In this tutorial, we will work on Ubuntu, but the instructions for other distros are provided as well.

Follow the steps below:

1. Open a terminal window (Ctrl + Alt + T) and stop the MySQL service and all the related processes. Run the following commands:

sudo service mysql stop
sudo killall -KILL mysql mysqld_safe mysqld
Stopping all MySQL services on Linux Ubuntu.

3. Depending on the Linux distribution and package manager you are using, run one of the following commands to uninstall MySQL:

  • CentOS, Rocky Linux, and RedHat:
sudo yum remove mysql-client mysql-server -y
  • Ubuntu and Debian:
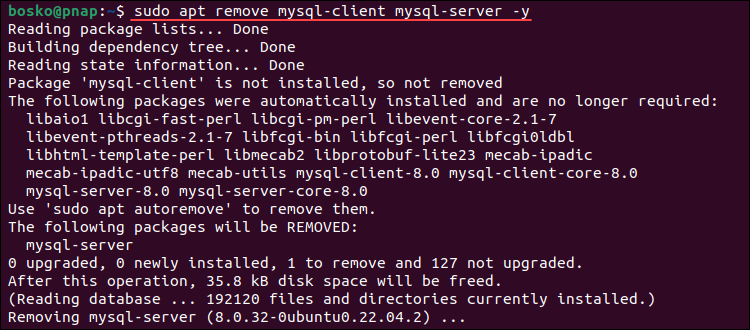
sudo apt remove mysql-client mysql-server -y
Uninstalling the MySQL server and client from Ubuntu.

Run autoremove and autoclean to remove unnecessary packages and clean up the package cache:

sudo apt autoremove -y 
sudo apt autoclean -y
  • Fedora:
sudo dnf remove mysql-client mysql-server -y

4. After uninstalling MySQL, the next step is to remove residual data. If you still need the data, make a backup before removing it, or rename the directory.

Rename the /var/lib/mysql directory to keep the data if you ever need it again in the future:

sudo mv /var/lib/mysql /var/lib/mysql_directory_backup

Alternatively, remove MySQL-related directories by running:

sudo rm -rf /etc/apparmor.d/abstractions/mysql /etc/apparmor.d/cache/usr.sbin.mysqld /etc/mysql /var/lib/mysql /var/log/mysql* /var/log/upstart/mysql.log* /var/run/mysqld

5. Remove the mysql user and delete the mysql group, if it exists. Run:

sudo deluser --remove-home mysql
sudo delgroup mysql
Removing the mysql user and mysql group.

After completing the steps above, you have successfully uninstalled MySQL from your Linux system.

Uninstall MySQL on Windows

Follow the steps below to uninstall MySQL from a Windows operating system:

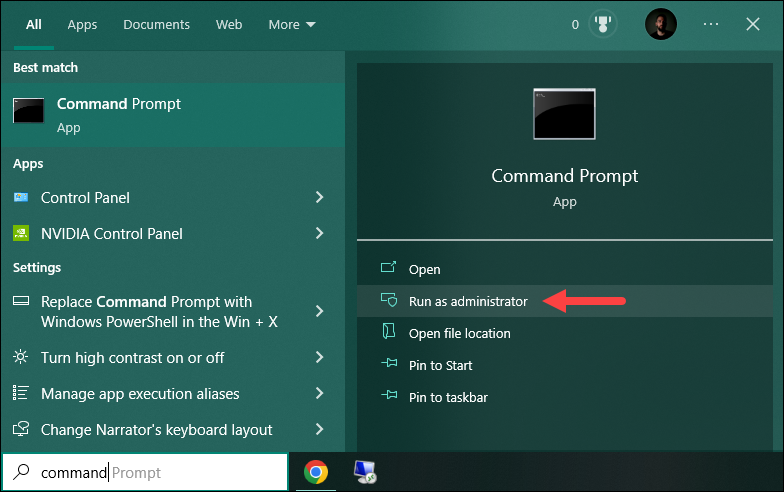
1. Press the Windows key and search for command prompt. Run the app as administrator.

Run the command prompt as administrator in Windows.

2. Stop the running MySQL server before uninstalling it. The easiest way to stop it is by using the mysqladmin command which was installed automatically during the MySQL installation. In the command prompt, navigate to the bin folder of the MySQL installation directory. For example, the default path is:

cd C:\Program Files\MySQL\MySQL Server 8.0\bin
Change the working directory in Windows.

After navigating into that path, stop the running server by executing:

mysqladmin -u root -p shutdown

The command asks you for the password and shuts down the running server after confirming it.

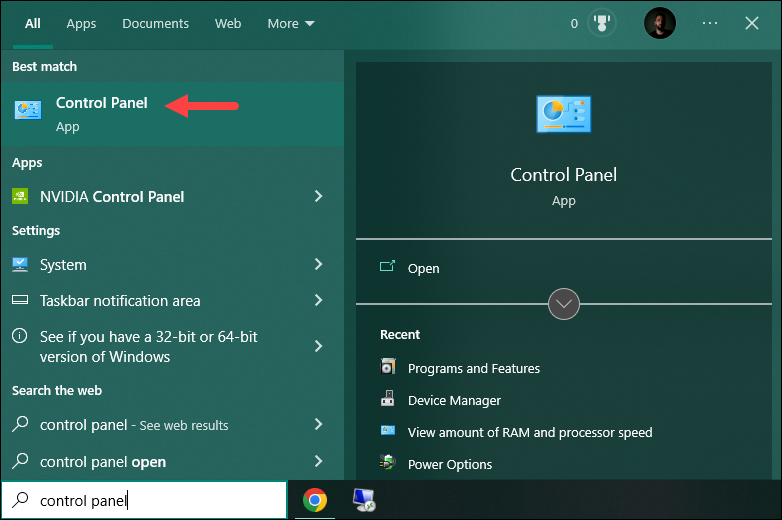
3. Next, open the Control Panel. Press the Windows key and search for control panel. Press Enter to open the app.

Opening the Control Panel.

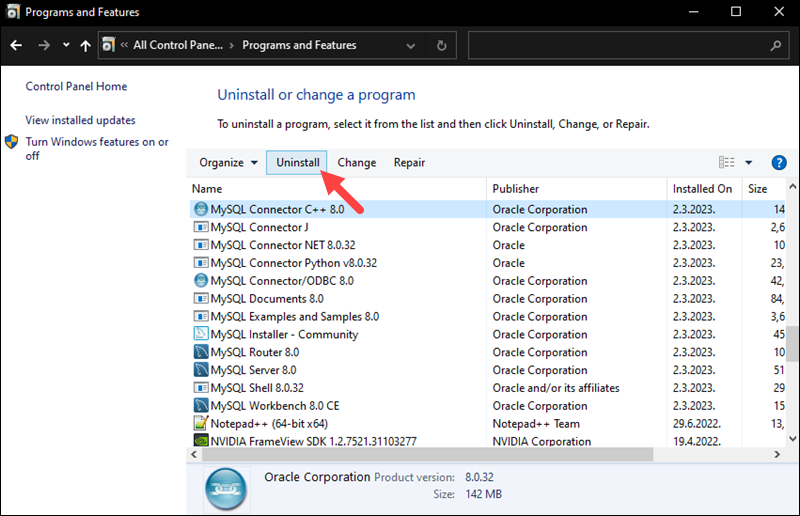
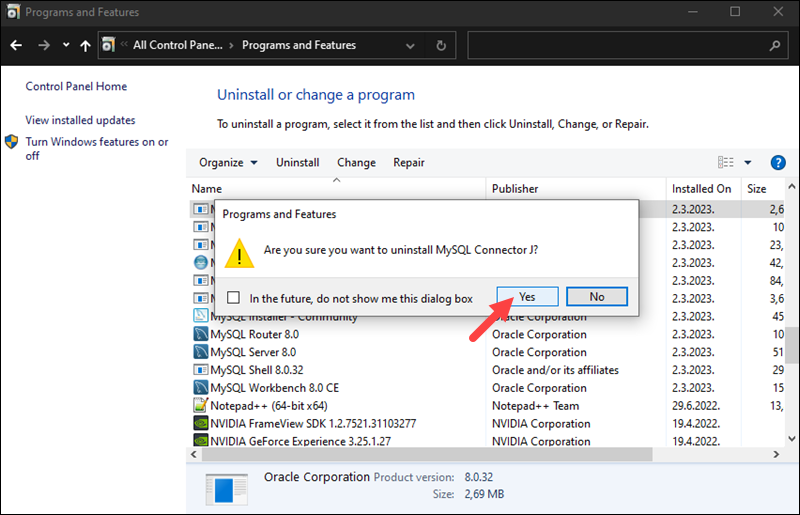
4. Open Programs and Features. In the list of installed programs, locate MySQL and all related programs. Click each one individually and select the Uninstall option.

Uninstall MySQL in Windows.

Click Yes for each prompt and wait for the wizard to finish.

Confirming MySQL installation in Windows.

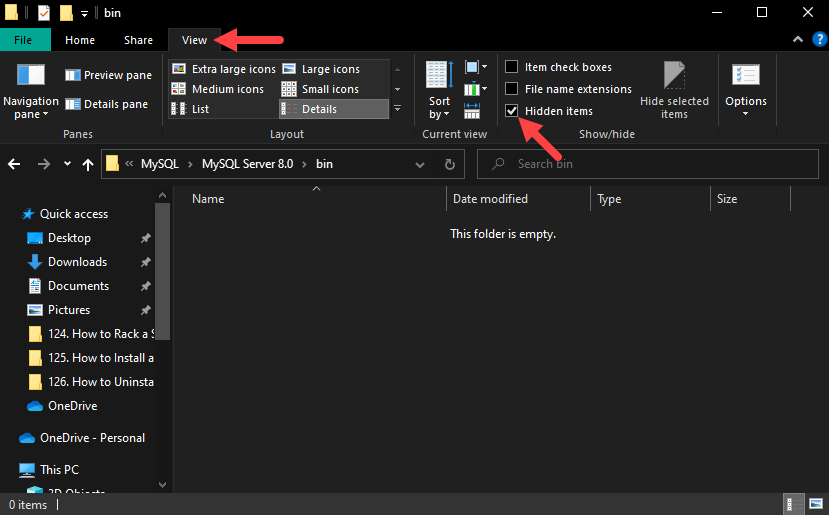
5. After uninstalling all MySQL components, delete the remaining data directories. Since one of the directories is hidden, make sure to enable the Hidden items option in folder settings.

To do so, open any folder using File Explorer, click the View tab, and check the Hidden items option:

Showing hidden items in Windows.

Important: If there is critical data that you may still need, make sure to backup MySQL databases before deleting them.

The directories that you need to remove are:

  • C:\Program Files\MySQL
  • C:\Program Files (x86)\MySQL
  • C:\ProgramData\MySQL
  • C:\Users\[YourUsername]\AppData\Roaming\MySQL

6. After you uninstall all the components and delete the remaining directories, restart the computer for the changes to take effect.

Uninstall MySQL on macOS

Follow the steps below to uninstall MySQL on a macOS system:

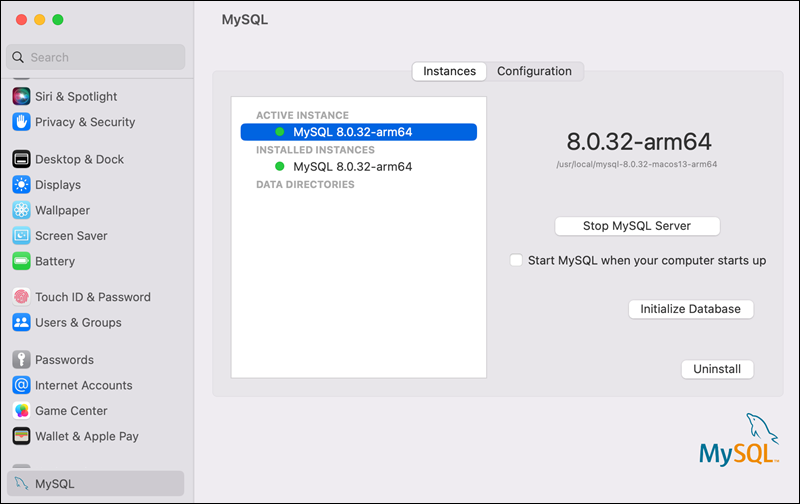
1. Go to System Settings and click MySQL. Click the Uninstall button to remove MySQL from the system.

Uninstalling MySQL from macOS.

2. Click the Launchpad icon in the Dock and type Terminal in the search field. Click Terminal to open a new terminal window.

3. Deleting MySQL removes all its databases. If you have critical data stored in MySQL, make sure to back up your files first.

Use mysqldump to back up your databases to a text file. Run the following command:

./mysqldump -u root -p --all-databases > mysqlbackup.sql

The output is redirected to the mysqlbackup.sql file.

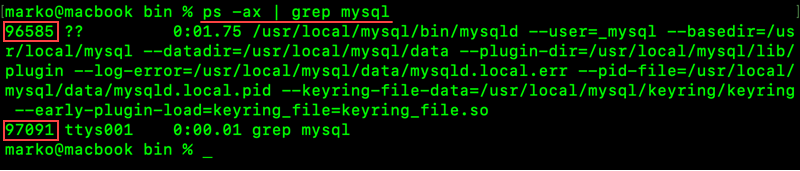
4. Check for running MySQL processes by running the following command:

ps -ax | grep mysql
Checking for running MySQL processes in macOS.

Terminate the running processes using the following syntax:

kill [process_id]

For example, to kill the ttys001 process from the image above, run:

kill 97091

5. Remove the default MySQL directory and all the leftover directories and files. Run these commands:

sudo rm /usr/local/mysql 
sudo rm -rf /usr/local/mysql
sudo rm -rf /usr/local/var/mysql
sudo rm -rf /Library/StartupItems/MySQLCOM
sudo rm -rf /Library/PreferencePanes/MySQL*
sudo rm -rf /Library/Receipts/mysql*
sudo rm -rf /private/var/db/receipts/*mysql*

Removing all the directories is important especially if you want to install an older MySQL version on Mac.

6. Use a text editor to open the /etc/hostconfig file and remove the following line:

MYSQLCOM=-YES-

Note: Some versions of macOS don't have the /etc/hostconfig file, so skip this step if the file doesn't exist on your system.

After following the steps above, you have successfully uninstalled MySQL from your macOS system and cleaned up unnecessary files.

Conclusion

This tutorial showed how to uninstall MySQL from Linux, Windows, and macOS operating systems.

For more MySQL tutorials, see how to install and get started with MySQL Workbench on Ubuntu, or how to secure your MySQL installation.


SOURCE