Tuesday, 28 January 2025

How To Set Up Password Authentication with Apache on Ubuntu

 Introduction

When setting up a web server, there are often sections of the site that you wish to restrict access to. Web applications often provide their own authentication and authorization methods, but the web server itself can be used to restrict access if these are inadequate or unavailable.

In this guide, we’ll demonstrate how to password protect assets on an Apache web server running on Ubuntu 14.04.

Prerequisites

To get started, you will need access to an Ubuntu 14.04 server environment. You will need a non-root user with sudo privileges in order to perform administrative tasks. To learn how to create such a user, follow our Ubuntu 14.04 initial server setup guide.

Install the Apache Utilities Package

In order to create the file that will store the passwords needed to access our restricted content, we will use a utility called htpasswd. This is found in the apache2-utils package within the Ubuntu repositories.

Update the local package cache and install the package by typing this command. We will take this opportunity to also grab the Apache2 server in case it is not yet installed on the server:

  1. sudo apt-get update
  2. sudo apt-get install apache2 apache2-utils

Create the Password File

We now have access to the htpasswd command. We can use this to create a password file that Apache can use to authenticate users. We will create a hidden file for this purpose called .htpasswd within our /etc/apache2 configuration directory.

The first time we use this utility, we need to add the -c option to create the specified file. We specify a username (sammy in this example) at the end of the command to create a new entry within the file:

  1. sudo htpasswd -c /etc/apache2/.htpasswd sammy

You will be asked to supply and confirm a password for the user.

Leave out the -c argument for any additional users you wish to add:

  1. sudo htpasswd /etc/apache2/.htpasswd another_user

If we view the contents of the file, we can see the username and the encrypted password for each record:

  1. cat /etc/apache2/.htpasswd
Output
sammy:$apr1$lzxsIfXG$tmCvCfb49vpPFwKGVsuYz. another_user:$apr1$p1E9MeAf$kiAhneUwr.MhAE2kKGYHK.

Configure Apache Password Authentication

Now that we have a file with our users and passwords in a format that Apache can read, we need to configure Apache to check this file before serving our protected content. We can do this in two different ways.

The first option is to edit the Apache configuration and add our password protection to the virtual host file. This will generally give better performance because it avoids the expense of reading distributed configuration files. If you have this option, this method is recommended.

If you do not have the ability to modify the virtual host file (or if you are already using .htaccess files for other purposes), you can restrict access using an .htaccessfile. Apache uses.htaccess` files in order to allow certain configuration items to be set within a file in a content directory. The disadvantage is that Apache has to re-read these files on every request that involves the directory, which can impact performance.

Choose the option that best suits your needs below.

Configuring Access Control within the Virtual Host Definition

Begin by opening up the virtual host file that you wish to add a restriction to. For our example, we’ll be using the 000-default.conf file that holds the default virtual host installed through Ubuntu’s apache package:

  1. sudo nano /etc/apache2/sites-enabled/000-default.conf

Inside, with the comments stripped, the file should look similar to this:

/etc/apache2/sites-enabled/000-default.conf
<VirtualHost *:80>
    ServerAdmin webmaster@localhost
    DocumentRoot /var/www/html
    ErrorLog ${APACHE_LOG_DIR}/error.log
    CustomLog ${APACHE_LOG_DIR}/access.log combined
</VirtualHost>

Authentication is done on a per-directory basis. To set up authentication, you will need to target the directory you wish to restrict with a <Directory ___> block. In our example, we’ll restrict the entire document root, but you can modify this listing to only target a specific directory within the web space:

/etc/apache2/sites-enabled/000-default.conf
<VirtualHost *:80>
    ServerAdmin webmaster@localhost
    DocumentRoot /var/www/html
    ErrorLog ${APACHE_LOG_DIR}/error.log
    CustomLog ${APACHE_LOG_DIR}/access.log combined

    <Directory "/var/www/html">
    </Directory>
</VirtualHost>

Within this directory block, specify that we wish to set up Basic authentication. For the AuthName, choose a realm name that will be displayed to the user when prompting for credentials. Use the AuthUserFile directive to point Apache to the password file we created. Finally, we will require a valid-user to access this resource, which means anyone who can verify their identity with a password will be allowed in:

/etc/apache2/sites-enabled/000-default.conf
<VirtualHost *:80>
    ServerAdmin webmaster@localhost
    DocumentRoot /var/www/html
    ErrorLog ${APACHE_LOG_DIR}/error.log
    CustomLog ${APACHE_LOG_DIR}/access.log combined

    <Directory "/var/www/html">
        AuthType Basic
        AuthName "Restricted Content"
        AuthUserFile /etc/apache2/.htpasswd
        Require valid-user
    </Directory>
</VirtualHost>

Save and close the file when you are finished. Restart Apache to implement your password policy:

  1. sudo service apache2 restart

The directory you specified should now be password protected.

Configuring Access Control with .htaccess Files

If you wish to set up password protection using .htaccess files instead, you should begin by editing the main Apache configuration file to allow .htaccess files:

  1. sudo nano /etc/apache2/apache2.conf

Find the <Directory> block for the /var/www directory that holds the document root. Turn on .htaccess processing by changing the AllowOverride directive within that block from “None” to “All”:

/etc/apache2/apache2.conf
. . .

<Directory /var/www/>
    Options Indexes FollowSymLinks
    AllowOverride All
    Require all granted
</Directory>

. . .

Save and close the file when you are finished.

Next, we need to add an .htaccess file to the directory we wish to restrict. In our demonstration, we’ll restrict the entire document root (the entire website) which is based at /var/www/html, but you can place this file in any directory you wish to restrict access to:

  1. sudo nano /var/www/html/.htaccess

Within this file, specify that we wish to set up Basic authentication. For the AuthName, choose a realm name that will be displayed to the user when prompting for credentials. Use the AuthUserFile directive to point Apache to the password file we created. Finally, we will require a valid-user to access this resource, which means anyone who can verify their identity with a password will be allowed in:

/var/www/html/.htaccess
AuthType Basic
AuthName "Restricted Content"
AuthUserFile /etc/apache2/.htpasswd
Require valid-user

Save and close the file. Restart the web server to password protect all content in or below the directory with the .htaccess file:

  1. sudo service apache2 restart

Confirm the Password Authentication

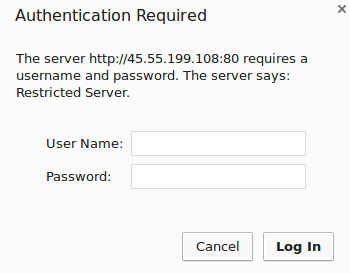
To confirm that your content is protected, try to access your restricted content in a web browser. You should be presented with a username and password prompt that looks like this:

Apache2 password prompt

If you enter the correct credentials, you will be allowed to access the content. If you enter the wrong credentials or hit “Cancel”, you will see the “Unauthorized” error page:

Apache2 unauthorized error

Conclusion

You should now have everything you need to set up basic authentication for your site. Keep in mind that password protection should be combined with SSL encryption so that your credentials are not sent to the server in plain text. To learn how to create a self-signed SSL certificate to use with Apache, follow this guide. To learn how to install a commercial certificate, follow this guide.


SOURCE

Wednesday, 15 January 2025

Step-by-Step Guide: Deploying a Next.js Application on an Ubuntu Server with Apache and PM2


Step 1: SSH into the Server

  • Access your server via SSH using the root user or a user with sufficient privileges.
ssh root@195.110.58.215

Step 2: Update System Packages and Install Dependencies

  • Update the server's package list and install necessary software, including Node.js, npm, Git, and Apache.
sudo apt update
sudo apt install nodejs npm git apache2

Step 3: Create Project Directory

  • Set up the directory where your Next.js application will be hosted.
sudo mkdir -p /var/www/hibreton-frontend
sudo chown -R $USER:$USER /var/www/hibreton-frontend

Step 4: Generate an SSH Key (Optional)

  • If you need to access a private Git repository, generate an SSH key to use with Git.
ssh-keygen -t rsa -b 4096 -C "hibreton-frontend" -f ~/.ssh/hibreton_frontend
  • Display the public key and add it to your Git provider:
cat ~/.ssh/hibreton_frontend.pub
  • Add the key to the repository you wish to clone image

Step 5: Clone the Repository

  • Clone your Next.js project from GitHub or another Git provider.
GIT_SSH_COMMAND='ssh -i ~/.ssh/hibreton_frontend' git clone git@github.com:hibretOne-CIC/hibretone-frontend-react.git /var/www/hibreton-frontend

Step 6: Install Project Dependencies

  • Navigate to the project directory and install the necessary Node.js packages.
cd /var/www/hibreton-frontend
npm install

Step 7: Build the Project

  • Build the Next.js project for production.
npm run build

Step 8: Install PM2

  • PM2 is a process manager for Node.js that ensures your application remains online. Install it globally.
pm2 start npm --name "hibreton-frontend" -- start

Step 10: Configure Apache as a Reverse Proxy

  • Apache will serve as a reverse proxy, forwarding requests to the Next.js app running on port 3000.

Step 10.1: Stop Nginx (if running)

  • If Nginx is running, stop it to avoid port conflicts with Apache.
sudo systemctl stop nginx

Step 10.2: Create an Apache Configuration File

  • Create a virtual host configuration for your Next.js application.
sudo nano /etc/apache2/sites-available/hibreton-frontend.conf
  • Add the following content to the file:
<VirtualHost *:80>
    ServerName 195.110.58.215
    ServerAdmin webmaster@localhost
    DocumentRoot /var/www/hibreton-frontend

    ProxyPreserveHost On
    ProxyPass / http://localhost:3000/
    ProxyPassReverse / http://localhost:3000/

    ErrorLog ${APACHE_LOG_DIR}/hibreton-frontend-error.log
    CustomLog ${APACHE_LOG_DIR}/hibreton-frontend-access.log combined
</VirtualHost>

Step 10.3: Enable the Apache Modules

  • Enable the necessary modules for proxying.
sudo a2enmod rewrite
sudo a2enmod proxy
sudo a2enmod proxy_http

Step 10.4: Enable the Site and Disable Default Site

  • Enable your new site and disable the default Apache site.
sudo a2ensite hibreton-frontend.conf
sudo a2dissite 000-default.conf

Step 10.5: Test Apache Configuration

  • Check that the Apache configuration is correct.
sudo apache2ctl configtest

Step 11: Set Up PM2 to Auto-Start on Reboot

  • Ensure that PM2 starts your application automatically when the server reboots.
pm2 startup systemd
pm2 save

Step 12: Configure Firewall

  • Allow Apache traffic through the firewall if UFW is active.
sudo ufw allow 'Apache Full'

Step 13: Access the Application

  • Your Next.js application should now be accessible at http://195.110.58.215.

Troubleshooting

Checking Apache Logs

  • If the application does not load, check the Apache error logs for clues.
sudo tail -f /var/log/apache2/error.log

Checking the PM2 Process

  • Ensure the Node.js process is running correctly.
pm2 list
  • To view logs for the Next.js application:
pm2 logs hibreton-frontend

Restarting or Removing the Application in PM2

  • If you need to restart or remove the application from PM2:
pm2 restart hibreton-frontend
pm2 delete hibreton-frontend

Handling Port Conflicts

  • If port 3000 is already in use, find and kill the process using it.
sudo lsof -i :3000
sudo kill -9 <PID>
  • Afterward, restart the application with PM2:
pm2 start npm --name "hibreton-frontend" -- start

Next.js Application Not Binding to 0.0.0.0

  • Ensure that your Next.js application is configured to listen on 0.0.0.0 instead of localhost to be accessible externally.
// next.config.js
module.exports = {
  server: {
    hostname: '0.0.0.0',
    port: 3000,
  },
};
  • With these steps, your Next.js application should be successfully deployed and served using Apache and PM2!


SOURCE

Tuesday, 31 December 2024

How to Install Tomcat on Ubuntu 24.04 LTS


How to Install Tomcat on Ubuntu 24.04 LTS

In This Article We Will Learn How to  install  Tomcat on Ubuntu 24.04 LTS.

Tomcat is a free and open-source Java Servlet container, a software application that executes Java Server Pages (JSP) and Java servlets. It is widely used for deploying Java-based web applications. We will walk you through the process step-by-step, including installing Java, creating a dedicated Tomcat user, downloading and extracting the Tomcat archive, configuring systemd, and verifying the installation.

Table of Contents

Prerequisites

  • AWS Account with Ubuntu 24.04 LTS EC2 Instance.
  • Java Development Kit (JDK) installed.

Step #1:Install Java on Ubuntu 24.04 LTS

To install Tomcat you should have Java installed. Tomcat relies on Java to function.

First update the package repository.

sudo apt update
How to Install Tomcat on Ubuntu 24.04 LTS 1

Install Openjdk (Java).

sudo apt install openjdk-17-jdk
How to Install Tomcat on Ubuntu 24.04 LTS 2

Step #2:Create a Tomcat User

For security reasons, it’s best not to run Tomcat as the root user. Let’s create a dedicated user and group.

sudo useradd -m -U -d /opt/tomcat -s /bin/false tomcat

This command creates a user named “tomcat” with a home directory at /opt/tomcat. The /bin/false shell prevents login access.

How to Install Tomcat on Ubuntu 24.04 LTS 3

Step #3:Install Tomcat on Ubuntu 24.04 LTS

Now lets install Tomcat. First navigate to the Tomcat official website and download the latest version of Tomcat 10. You can use wget for this purpose.

sudo wget https://www-eu.apache.org/dist/tomcat/tomcat-10/v10.1.24/bin/apache-tomcat-10.1.24.tar.gz -P /tmp
How to Install Tomcat on Ubuntu 24.04 LTS 4

extract it to the /opt/tomcat directory.

sudo tar -xvf /tmp/apache-tomcat-10.1.24.tar.gz -C /opt/tomcat
How to Install Tomcat on Ubuntu 24.04 LTS 5

Step #4:Update Permissions of Tomcat

Change ownership of the Tomcat directory to the tomcat user and group:

sudo chown -R tomcat:tomcat /opt/tomcat
How to Install Tomcat on Ubuntu 24.04 LTS 6

Step #5:Configure Tomcat as a Service

A systemd unit file tells systemd how to manage a service. Create a file named tomcat.service under the /etc/systemd/system directory using a text editor.

navigate to the /etc/systemd/system.

cd /etc/systemd/system
How to Install Tomcat on Ubuntu 24.04 LTS 7

Create a tomcat.service file using nano command.

sudo nano tomcat.service
How to Install Tomcat on Ubuntu 24.04 LTS 8

add the following content into it.

[Unit]
Description=Tomcat Server
After=network.target

[Service]
Type=forking
User=tomcat
Group=tomcat
Environment="JAVA_HOME=/usr/lib/jvm/java-17-openjdk-amd64"
WorkingDirectory=/opt/tomcat/apache-tomcat-10.1.24
ExecStart=/opt/tomcat/apache-tomcat-10.1.24/bin/startup.sh

[Install]
WantedBy=multi-user.target
How to Install Tomcat on Ubuntu 24.04 LTS 9

Save and close the file.

Adjust the JAVA_HOME environment variable path based on your OpenJDK installation location.

Step #6:Reload systemd and Start Tomcat

Reload the systemd daemon to apply the changes.

sudo systemctl daemon-reload
How to Install Tomcat on Ubuntu 24.04 LTS 10

Start the Tomcat service.

sudo systemctl start tomcat
How to Install Tomcat on Ubuntu 24.04 LTS 11

Enable Tomcat to start on boot.

sudo systemctl enable tomcat
How to Install Tomcat on Ubuntu 24.04 LTS 12

Now you can verify if your service is running properly or not by running your public ip address with port 8080 which is default port for Tomcat in url. You should see the Tomcat welcome page if everything is set up correctly.

How to Install Tomcat on Ubuntu 24.04 LTS 13

Conclusion:

In conclusion, installing Apache Tomcat on Ubuntu 24.04 is a straightforward process that involves updating your system, installing Java, creating a Tomcat user, downloading and configuring Tomcat, setting up a systemd service. By following these steps, you can easily install Tomcat and set up a robust environment for deploying Java-based web applications on your server.


SOURCE